RUS
6
• Включите машинку и посмотрите на ход лезвий, они должны двигаться
беспрепятственно.
• Во время работы прибора шнур не должен быть спутан.
• Посадите человека, которого Вы хотите подстричь, таким образом,
чтобы его голова находилась на уровне Ваших глаз. Это способствует
лучшему обзору и позволяет контролировать процесс стрижки.
• Тщательно расчешите волосы, чтобы удалить все волосяные узлы.
• Оберните шею человека полотенцем, чтобы состриженные волосы не
попадали ему за ворот.
Рекомендации по стрижке
• Используйте короткий ход машинки только при выполнении стрижки по
всей голове.
• Стрижка волос с использованием машинки требует определенных
навыков, поэтому первые несколько раз используйте насадки для
стрижки волос, которые позволяют срезать как можно меньше волос.
Использование дополнительных насадок-гребней
• Дополнительная насадка- гребень 6.1 - стрижка волос длиной около 3
мм.
• Дополнительная насадка- гребень 6. 2- стрижка волос длиной около 6
мм.
• Дополнительная насадка- гребень 6. 3 - стрижка волос длиной около 9
мм.
• Дополнительная насадка- гребень 6. 4 - стрижка волос длиной около 12
мм.
• Расположите насадку зубцами вверх, поместите ее в разъем для
установки лезвий и зафиксируйте.
• Обработайте сначала небольшой участок волос, чтобы привыкнуть к
длине срезаемых волос, используя выбранную Вами насадку.
• Для более равномерного состригания волос, перемещайте машинку
против направления роста волос.
• Не пытайтесь ускорить процесс стрижки, перемещая машинку быстрее,
чем она успевает состригать волосы.
• В процессе стрижки рекомендуется периодически отчищать лезвия от
состриженных волос.
Summary of Contents for HT-964-200
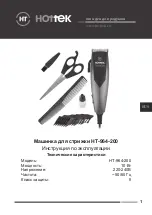
Page 1: ...RUS 1 HT 964 200 10 220 240 50 60 II HT 964 200 www hottek ru...
Page 2: ...RUS 2...
Page 3: ...RUS 3...
Page 4: ...RUS 4 1 2 3 4 5 6 4 3 6 9 12 7 8 9 10 11 1 2...
Page 5: ...RUS 5 5 5 5 6 1 3 6 4 12 5 5 5...
Page 6: ...RUS 6 6 1 3 6 2 6 6 3 9 6 4 12...
Page 8: ...RUS 8 6 1 6 2 3 6 5 12...
Page 9: ...RUS 9 10 10 3 40 70 1...
Page 10: ...RUS 10 CE 3 401 20 7 495 204 17 75 0919 2019...
Page 20: ...KAZ 20 HT 964 200 H 964 200 10 220 240 B 50 60 II www hottek ru...
Page 21: ...KAZ 21...
Page 22: ...KAZ 22 1 2 3 4 5 6 4 3 6 9 12 7 8 9 10 11 1 2...
Page 23: ...KAZ 23 5 5 5 6 1 3 6 4 12 5 5 5...
Page 24: ...KAZ 24 6 1 3 6 2 6 6 3 9 6 4 12...
Page 26: ...KAZ 26 5 12 10 10 3...
Page 27: ...KAZ 27 40 70 1...

