


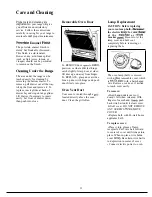
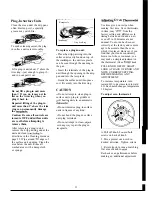


Plug-In Surface Units
Clean the area under the drip pans
often. Built-up soil, especially
grease, may catch fire.
To make cleaning easier, the plug-
Receptacle
Drip Pan/Ring
in surface units are removable.
To replace a plug-in unit:
●
Place the drip pan/ring into the
surface unit cavity found on top of
the
so the unit receptacle
can be seen through the opening in
the pan.
Lift a plug-in unit about 1“ above the
trim ring—just enough to grasp
and you can pull it out.
Do not lift a plug-in unit more
than If you do, it may not lie
flat on the trim ring when you
plug it back in.
Repeated lifting of the plug-in
unit more than 1“ above the trim
ring can permanently damage
the
Caution: Be sure all controls are
turned to
OFF and surface units
are cool before attempting to
remove them.
After removing a plug-in unit,
remove the drip pan/ring under the
unit and clean
to
directions in the Cleaning Guide on
●
Insert the terminals of the plug-in
unit through the opening in the drip
pan and into the receptacle.
. Guide the surface unit into place
so it fits evenly into the trim ring.
CAUTION
Do not attempt to clean plug-in
surface units, plug-in griddle or
heating units in an automatic
●
Do not immerse plug-in surface
units in liquids of any kind.
●
Do not bend the plug-in surface
unit plug terminals.
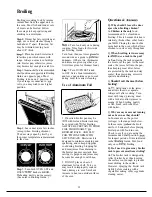
Oven
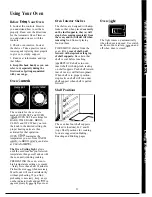
Use time given on recipe when
cooking first time. Oven thermostats,
in time, may
from the
factory setting and differences in
timing between an old and a new
oven of 5 to 10 minutes are not
unusual. Your oven has been set
correctly at the factory and is more
apt to be accurate than the oven
which it replaced. However, if you
find that your foods consistently
brown too little or too much, you
may make a simple adjustment in
the thermostat (Oven
knob.
PULL KNOB OFF OF SHAFT,
LOOK AT BACK OF KNOB AND
NOTE CURRENT SETTING,
BEFORE MAKING ANY
ADJUSTMENT.
To increase temperature, turn
toward HI; to decrease turn toward
LO. Each notch changes temperature
10 degrees.
To adjust oven thermostat:
●
Do not attempt to clean,
or in any way repair the plug-in
receptacle.
.
Pull off knob. Loosen both
screws on back of knob.
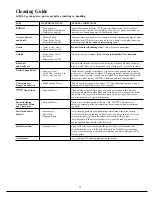
page 35. Wipe around
edges of
2. Move pointer one notch in
the surface unit opening. Clean the
desired direction. Tighten screws.
area below the unit. Rinse all
washed areas with a damp cloth
3. Return knob to range, matching
or sponge.
flat area of knob to
Recheck oven performance before
making an additional adjustment.
33
Summary of Contents for RS778GJ
Page 6: ...Features of Your Grill Griddle Range 6...
Page 38: ...Notes 38...


