Hotpoint RS778GJ How To Get The Best Download Page 26

Roasting

Roasting is cooking by dry heat.
Tender meat or poultry can be
roasted uncovered in your oven.
Roasting temperatures, which
should be low and steady, keep
spattering to a minimum. When
roasting, it is not necessary to
sear, baste, cover or add water

to your meat.

Roasting is really a baking

Step 4: Most meats continue to

procedure used for meats. Therefore,

cook slightly while standing, after

oven controls are set to BAKE. (You

being removed from the oven.

may hear a slight clicking sound,

Standing time recommended for

indicating the oven is working

roasts is 10 to 20 minutes to allow

properly.) Roasting is easy; just
follow these steps:

1

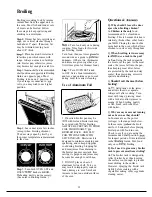
Step 1: Check weight of meat, and
place, fat side up, on roasting rack
in a shallow pan. (Broiler pan with
rack is a good pan for this. ) Line
broiler pan with aluminum foil when

using pan for marinating, cooking
with fruits, cooking heavily cured
meats, or for basting food during

cooking. Avoid spilling these
materials on oven liner or door.

Step 2: 

 in oven on shelf in

 position. No preheating is

necessary.

Step 3: Turn OVEN SET to BAKE
and OVEN 

 to 

 Small

poultry may be cooked at 
for best browning.

roast to firm up and make it easier to
carve. Internal temperature will rise
about 5° to 

 to compensate for

temperature rise, if desired, remove
roast from oven at 5° to 

 less

than temperature on guide.

 You may wish to use TIME

BAKE, as described on page 24, to
turn oven on and off automatically.

Remember that food will continue
to cook in the hot oven and therefore

. . .

. . . . . .

should be 


 the 

internal temperature has been
reached.

For Frozen Roasts

● 

Frozen roasts of beef, pork,

lamb, etc., can be started without
thawing, but allow 10 to 25 minutes
per pound additional time (10
minutes per pound for roasts under
5 pounds, more time for larger
roasts).

● 

Thaw most frozen poultry before

roasting to ensure even doneness.
Some commercial frozen poultry
can be cooked successfully without
thawing. Follow directions given
on packer’s label.

Questions & Answers

Q. Is it necessary to check for
doneness with a 

 thermometer?

A. 

Checking the finished internal

temperature at the completion of
cooking time is recommended.
Temperatures are shown in Roasting
Guide on opposite page. For roasts
over 8 pounds, cooked at 
with reduced time, check with
thermometer at half-hour intervals
after half the time has passed.

Q. 

 is my roast crumbling

when I try to carve it? 

-

A. 

Roasts are easier to slice if

allowed to 

 10 to 20 minutes

after removing from oven. Be sure

to cut across the grain of the meat.

Q. Do I need to preheat my
oven each time I cook a roast
or poultry?

A. It is rarely necessary to preheat
your oven, 

 for very small

roasts, which cook a short length
of time.

Q. When buying a roast, are
there any special tips that would
help me cook it more evenly?

A. 

Yes. Buy a roast as even in

thickness as possible, or buy rolled
roasts.

Q. Can I seal the sides of my foil

“tent” when roasting a turkey?

A. 

Sealing the 

 will steam the

meat. Leaving it unsealed 

 the

air to circulate and brown the meat.

26

Summary of Contents for RS778GJ

Page 1: ...22 Cookware Tips 10 11 Energy Saving Tips 5 Features 6 7 Griddle 12 16 Grill 17 21 Installation Instructions 5 Leveling 5 Light Bulb Replacement 32 Model and Serial Numbers 2 Oven 23 Problem Solver 36...

Page 2: ...rvice calls concerning your range If you received a damaged range Immediately contact the dealer or builder that sold you the range Save time and money Before you request service Check the Problem Sol...

Page 3: ...ents while using theapptice Hammable material could be ignited if brought in contact with hot heating elements and may cause severe burns Q Use only dry pot holders moist or damp pot holders on hot su...

Page 4: ...ended at high heat se Boilover causes smoking and greasy spillovers that may catch on fire Be sure drip pans and vent ducts are not covered and are in place Their absence during cooking could damage r...

Page 5: ...king temperature reduce heat immediately to lowest setting that will keep it cooking Use residual heat with surface cooking whenever possible For example when cooking eggs in the shell bring water and...

Page 6: ...Features of Your Grill Griddle Range 6...

Page 7: ...f cleaning and remains on as long as oven is in use 8 Calrod Module Entire unit can be easily removed for cleaning Plugs into either side for optimum convenience 9 One Piece Chrome Plated Drip Pan Rin...

Page 8: ...Step 1 Grasp control knob and push in Step 2 Turn either clockwise or counterclockwise to desired heat setting Control must be pushed in to set only from OFF position When control is in any position o...

Page 9: ...y harm cooktop surfaces surrounding heating units Observe Following Points in Canning 1 Bring water to boil on HIGH heat then after boiling has begun adjust heat to lowest setting to maintain boil sav...

Page 10: ...r skillet LOW 3 Cook only 3 to 4 minutes for soft cooked 15 minutes for hard cooked Fried sunny side up Covered Skillet Continue cooking at MED HI 7 until whites are just set about 3 to 5 more minutes...

Page 11: ...ger time Tam over pancakes when bubbles rise to surface Pancakes or French toast Skillet or Griddle MED HI 7 Heat skillet 8 to 10 minutes Grease lightly Cmk 2 to 3 minutes per side Pasta Noodles or sp...

Page 12: ...Griddle Control The control knob must be pushed into start this prevents surface heating units from being turned on accidentally Push the knob in only when it is in the OFF position Men the knob is i...

Page 13: ...utes Hors d oeuvres will stay hot for serving up to 1 or ly hours Rearrange or stir foods occasionally if possible Q Why aren t my foods done even though they have cooked the full time A Under low vol...

Page 14: ...s cut 3 inches long and l 4 inch wide Cut cubes 1 inch 4 5 perside 4 5 2 3 Griddle up to 6 eggs Avoid drain hole 34 17 24 10 12 10 12 Tarn over often Turn to setting 8 after half of total cooking time...

Page 15: ...dough into 8 equal parts On floured surface roll out each part into a 5 inch circle In mixing bowl stir together tomato sauce salt onion oregano and sugar Set aside Melt butter on griddle add 4 pizza...

Page 16: ...gg 1 2 cup milk 2 tablespoons butter melted 1 2 cup flour 2 teaspoons baking powder 1 cup cream style corn Preheat griddle then spread oil evenly over griddle In small mixing bowl mix corn meal salt a...

Page 17: ...heating element Each half of the grill is controlled by one of the surface heating unit control knobs on that side of the range How to Set Grill Controk The control knobs must be pushed in to start t...

Page 18: ...ats on the grill forks will pierce the meat and release juices Q I follow the cooking times suggested but my foods don t get done properly Is there something wrong with my grill A Probably not Suggest...

Page 19: ...cooking time HI HI HI Ham Chunks 1 inch precooked 9 17 20 Hot Dogs HI 7 9 total Rearrange often fibobs Meat HI Vegetable HI Lamb Chops to l in HI 20 25 10 15 For less tender vegetables such as tomatoe...

Page 20: ...teaspoon dry mustard 1 teaspoon brown sugar 1 teaspoon salt 2 teaspoons chili powder 2 tablespoons vinegar 1 tablespoon Worcestershire sauce 1 4 teaspoon pepper 1 2 cup onions finely chopped 1 tables...

Page 21: ...ning ribs over every 20 minutes Brush with sauce below and continue cooking 15 to 30 minutes turning over every 5 minutes Remove from grill and brush with sauce before serving Barbecue Bourbon Sauce 1...

Page 22: ...on your range uses the Automatic Timer to set the length of time needed to clean whether you wish to clean immediately or delay the cleaning By setting the Start and or Stop Dials you may choose to b...

Page 23: ...re settings is speedy rarely more than about 10 minutes Preheat the oven ody when necessary Most foods will cook satisfactorily without preheating If you find preheating is necessary keep an eye on th...

Page 24: ...ng make sure the range clock shows the correct time of day 6 mmq u w Step 1 To set start time push m knob on START dial and turn pointer to time you wdnt oven to turn on for exdmple 330 Immediate Star...

Page 25: ...t rolls Shiny Oblong or Muffin Pans B A 350 350 20 30 For thin rolls Shelf B may be used Cakes without shortening Angel food Aluminum Tube Pan Jelly roll A 325 3750 30 55 Two piece pan is convenient M...

Page 26: ...en on and off automatically Remember that food will continue to cook in the hot oven and therefore should be removti wnen the aeslrea internal temperature has been reached For Frozen Roasts Frozen roa...

Page 27: ...up and make it easier to carve Internal temperature will rise about 5 to 10 F to compensate for temperature rise if desir d remove roast from oven at 5 to 10 F less than temperature on guide Oven tem...

Page 28: ...ack may be covered with foil for broiling ALWAYS BE CERTAIN TO MOLD FOIL THOROUGHLY BROILER RACK AND SLIT FOIL CONFORM WITH SLITS IN RACK Broiler rack is designed to minimize smoking and spattering an...

Page 29: ...slices Ground Beef l lb 4 patties Space evenly Well Done 2 to in thick c 7 4 5 Up to 8 patties take about same time Beef Steaks Rare l inch thick c Medium 1 tO Ifi lbs 7 7 Steaks less than 1 inch cook...

Page 30: ...be cleaned in the self cleaning oven How to Set Oven for Cleaning Step 1 Turn OWN SET and OWN TE knobs to CLEAN Controls will snap into find position when the CLEAN location is reached Step 2 Slide th...

Page 31: ...gh temperature bakings or broil ings the LOCKED light may come on The oven door can t be latched for self cleaning while the LOCKED light is on If this happens let the oven cool until the LOCKED light...

Page 32: ...ft door up and away from hinges To REPLACE grasp door at sides Line up door with hinges and push door firmly into place Oven Vent Duct Your oven is vented through a grill located directly above the ov...

Page 33: ...in surface units plug in griddle or grill heating units in an automatic Do not immerse plug in surface units in liquids of any kind Do not bend the plug in surface unit plug terminals Mjusting Oven T...

Page 34: ...hen the unit is heated NOTE Bake unit is hinged and can be lifted gently to clean oven floor Drain fat cool pan and rack slightly Do not let soiled pan and rack stand in oven to cool Sprinkle on deter...

Page 35: ...en coils are heated After meal remove all cookware from surface units and heat soiled units at HI Let soil burn off about a minute and switch units to OFF Try not to get cleaning materials on coils If...

Page 36: ...ob not set on BAKE OR BAKE PROPERLY OVEN TEMP knob not set correctly Shelf position is incorrect Check Roasting or Baking Guides Oven shelf is not level Incorrect coo or cookware of improper sti is be...

Page 37: ...dvanced for long enough Both OVEN SET and OVEN TEMP knobs must be set at CLEAN setting A thick pile of spillover when cleaned leaves a heavy layer of ash in spots which could have insulated the area f...

Page 38: ...Notes 38...

Page 39: ...further help FIRST contact the people who serviced your appliance Explain why you are not pleased In most cases this will solve the problem NEXT if you are still not pleased write all the details incl...

Page 40: ...Read your Use and Care material If you then have any questions about operating the product please contact your dealer or our Consumer Affairs office at the address below or call toll free GE Answer Ce...

Reviews: