CANADIAN HOT TUBS INC.
14
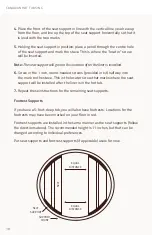
TUB FOR 2 (5’X3’ OVAL)
This hot tub has two different groups of staves: one group is for the side
sections and one is for the ends where the curve radius becomes tighter. To
make it easy to see where the staves change, the floor of the hot tub has four
marks to show you where one group of staves ends and the other begins.
5.
When all the staves have been arranged around the hot tub, tap each stave
into the floor. Make sure that they are straight and that the tongue and
groove joints are tight together. The staves will slip easily onto the floor for
the first ¼ inch if they are positioned square to the floor.
Use a Carpenter’s Square when tapping staves onto the floor. You can use the
square in two ways:
• Against the inner angle of the staves and the floor, to make sure the
staves are going on perfectly upright.
• Against the side of each newly placed stave to make sure staves do not
begin to lean sideways.
Note:
All the staves will be drawn tighter to the floor once the bands are around
the hot tub.
Use a combination of the three spacer staves to fill in the last gap in the wall.
STEP 3 – Installing Bands
Important Information
• Use gloves when handling the bands as the edges may be sharp.
Firmly grasp the bands as you open them.
• When marking the placement of the bands, always measure from
the bottom of the stave on the outside of the hot tub.
Summary of Contents for Algonquin
Page 1: ...User Manual SAFETY INSTALLATION MAINTENANCE ...
Page 2: ...CANADIAN HOT TUBS INC 2 SECTION ONE Important Safety Information ...
Page 7: ...USER MANUAL 7 ...
Page 8: ...CANADIAN HOT TUBS INC 8 SECTION TWO Hot Tub Installation Instructions ...
Page 31: ...USER MANUAL 31 ...
Page 32: ...CANADIAN HOT TUBS INC 32 SECTION THREE Maintenance ...


