background image

13

[i] ATTACHMENT PLUG

WARNING

1. Check periodically that the attachment plug blades and their vicinity are free 

of dust and that the attachment plug is securely plugged into the receptacle. 

Dusty blades or loose connection may cause electric shock or fire.

2. Do not damage the power cord. It should not be additionally processed, 

jerked, bundled, weighed down or caught in. It could cause electric shock or 

fire.

3. The unit must have a separate power supply. Branching off the power 

cord, using an extension cord, or sharing a single power supply with other 

appliances may result in electric shock, heat generation or fire.

Check the attachment plug and power cord once or twice a year to see if:

* The attachment plug is plugged into a separate receptacle.

* The attachment plug and power cord are not overheated, damaged, weighed down or 

caught in. In case of any trouble, immediately contact an authorized Hoshizaki service 

company and ask for a repair.

* The attachment plug blades and their vicinity and the receptacle are free of dust. Clean 

them if necessary.

[j] SUBFREEZING TEMPERATURES

CAUTION

If there is a possibility that the ambient temperature may fall below 0°C and 

freeze the unit, be sure to drain the unit. The water supply line could be 

damaged and leak water, resulting in damage to the surrounding property.

IMPORTANT

Do not dispense product while draining the unit.

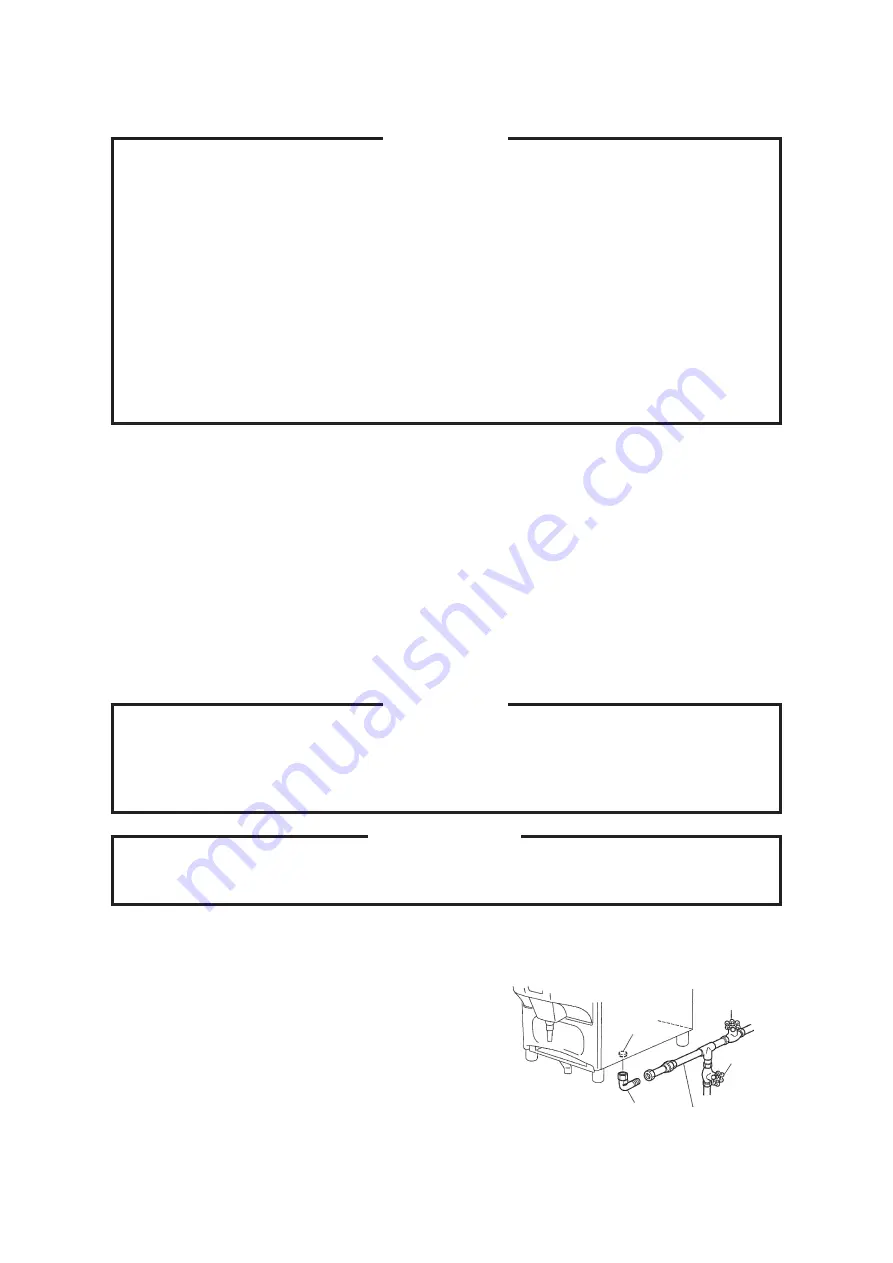
1) Turn off the power switch. Drain the hot water tank to the level “C” or “L”. See “4. [d] 

SHUT DOWN” for details.

2) Close the water supply line shut-off valve.

3) Turn on the power switch.

4) Open the drain valve to drain the water circuit.

Shut-off Valve

Drain Valve

Elbow

Water 

Inlet

Water Supply Line

Summary of Contents for DL-1HTF

Page 1: ...DL 1HTF L1W031102 070116 LIQUID DISPENSER INSTRUCTION MANUAL 3 16 Minamiyakata Sakae Toyoake Aichi 470 1194 Japan FOR END USER...

Page 2: ...TER INSTALLATION 4 b AMBIENT TEMPERATURE 4 c WATER PRESSURE 4 d POWER SUPPLY 4 e CLEANING AND INSPECTION 4 3 CHECKS BEFORE OPERATION 5 a DISPENSER 5 b PREMIX PACKAGE 5 4 OPERATION 5 a START UP 7 b DIS...

Page 3: ...T TAP 14 b HANGER 14 c PREMIX PACKAGE 15 d ADJUSTMENTS 16 7 TROUBLE SHOOTING 18 a TROUBLES WITH ERROR CODE INDICATION 18 b TROUBLES WITHOUT ERROR CODE INDICATION 19 c PERIODIC REPLACEMENT 20 8 LONG ST...

Page 4: ...ION a GENERAL 1 Screen The remaining premix level can be checked 2 Dispense Button See b DISPENSE BUTTON 3 Dispensing Nozzle Dilutes premix with hot water and dispenses product 1 2 3 4 5 6 7 8 9 10 11...

Page 5: ...SETTING PANEL 11 Suction Pump Draws premix from its package into the dispensing nozzle 12 Hanger Hangs a premix package 13 Hot Water Tank inside Heats water and keeps it hot 14 Power Switch Earth Leak...

Page 6: ...decreases the set point 4 Ready Lamp Lights up to indicate that product can be dispensed 5 Set Button Use to change the settings d ACCESSORIES Instruction Manual x 1 Installation Manual x 1 Maintenan...

Page 7: ...nge may affect performance CAUTION To avoid the risk of corrosion clogging and health problems be sure to use tap water with a turbidity level of not more than 2 c WATER PRESSURE CAUTION To prevent wa...

Page 8: ...properly installed in place See 5 MAINTENANCE AND INSPECTION Check that the water supply line shut off valve is open b PREMIX PACKAGE CAUTION To prevent possible food poisoning do not use expired pre...

Page 9: ...put heavy things or water containing vessels on the unit They could fall off and cause injury or spilled water may degrade the electrical insulation and increase the risk of electric leak 2 Do not blo...

Page 10: ...lamp flashes and the dispensing nozzle dispenses product 5 When the dispensing nozzle stops dispensing the dispense lamp stays on Then remove the cup c REPLACING PREMIX PACKAGE When the premix package...

Page 11: ...ic shock corrosion or failure 5 An alcohol disinfectant is flammable Do not use it near fire 6 Assemble the dispensing nozzle and other parts properly Otherwise hot water exceeding 80 C may leak and c...

Page 12: ...ction of arrow 1 and pull them off in the direction of arrow 2 2 Disassemble the dispensing nozzle and multi tube Use a food grade neutral cleaner sponge and cleaning brush accessory to clean them 3 R...

Page 13: ...me without product or with an alcohol disinfectant The impeller may stick to the casing and fail to turn or get damaged 3 When the premix package becomes almost empty the unit cannot operate properly...

Page 14: ...eller to the casing in the rotating direction 3 Attach the casing to the unit by fitting the center of the impeller to the shaft 4 Turn the casing in the arrow direction until it reaches the normal po...

Page 15: ...is left inoperable it could increase the risk of electric shock in case of electric leak 1 Press the test button 2 Check if the power switch turns off 3 If the power switch does not turn off unplug th...

Page 16: ...eparate receptacle The attachment plug and power cord are not overheated damaged weighed down or caught in In case of any trouble immediately contact an authorized Hoshizaki service company and ask fo...

Page 17: ...here are two different sizes of the joint tap connections on premix packages For the smaller size of connection fix the joint tap and nut H as follows 1 Tightly screw the nut H into the joint tap nut...

Page 18: ...premix package for more than three consecutive days 3 When releasing air from the premix package keep your face away from the joint tap Premix may splash into your eyes 4 Store premix packages with t...

Page 19: ...tion to lock the joint tap with the suction pump 11 Check for proper installation of the joint tap 12 Slowly close the front cover If it is half open the unit may not dispense product properly 13 Plac...

Page 20: ...premix used Code Item Factory Adjustment Adjustable Range T 1 Hot Water 3 5 sec 0 5 7 sec T 2 Premix 2 0 sec 0 6 5 sec T 3 Max Hot Water Temp 92 C 82 92 C 3 While the display is flashing T 1 press the...

Page 21: ...ranty card and state of the trouble a TROUBLES WITH ERROR CODE INDICATION When the display shows an error code check and correct the problem according to the table below Code Problem Possible Cause Re...

Page 22: ...to 6 c PREMIX PACKAGE 2 The premix setting is too low 3 The suction pump is not properly connected Reconnect it according to 6 c PREMIX PACKAGE 4 The impeller is defective See 5 d SUCTION PUMP for de...

Page 23: ...of relocation contact an authorized Hoshizaki service company Improper installation may cause water leak electric shock or fire 3 When disposing of the unit contact an authorized Hoshizaki service co...

Reviews: