


Plumbing Requirements
All piping, tubes and hoses leading to the UV unit connection points must be leak-free!
Note:
UV unit may be installed horizontally or vertically. For vertical installation, make sure the inlet port is
positioned at the bottom.
Note:
Do not assemble or install damaged parts. Quartz sleeve and UV lamp are fragile and must be handled
with care.
Install Fittings
Perform this procedure to prepare the UV unit for installation.
1. Inspect each port and fitting to ensure threads are free of dirt, burrs and excessive nicks. If threads are badly
nicked, replace the fitting.
2. Wrap ³” wide PTFE tape 2 to 3 turns counterclockwise around the male threads of the ³” fitting. Do not wrap
tape around the first thread.
3. Screw the fitting into cylinder ports to finger-tight position to achieve desired alignment.
4. Do not back off fitting. Do not over tighten fitting. Over tightening could strip the fitting threads and cause leak.
Install Quartz Sleeve
Perform this procedure only when water piping for UV unit is in place and ready for service.
1. Visually inspect quartz sleeve for cracks and damages.
2. Remove the four screws holding the ballast box cover and remove the cover.
3. Remove the rubber boot and pull out the 4-point lamp connector.
4. Remove the compression nuts.
5. Insert the close-end of the quartz sleeve into the cylinder through the ballast box pass-thru.
6. Allowing ²” of the quartz sleeve to expose on the viewport pass-thru.
7. Lubricate the tips of the quartz sleeve with clean water and insert new O-ring. Ensure the O-ring has all-round
contact with the cylinder pass-thru.
8. Tighten the compression nut while making sure the nut does not contact the quartz sleeve. Adjust O-ring position
as necessary. The compression nut should be snug and tight, do not over-torque.
9. Repeat Step 7 and 8 on the ballast box compression nut.
Connect Plumbing
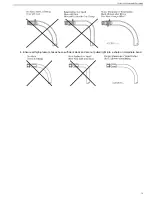
Tube or hose ends must be cut squared and clean and have no rough edges. The quick fit elbow fitting has a
C-clamp that will lock the tube in place once inserted.
1. Insert the supply pipe into one cylinder port and label the port “Inlet.”
2. Insert the temporary pipe into the other cylinder port to direct water into a container.
3. Slowly fill the cylinder with water and flush cylinder for 1 minute.
4. Remove temporary pipe and insert the return pipe into the cylinder port and label the port “Outlet.”
5. Slowly pressurize the UV unit by filling the cylinder with water while checking for leaks.
6. If leaks are found on the compression nuts, depressurize the unit and slightly tighten the leaking compression
nut.
7. Retest until a leak-free installation is verified.
8. Once UV unit is leak-free, the quartz sleeve installation is complete and the UV lamp can be installed.
Note:
To remove tube from fitting, first remove the C-clamp then push fitting sleeve down. Once the fitting
sleeve is down, pull the tube out of the fitting.
29
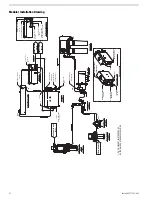
Installation
Summary of Contents for Seafari Quest Compact 200
Page 2: ......
Page 3: ...Seafari QUEST 200 600 Owner s Manual Horizon Reverse Osmosis Manual PN B651100001...
Page 4: ......
Page 8: ......
Page 16: ......
Page 22: ......
Page 52: ......
Page 60: ......
Page 62: ...2 12 4 12 8 10 7 3 1 6 5 9 12 11 4 Seafari QUEST 200 600 60...
Page 68: ...11 13 6 14 16 1 4 5 9 3 10 8 2 7 8 15 12 Seafari QUEST 200 600 66...
Page 70: ...9 3 5 4 1 10 8 16 14 11 2 15 12 13 7 8 6 Seafari QUEST 200 600 68...
Page 72: ...11 13 6 14 16 1 4 5 9 3 10 8 2 7 8 15 12 Seafari QUEST 200 600 70...
Page 74: ...9 3 5 4 1 10 8 16 14 11 2 15 12 13 7 8 6 Seafari QUEST 200 600 72...
Page 76: ...13 15 8 16 9 1 6 7 4 12 11 3 10 11 20 14 5 2 21 19 17 18 Seafari QUEST 200 600 74...
Page 78: ...4 7 6 1 12 11 9 16 13 3 20 14 15 10 11 8 5 2 18 21 19 17 21 Seafari QUEST 200 600 76...
Page 80: ...13 15 8 16 9 1 6 7 4 12 11 3 10 11 20 14 5 2 21 19 17 18 Seafari QUEST 200 600 78...
Page 82: ...4 7 6 1 12 11 9 16 13 3 20 14 15 10 11 8 5 2 18 21 19 17 21 Seafari QUEST 200 600 80...
Page 85: ...9 9 6 3 8 7 1 5 1 4 9 6 2 11 12 10 12 10 1 83 Exploded Parts View...
Page 89: ...19 10 13 20 4 15 5 3 8 6 14 15 11 9 7 13 10 20 2 19 18 22 21 12 16 17 1 87 Exploded Parts View...
Page 91: ...5 6 2 3 2 6 7 9 9 8 1 10 5 89 Exploded Parts View...
Page 101: ...12 8 9 2 10 13 1 3 5 4 14 11 6 15 7 99 Exploded Parts View...
Page 104: ...8 15 14 13 6 2 1 16 5 10 3 6 6 8 4 12 7 15 11 9 Seafari QUEST 200 600 102...
Page 114: ......
Page 115: ......