background image

BEFORE

YOU 
BEGIN

2

INTRODUCTION

IMPORT

ANT

PRECAUTIONS

ASSEMBL

Y

BEFORE

YOU 
BEGIN

BIKE

OPERA

TION

LIMITED

W

ARRANTY

TROUBLESHOOTING

MAINTENANCE

CONDITIONING

GUIDELINES

ASSEMBL

Y

CONDITIONING

GUIDELINES

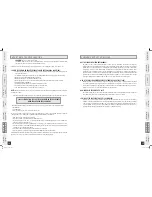
Your Horizon Performance bike is designed to be reliable. However, if you do experience problems with your bike, 

please reference the troubleshooting guide listed below.

PROBLEM:


The console does not turn on.

SOLUTION:


Verify the following:

•  The outlet the machine is plugged into is functional. Double check that the breaker has not tripped.

•  The correct adapter is being used. Only use the adapter provided or authorized by Horizon Fitness.

•  The adapter is not pinched or damaged and is properly plugged into the outlet AND the machine.

• The power switch is turned to the ON position (may not apply to all models).

•  Unplug the power cord.  Remove the console and check that all connections to the console are secure and not 

damaged or pinched.

PROBLEM: 

The console lights up but the Time/RPM’s do not count.

SOLUTION:


Verify the following:

• Unplug the power cord. Remove the console and check that all connections to the console are secure and not 

damaged or pinched.

•  If  doing  the  above  does  not  fix  the  problem,  the  speed  sensor  and/or  magnet  may  have  become  dislodged  or 

damaged. 

PROBLEM: 

The resistance levels seem to be incorrect, seeming too hard or too easy.

SOLUTION:


Verify the following:

• The correct adapter is being used. Only use the adapter provided or authorized by Horizon Fitness.
• Reset the console and allow the resistance to reset to the default position. Restart and retry the resistance levels.

TROUBLESHOOTING

BEFORE YOU 

BEGIN

ASSEMBL

Y

INTRODUCTION

IMPORT

ANT

PRECAUTIONS

BIKE

OPERA

TION

CONDITIONING GUIDELINES

TROUBLESHOOTING & 

MAINTENANCE

LIMITED WARRANTY

TROUBLESHOOTING & 

MAINTENANCE

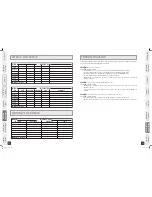
8&&,

8&&,-:(0"-

8&&,-:505"-4

%":

46/%":

.0/%":
56&4%":

8&%/&4%":

5)634%":

'3*%":
4"563%":

%"5&

%*45"/$& $"-03*&4

5*.&

$0..&/54

8&&,

8&&,-:(0"-

8&&,-:505"-4

%":

46/%":

.0/%":
56&4%":

8&%/&4%":

5)634%":

'3*%":
4"563%":

%"5&

%*45"/$& $"-03*&4

5*.&

$0..&/54

WEEKLY LOG SHEETS

MONTHLY LOG SHEETS

.0/5)

.0/5)-:(0"-

.0/5)-:505"-4

8&&,

%*45"/$&

$"-03*&4

5*.&

B600_Rev.1.6.indd   32-33

7/11/07   1:32:07 PM

Summary of Contents for B600

Page 1: ...BIKE USER S GUIDE FOR MODEL B600 HORIZON PERFORMANCE B600_Rev 1 6 indd 1 7 11 07 1 31 09 PM ...

Page 2: ...tures you need to get stronger and healthier faster Because we re committed to designing fitness equipment from the inside out we use only the highest quality components It s a commitment we back with one of the strongest frame to brake warranty packages in the industry You want exercise equipment that offers the most comfort the best reliability and the highest quality in its class Horizon Perfor...

Page 3: ...ers of this bike are adequately informed of all warnings and precautions If you have any questions after reading this manual contact Customer Tech Support at the number listed on the back panel of this manual At NO time should pets or children under the age of 12 be closer to the bike than 10 feet At NO time should children under the age of 12 use the bike Children over the age of 12 should not us...

Page 4: ...GUIDE RAIL CAP SEAT FRAME SEAT BACK REMOTE RESISTANCE TOGGLES SEAT GUIDE RAIL SEAT BASE REAR STABILIZER TUBE REAR END CAP PEDALS CONSOLE MAST MAST BOOT FRONT END CAP ASSEMBLY STEP 1 Open HARDWARE BAG FOR STEP 1 Slide REAR END CAPS onto REAR STABILIZER TUBE Attach 2 LEVELERS and LEVELER ADUSTERS found in the hardware box to the bottom of the REAR STABILIZER TUBE and secure tightly Attach the REAR S...

Page 5: ...Left Pedal onto the Left Crank Arm tightening it Counter Clockwise with the provided 13mm 15mm Flat Wrench Note The Left Crank Arm is reverse threaded so it is very important that it is tightened Counter Clockwise Tightening it the opposite way can damage the pedal or the crank arm or both A B MAIN FRAME CONNECT WIRES BASE FRAME BOLT A SPRING WASHER B WASHER C ASSEMBLY STEP 2 A Open HARDWARE BAG F...

Page 6: ...T FRAME into place by pusing down on SEAT LEVER NOTE Seat lever will face forward when in locked position Attach the RUBBER STOPPER to the bottom of the SEAT GUIDE RAIL using 1 SCREW H Set assembled SEAT GUIDE RAIL on the grooves of the BASE FRAME Re attach the PRE ATTACHED BOLTS SPRING WASHERS and WASHERS through the BASE FRAME into each end of the SEAT GUIDE RAIL DO NOT TIGHTEN UNTIL ALL FOUR BO...

Page 7: ... ATTACHED SCREWS screws will have to be removed from the console first Attach WATER BOTTLE CAGE using 2 SCREWS L Connect AC ADAPTOR to the AC ADAPTOR INPUT located at front of the main frame Connect ADAPTOR to a power outlet D E F G BEFORE YOU BEGIN CONGRATULATIONS on choosing your bike You ve taken an important step in developing and sustaining an exercise program Your bike is a tremendously effe...

Page 8: ...s I ENTER Used to set your workout and change workout settings J QUICK RESISTANCE keys Used to reach desired resistance more quickly K RESISTANCE keys Used to adjust resistance in small increments 1 increments L Change display button Press to change display feedback during workout M Clock Date button Displays clock and date data in display windows N iPOD Docking station MP3 PLAYER POCKET Used to d...

Page 9: ...gram WEIGHT LOSS Promotes weight loss by raising and lowering the resistance level while keeping you in your fat burning zone Cardio WORKOUTS Creates an intense cardio workout by raising and lowering resistance levels through out your workout POWER WORKOUTS Enhances your strength speed and endurance by increasing and decreasing resistance at specific intervals energy zones Automatically adjusts re...

Page 10: ...6 5 5 4 4 3 2 2 1 P2 Warm up and cool down last 4 00 minutes each WARM UP WORKOUT SEGMENTS REPEAT COOL DOWN SECONDS 60 60 60 60 60 60 60 60 60 60 60 60 60 60 60 60 60 60 60 60 SEGMENT 1 2 3 4 5 6 7 8 9 10 11 12 13 14 15 16 17 18 19 20 LEVEL 1 2 2 5 6 6 7 7 8 8 8 8 7 7 6 6 5 2 2 1 P3 Warm up and cool down last 4 00 minutes each WARM UP WORKOUT SEGMENTS REPEAT COOL DOWN SECONDS 60 60 60 60 60 60 60 ...

Page 11: ...R to skip to STEP 2 2 Select POWER WORKOUTS using the WORKOUT QUICK KEY and press ENTER NOTE POWER WORKOUTS key represents multiple programs P8 P9 and P10 Press POWER WORKOUTS key once and P8 will display press twice for P9 and press 3 times for P10 3 Set Time using the keys and press ENTER 4 Press the PRESS TO BEGIN key to start workout Warm up and cool down last 4 00 minutes each WARM UP WORKOUT...

Page 12: ... H M L H M L H M L COOL DOWN LEVEL 1 2 3 4 5 6 7 8 9 10 11 12 13 14 15 16 17 18 19 20 1 2 1 1 2 3 2 3 1 2 3 1 2 3 1 2 3 2 1 1 1 2 1 1 1 2 4 3 4 2 3 4 2 3 4 2 3 4 2 1 1 1 3 1 1 1 2 5 4 5 3 4 5 3 4 5 3 4 5 2 1 1 1 4 1 1 1 3 6 5 6 4 5 6 4 5 6 4 5 6 3 1 1 1 5 1 2 3 3 7 6 7 5 6 7 5 6 7 5 6 7 3 2 1 1 6 1 2 3 4 8 7 8 6 7 8 6 7 8 6 7 8 4 3 2 1 7 1 2 3 4 9 8 9 7 8 9 7 8 9 7 8 9 4 3 2 1 8 1 2 3 5 10 9 10 8 ...

Page 13: ...KOUT The console automatically defaults to Current Workout displaying your progress in real time AVERAGE WORKOUT This option allows you to see your average accumulated data for the last 30 workouts The following information will be shown in each display window TIME Average workout time CALORIES Average calories burned DISTANCE Average workout distance SPEED Average speed of workout RPM Average RPM...

Page 14: ...ve not used the machine since Sunday the console will read zeros The following information will be shown in each display window TIME Total time of weekly workout CALORIES Average weekly calories burned DISTANCE Total distance of weekly workout SPEED Average speed of weekly workout RPM Average RPM of weekly workout WATTS Average Watts of weekly workout PACE Average Pace of workout Note If the Date ...

Page 15: ... How hard you workout is also determined by your goals If you use your machine to prepare for a 5K workout you will probably work out at a higher intensity than if your goal is general fitness Regardless of your long term goals always begin an exercise program at low intensity Aerobic exercise does not have to be painful to be beneficial There are two ways to measure your exercise intensity The fi...

Page 16: ... warm up should gradually bring your heart rate into your Target Heart Rate Zone COOL DOWN Never stop exercising suddenly A cool down period of 3 5 minutes allows your heart to readjust to the decreased demand Make sure that your cool down period consists of a very slow pace to allow your heart rate to lower After the cool down repeat the stretching exercises listed above to loosen and relax your ...

Page 17: ... not damaged or pinched PROBLEM The console lights up but the Time RPM s do not count SOLUTION Verify the following Unplug the power cord Remove the console and check that all connections to the console are secure and not damaged or pinched If doing the above does not fix the problem the speed sensor and or magnet may have become dislodged or damaged PROBLEM The resistance levels seem to be incorr...

Page 18: ...g the buttons on the console Does the resistance constantly cycle through the levels during the workout Has the machine been maintained per the maintenance schedule Does the problem occur when using the handlebars Without using the handlebars Answering these and other questions will give the technicians the ability to send proper replacement parts and the service necessary to get you and your Hori...

Page 19: ...overed Repair or replacement of a defective motor electronic component or defective part and is the sole remedy of the warranty What IS NOT covered Normal wear and tear improper assembly or maintenance or installation of parts or accessories not originally intended or compatible with the equipment as sold Damage or failure due to accident abuse corrosion discoloration of paint or plastic neglect t...

Page 20: ...Tech Support Hotline 1 800 244 4192 Email comments horizonfitness com Website www horizonfitness com Every employee at Horizon Fitness takes pride in providing you with a high quality product We want to know if you have a problem and we want to have an opportunity to correct it for you Note Please read the troubleshooting section before contacting Customer Tech Support To receive additional produc...

Reviews: