background image

SV9501/SV9502/SV9601/SV9602 SMARTVALVE

TM 

SYSTEM CONTROL

5

69-1270—3

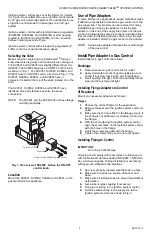
Fig. 5. Use a moderate amount of pipe compound.

Connecting the Pilot Gas Tubing

NOTE:

1.

The pilot tubing provides the SmartValve

TM


system’s flame sense current path. Make 
sure the connections are clean and tight.

2.

Do not make sharp bends or deform the 
tubing. Do not bend tubing at the ignition 
system control after the compression nut is 
tightened, because this can cause gas 
leakage.

1.

Cut the tubing to the desired length.

2.

Bend the tubing as necessary for routing to the pilot 
burner.

3.

Square off and debur the end of the tubing.

4.

Unscrew the brass compression fitting from the pilot 
outlet.

5.

Slip the fitting over the tubing and out of the way.

6.

Push the tubing into the pilot gas outlet.

7.

Tap the outlet end of the control.

8.

Remove and discard the old fitting.

9.

While holding tubing all the way in, slide the new fit-
ting (included with the new SmartValve

TM

) into place 

and begin thread until finger tight as shown in Fig. 7.

10.

Tighten fitting one more full turn with the wrench. 
Do not overtighten.

11.

Connect the other end of the tubing to the pilot 
burner as described in the instructions supplied with 
Q3450 or Q3480 pilot hardware.

Wiring

Follow the wiring instructions supplied by the appliance 
manufacturer if available. Otherwise, use the following 
general instructions.

NOTE:

1.

In most cases, connect the wiring by plugging 
the appliance wiring harness connector into 
the SmartValve

TM

. Use the supplied exten-

sion harness if necessary.

2.

Where the general instructions are different 
from the appliance manufacturer’s instruc-
tions, use the appliance manufacturer’s 
instructions.

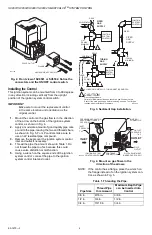
Fig. 6. Proper use of wrench on ignition system control with and without flanges.

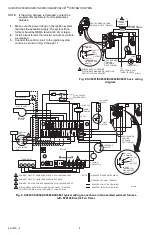
Fig. 7. Tighten new fitting and nut. 

Always use a new compression fitting.

CAUTION

Equipment Damage Hazard.
Electrostatic discharge can short equipment 
circuitry.

Disconnect the power supply before making wiring 
connections.

IMPORTANT

All wiring must comply with applicable electrical 
codes and ordinances.

TWO 
IMPERFECT 
THREADS

IGNITION 
SYSTEM 
CONTROL

THREAD PIPE THE AMOUNT 
SHOWN IN TABLE FOR INSERTION 
INTO IGNITION SYSTEM CONTROL 

APPLY A MODERATE AMOUNT OF
PIPE COMPOUND ONLY TO PIPE 
(LEAVE TWO END THREADS BARE).

M3344

PIPE

APPLY WRENCH FROM TOP OR 
BOTTOM OF IGNITION SYSTEM 
CONTROL TO EITHER SHADED AREA

WHEN FLANGE IS NOT USED

APPLY WRENCH
TO FLANGE ONLY

WHEN FLANGE IS USED

M7928

IGNITION SYSTEM CONTROL

TIGHTEN NUT ONE TURN
BEYOND FINGER TIGHT

FITTING BREAKS OFF AND CLINCHES 
TUBING AS NUT IS TIGHTENED

TO PILOT 
BURNER

M3346

Summary of Contents for TRADELINE SV9501

Page 1: ...ed step outlet pressure at the start of each heating cycle to allow main burner ignition at reduced outlet pressure Reducer bushings are provided with the SV9602 and SV9601 models for adapting to smaller pipe sizes IMPORTANT Carefully determine the full Honeywell model number of the existing control Use Table 4 or Table 5 to make sure the replacement control model is suitable for replacing the ori...

Page 2: ...ge the control Make sure the ambient temperature at the control does not exceed the control rating If the appliance operates at very high temperatures use insulation shielding and proper air circulation as necessary to protect the control The appliance manufacturer should provide proper insulation or shielding Make sure there is proper air circulation when installing the appliance Installation WAR...

Page 3: ...ine in place of the gas control by following the same precautions and instructions that are used for installing the gas control After the pipe adapter is installed attach the gas control to the adapter NOTE Using a pipe adapter increases the overall length of the gas control Install Pipe Adapter to Gas Control Install adapter to gas control as follows Bushings 1 Remove seal over gas control inlet ...

Page 4: ...system control connect the pipe to the ignition system control inlet and outlet Fig 3 Sediment trap installation Fig 4 Mount so gas flows in the direction of the arrows NOTE If the control has a flange place the wrench on the flange instead of on the ignition system con trol as shown in Fig 6 Table 1 Threading the Pipe M17142 VALVE OUTLET FLANGE 9 64 INCH HEX SCREWS 4 Pipe Size Thread Pipe this Am...

Page 5: ...50 or Q3480 pilot hardware Wiring Follow the wiring instructions supplied by the appliance manufacturer if available Otherwise use the following general instructions NOTE 1 In most cases connect the wiring by plugging the appliance wiring harness connector into the SmartValveTM Use the supplied exten sion harness if necessary 2 Where the general instructions are different from the appliance manufa...

Page 6: ...ERMOSTAT OR PRESSURE SWITCH PILOT BURNER GROUND THROUGH PILOT TUBING L1 POWER SUPPLY PROVIDE DISCONNECT MEANS AND OVERLOAD PROTECTION AS REQUIRED 1 1 M7935C UNUSED M7937D G W C Y R FUSE AIR CLEANER LO ML MH HI CIRCULATING FAN STARTING CAP ROLL OUT SWITCH LIMIT CONTROL PRESSURE SWITCH TRANS FORMER 115 230 VAC 24 VAC DENOTES STANDARD TERMINAL DENOTES OPTIONAL TERMINAL THERMOSTAT L2 N L1 H TO 115 230...

Page 7: ...ccurs normally ON Allows gas to flow through the control valve The thermostat controls the gas flow to the pilot and main burners Fig 11 SV9501 SV9502 SV9602 SV9601 typical wiring diagram in induced draft boiler application THERMOSTAT L2 L1 120 VAC POWER SUPPLY W G C R Y COIL RED BLACK RED D892 VENT DAMPER 4 3 2 1 BLACK CIRCULATOR PUMP AQUASTAT CONTROL ROLLOUT SWITCH SPILL SWITCH M7936C BLACK PILO...

Page 8: ... gas leakage NOTE Controls are provided with adjustment screws set at the maximum pilot flow position Fig 12 Proper flame adjustment Check and Adjust Gas Input and Burner Ignition IMPORTANT Many replacement valves require outlet pressure adjustment Do not exceed the input rating stamped on the appliance nameplate Do not exceed the manufacturer s recommended burner orifice pressure for size of orif...

Page 9: ...e the control apart or clean it Improper cleaning or reassembly may cause gas leakage Regular preventive maintenance is important in applications that place a heavy load on system controls This include applications in commercial cooking agricultural and industrial industries where these conditions often exist Heavy cycling In commercial cooking the operation the equipment operates 100 000 to 200 0...

Page 10: ...pliances in the house Do not touch any electrical switches Do not use the phone Leave the building and go to a neighbor s phone to call your gas supplier If you cannot reach your gas supplier call the fire department 4 Do not force or use tools to move the ignition system control switch If the switch does not operate by hand the ignition system control must be replaced by a qualified licensed if r...

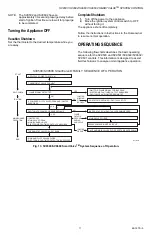
Page 11: ...eld technicians to analyze normal appliance operation Fig 13 SV9500 SV9600 SmartValveTM System Sequence of Operation APPLY 24V POWER TO SYSTEM START THERMOSTAT CALLS FOR HEAT A POWERED PILOT VALVE OPENS AND IGNITER ENERGIZES PILOT LIGHTS FLAME ROD SENSES FLAME IGNITER OFF MAIN VALVE OPENS MAIN BURNER LIGHTS ELECTRONIC FAN TIMER OUTPUT ENERGIZES THERMOSTAT CALL FOR HEAT ENDS MAIN AND PILOT VALVES C...

Page 12: ...equence and Troubleshooting flow chart in Fig 14 and 16 for the replacement SV9501 SV9502 SV9601 SV9602 SmartValveTM NOTE The HSI element action for SV9501 SV9502 SV9601 SV9602 is different from the HSI element action for SV9500 SV9600 For SV9500 SV9600 the element is on continuously during a call for heat until shortly after the pilot flame is detected the main valve energizes and the element tur...

Page 13: ...MEASURE VOLTAGE BETWEEN 24V HOT AND 24V COMMON LEADS TO SmartValve CONTROL MUST MEASURE AT LEAST 19 5 VAC WITH IGNITER POWERED SEE INSET A TO IDENTIFY PROPER LEAD THIS CHECK MUST BE DONE WITH THE SmartValve CONTROL CONNECTED AND IGNITER POWERED CHECK THAT PILOT FLAME MAKES GOOD CONTACT WITH PILOT BURNER FLAME ROD CHECK FOR GOOD ELECTRICAL CONNECTION THROUGH THE PILOT TUBING IF BOTH OF THE ABOVE AR...

Page 14: ...artValve CONTROL MUST MEASURE AT LEAST 19 5 VAC WITH IGNITER POWERED SEE INSET A TO IDENTIFY PROPER LEAD THIS CHECK MUST BE DONE WITH THE SmartValve CONTROL CONNECTED AND IGNITER POWERED CHECK THAT PILOT FLAME MAKES GOOD CONTACT WITH PILOT BURNER FLAME ROD CHECK FOR GOOD ELECTRICAL CONNECTION THROUGH THE PILOT TUBING IF BOTH OF THE ABOVE ARE GOOD REPLACE IGNITER FLAME ROD ASSEMBLY CYCLE THERMOSTAT...

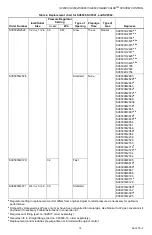
Page 15: ...ting Type of Opening Prepurge Time Type of Gas Replaces in wc kPa SV9502H2522 1 2 in x 1 2 in 3 5 0 87 Slow 15 sec Natural SV9500H2609a e SV9500H2617a e SV9500H2724e SV9500H3607a d e SV9500H3615b d e SV9501H2409a e SV9501H2417e SV9501H2425b e SV9501H3415a d e SV9501H3423b d e SV9502H1706 SV9502H2522 SV9502H2704 SV9501M2528 Standard None SV9500M2603 SV9500M2629a d SV9500M2637d SV9500M2645 SV9500M26...

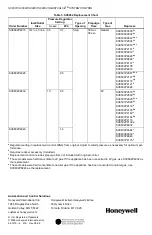
Page 16: ...ce has been converted to LP gas use SV9602P4832 as the replacement e These models were field convertible to natural gas If the appliance has been converted to natural gas use SV9602P4824 as the replacement Order Number Inlet Outlet Size Pressure Regulator Setting Type of Opening Prepurge Time Type of Gas Replaces in wc kPa SV9602P4816 3 4 in x 3 4 in 3 5 0 7 Step 30 Sec 30 sec Natural SV9500P2600b...

Reviews: