background image

PRIMUS

r

1000 Integrated Avionics System

A28--1146--112--00

4-41

Electronic Flight Instrument System (EFIS)

ARC DISPLAY

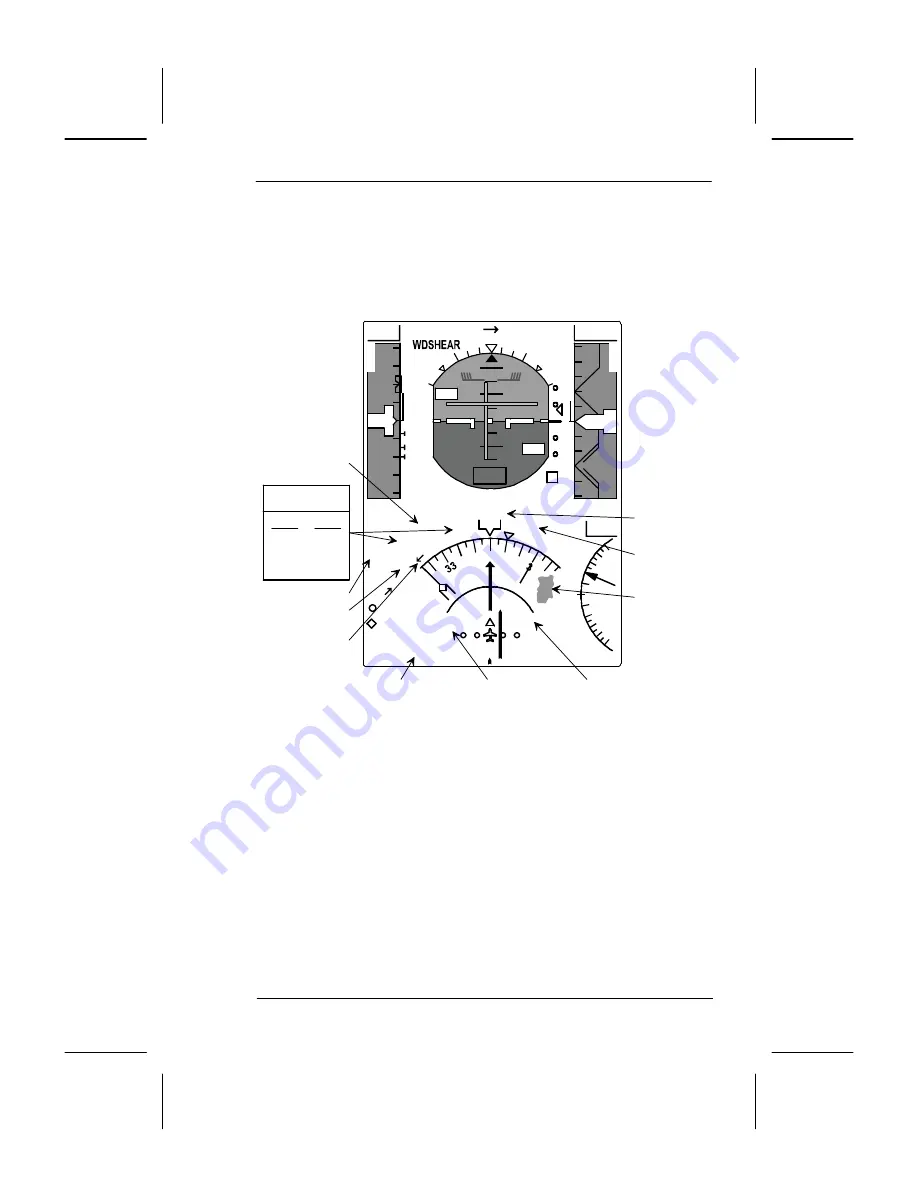
Most of the arc display annunciators, shown in figure 4--23 , are the

same as that for full compass HSI display. The differences are

described below.

10

10

10

10

20

20

350

9

1

260

280

220

200

240

260

145

00

.410

M

359 DTK

FMS

25.9 H

25

VOR1
ADF2

HDG

270

TGT

0

1

2

3

3

1

2

GSPD

212KTS

1000

200 RA

29.92 IN

LNAV

VS VNAV

AP

YD

FMS

ASEL

ADC2

SG2

M

A

X

S

P

D

VTA

ATT2

RA

LOC

CAS

TCAS

TEST

MSG

HDG

FHDGDR

APP

KDVT

3000

M

00

20

80

14500

143

14000

A

L

T

I

A

S

2

R

1

MIN

ATT

N

WX

50

--3.5

360

MAG2

FMS STATUS

ANNUNCIATORS

AD--50917@

”TO”WAYPOINT

DME HOLD

WEATHER RADAR

MODES AND TILT

ANGLE ANNUNCIATION

WEATHER RADAR

TGT/VAR

ANNUNCIATIONS

RANGE RING

VALUE

WEATHER RETURN

FMS MSG

ANNUNCIATION

INTEG

WPT

DR

DGR

ALERT

TERM

APP

SXTK

AMBER

CYAN

OFFSCALE

ARROW

FMS HEADING

(FHDG)

HEADING SOURCE

ANNUNCIATION

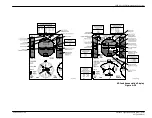
HSI Arc Display With FMS Map and Weather Radar

Figure 4--23

D

Heading Source Annunciations

-- When the cross--side heading

source is selected, or when the AHRS is in DG, the heading source

is shown above the compass card.

D

FMS Status Annunciation

-- Some critical FMS status displays are

annunciated to the left of the compass. These are: waypoint (WPT),

integrity (INTEG), offset (SXTK), terminal (TERM), approach

(APP), degrade (DGR) and dead reckoning (DR). TERM, SXTK and

APP are displayed in cyan; DR, DGR, and WPT are displayed in

amber. Message (MSG) is displayed to the right of the compass in

amber.

Summary of Contents for PRIMUS 1000

Page 1: ...PRIMUS 1000 Integrated Avionics System Pilot s Manual for the Embraer 145 AD 52817 ...

Page 2: ... U S A Pub No A28 1146 112 00 August 1997 Business and Commuter Aviation Systems Honeywell Inc Box 29000 Phoenix Arizona 85038 9000 PRIMUSr1000 Integrated Avionics System for the Embraer Model 145 Pilot s Manual ...

Page 3: ... contained herein shall be used reproduced or disclosed to others without the written authorization of Honeywell Inc except to the extent required for installation or maintenance of recipient s equipment NOTICE FREEDOM OF INFORMATION ACT 5 USC 552 AND DISCLOSURE OF CONFIDENTIAL INFORMATION GENERALLY 18 USC 1905 This document is being furnished in confidence by Honeywell Inc The information disclos...

Page 4: ...Upon receipt of a revision insert the latest revised pages and dispose of superseded pages Enter revision number and date insertion date and the incorporator s initials on the Record of Revisions The typed initials HI are used when Honeywell Inc is the incorporator Revision Number Revision Date Insertion Date By ...

Page 5: ...revision insert the yellow temporary revision pages according to the filing instructions on each page Then enter the temporary revision number issue date and insertion date on this page Temporary Revision No Issue Date Date the Temporary Revision Was Incorporated by a Regular Revision Insertion of Temporary Revision Date By Removal of Temporary Revision Date By ...

Page 6: ... 4 0 TC 5 0 TC 6 0 TC 7 0 TC 8 0 TC 9 0 TC 10 0 TC 11 0 TC 12 0 Introduction 1 1 0 1 2 0 1 3 1 4 0 F 1 5 1 6 0 System Description 2 1 0 2 2 0 2 3 0 2 4 0 2 5 0 2 6 0 2 7 0 2 8 0 2 9 0 2 10 0 F 2 11 2 12 0 Electronic Display System EDS 3 1 3 2 0 F 3 3 3 4 0 3 5 0 3 6 0 3 7 0 3 8 0 Electronic Flight Instrument System EFIS 4 1 4 2 0 F 4 3 4 4 0 4 5 0 4 6 0 4 7 0 4 8 0 4 9 0 4 10 0 4 11 0 4 12 0 4 13 ...

Page 7: ... 4 43 0 4 44 0 4 45 0 4 46 0 4 47 0 4 48 0 4 49 0 4 50 0 4 51 0 4 52 0 4 53 0 4 54 0 4 55 0 4 56 0 4 57 0 4 58 0 4 59 0 4 60 0 4 61 0 4 62 0 4 63 0 4 64 0 4 65 0 4 66 0 4 67 0 4 68 0 4 69 0 4 70 0 4 71 0 4 72 0 4 73 0 4 74 0 4 75 0 4 76 0 4 77 0 4 78 0 4 79 0 4 80 0 4 81 0 4 82 0 4 83 0 4 84 0 4 85 0 4 86 0 4 87 0 4 88 0 4 89 0 4 90 0 4 91 0 4 92 0 4 93 0 4 94 0 4 95 0 4 96 0 4 97 0 4 98 0 4 99 0 ...

Page 8: ...2 0 5 33 0 5 34 0 Flight Guidance System 6 1 0 6 2 0 6 3 0 6 4 0 6 5 0 6 6 0 6 7 6 8 0 System Limits 7 1 0 7 2 0 7 3 0 7 4 0 7 5 0 7 6 0 7 7 0 7 8 0 Modes of Operation 8 1 0 8 2 0 8 3 0 8 4 0 8 5 0 8 6 0 8 7 0 8 8 0 8 9 0 8 10 0 8 11 0 8 12 0 8 13 0 8 14 0 8 15 0 8 16 0 8 17 0 8 18 0 8 19 0 8 20 0 8 21 0 8 22 0 8 23 0 8 24 0 8 25 0 8 26 0 8 27 0 8 28 0 8 29 0 8 30 0 8 31 0 8 32 0 8 33 0 8 34 0 8 3...

Page 9: ...F A 3 A 4 0 A 5 0 A 6 0 A 7 0 A 8 0 A 9 0 A 10 0 A 11 A 12 0 Appendix B B 1 0 B 2 0 B 3 0 B 4 0 B 5 0 B 6 0 B 7 0 B 8 0 B 9 0 B 10 0 B 11 0 B 12 0 Appendix C C 1 C 2 0 F C 3 C 4 0 C 5 0 C 6 0 C 7 0 C 8 0 C 9 0 C 10 0 C 11 0 C 12 0 C 13 0 C 14 0 C 15 0 C 16 0 C 17 0 C 18 0 C 19 0 C 20 0 C 21 0 C 22 0 C 23 0 C 24 0 C 25 0 C 26 0 C 27 0 C 28 0 C 29 0 C 30 0 C 31 0 C 32 0 C 33 0 C 34 0 C 35 0 C 36 0 C...

Page 10: ...0 List of Effective Pages LEP 5 LEP 6 blank Subheading and Page Revision Subheading and Page Revision Index cont Index 12 0 Index 13 0 Index 14 0 Index 15 0 Index 16 0 Index 17 0 Index 18 0 Index 19 0 Index 20 0 Index 21 0 Index 22 0 Index 23 0 Index 24 0 ...

Page 11: ...on 2 9 Other Switches and Controls 2 9 3 ELECTRONIC DISPLAY SYSTEM EDS 3 1 Introduction 3 1 MFD Bezel Controller Basic Operation 3 5 Map Range Control 3 6 Controller Conventions 3 6 Reversionary Controllers and Dimming Panel 3 7 System Reversionary Panel 3 7 Data Acquisition Unit DAU Reversionary Panel 3 8 EDS Dimming Panel 3 8 4 ELECTRONIC FLIGHT INSTRUMENT SYSTEM EFIS 4 1 Introduction 4 1 Contro...

Page 12: ... 5 Displays 5 6 EICAS Display 5 6 Primary Engine Displays 5 7 Crew Alerting System CAS 5 22 CAS Messages 5 23 CAS Display Failure Indications 5 29 EICAS Reversionary Modes 5 30 Backup EICAS Display 5 31 Backup EICAS Display Failure Indications 5 34 6 FLIGHT GUIDANCE SYSTEM FGS 6 1 Guidance Controller GC 6 1 Autopilot AP Yaw Damper YD Couple CPL Buttons 6 1 Flight Director FD Mode Selection 6 3 Rem...

Page 13: ...n Sensor AOSS 7 4 System Performance and Operating Limits 7 5 8 MODES OF OPERATION 8 1 Heading HDG Hold Mode Wings Level 8 1 Roll Hold Mode 8 2 Heading Select Mode 8 3 VOR Navigation NAV Mode 8 4 VOR Approach VAPP Mode 8 9 Flight Management System FMS Navigation Mode Option 8 10 Localizer LOC Mode 8 12 Back Course BC Mode 8 17 Instrument Landing System ILS Approach Mode 8 20 Pitch Hold Mode 8 25 P...

Page 14: ...NS 11 1 APPENDICES A 1 AHZ 800 ATTITUDE AND HEADING REFERENCE SYSTEM AHRS A 1 Introduction A 1 Attitude and Heading Reference Unit A 5 AHRS Control and EICAS Annunciation A 5 AHRS Controls A 5 EICAS Annunciations A 6 Operation A 7 Standard Operation A 7 Reduced Performance Operation A 8 Power Up Test A 8 Pilot Self Test A 9 Ground Initialization A 9 Abnormal Operations A 10 B 1 PRIMUSâ 660 WEATHER...

Page 15: ...C 7 Radio Management Unit RMU Operation C 7 General C 7 Controls C 8 Memory Pages C 11 System SYS On Off Page C 11 VHF Communications Transceiver Operation C 13 Navigation Receiver Operation C 17 ATC Transponder and TCAS Operations C 20 ADF Operation C 24 Cross Side Operation C 27 Built In Test BIT C 28 Maintenance C 32 RMU Display Dimming C 32 Audio Panel Operation C 33 General C 33 Controls C 33...

Page 16: ...tton 4 10 4 9 MFD Main Menu Without FMS 4 10 4 10 MFD Main Menu With FMS 4 11 4 11 VSPEEDS Submenu 4 11 4 12 Joystick Submenu 4 13 4 13 Checklist Menu 4 15 4 14 TCAS Selection from Main Menu 4 18 4 15 WX Selection from Main Menu 4 18 4 16 MAP Plan Selection From Main Menu 4 19 4 17 Display Controller 4 20 4 18 Guidance Controller 4 22 4 19 PFD Functional Divisions 4 25 4 20 ADI and Annunciation Di...

Page 17: ...hout Weather 4 76 4 44 Map Mode With Weather 4 77 4 45 MFD Plan View 4 78 4 46 Plan Mode Caution and Warning Displays 4 79 4 47 Typical Plan Mode With Navaid Components and Flight Plan 4 80 4 48 Typical Checklist Display 4 83 4 49 MFD With Map Mode Display and Optional TCAS 4 84 4 50 Takeoff Display 4 87 4 51 Environmental Control System ECS System Display 4 88 4 52 Fuel Page 4 90 4 53 Hydraulic H...

Page 18: ...gation Mode Tracking Over Station 8 9 8 9 Long Range Navigation Mode Display 8 11 8 10 Localizer Mode Arm Display 8 13 8 11 Localizer Mode Capture Plan View 8 14 8 12 Localizer Capture Display 8 15 8 13 Localizer Mode Tracking Profile View 8 16 8 14 Localizer Tracking Display 8 16 8 15 Back Course Mode Intercept Plan View 8 17 8 16 Back Course Tracking Display 8 19 8 17 ILS Approach Localizer Inte...

Page 19: ...iator B 11 B 6 MPEL Boundary B 12 C 1 PRIMUSâ II Radio System Interface Block Diagram C 3 C 2 Radio Management Unit Controls C 8 C 3 Page Menu C 10 C 4 COM Frequency Storage Page C 11 C 5 System On Off Page C 12 C 6 RMU in COM Tuning Mode C 14 C 7 RMU Tuning C 14 C 8 Exchanging the Preset and Active Frequencies C 15 C 9 COM Message Squelch Open C 16 C 10 NAV Frequency Select Window C 17 C 11 Toggl...

Page 20: ...d Source Distance Range 4 44 4 15 VSPEED Bug Identification 4 46 4 16 Low Speed Awareness Color Logic 4 47 4 17 Comparison Monitor Parameters 4 60 4 18 Yaw Damper Status Annunciations 4 64 4 19 TCAS Failure Annunciations 4 64 4 20 Excessive Attitude Declutter Parameters 4 67 4 21 Weather Radar Mode Annunciations on MFD 4 70 4 22 Designating a New Waypoint Procedure 4 81 4 23 Engine T O Mode Logic ...

Page 21: ...Inhibit Function 5 29 6 1 FD1 FD2 Switch Operation 6 4 6 2 Red Warning Flight Guidance System Messages 6 5 6 3 Amber Caution Flight Guidance System Messages 6 6 7 1 System Performance Operating Limits 7 5 7 2 Air Data Display Parameters and Ranges 7 8 8 1 VOR Navigation Mode Engagement Procedure 8 4 8 2 VOR Approach Mode Engagement Procedure 8 9 8 3 FMS Mode Engagement Procedure 8 10 8 4 Localizer...

Page 22: ...ilot Initiated Self Test Annunciations A 9 B 1 Target Alert Characteristics B 4 B 2 Rainfall Rate Color Cross Reference B 6 B 3 PRIMUSâ 660 Weather Radar System Precautions B 8 C 1 COM Messages C 16 C 2 DME Cycling Sequence C 19 C 3 DME Function Key Operating Procedure C 20 C 4 Transponder Modes C 22 C 5 Extended Altitude Modes C 23 C 6 ADF Modes C 25 C 7 PAST Self Test Approximate Durations C 29 ...

Page 23: ... 850 PRIMUSR II Integrated Radio System D PRIMUSR 660 Weather Radar System D AA 300 Altimeter System The traffic alert and collision avoidance system TCAS is covered in another manual Optional systems including the PRIMUSR 880 Weather Radar Systems and the NZ 2000 Flight Management System FMS are described in separate pilot s manuals These manuals are listed in table 1 1 The equipment covered in t...

Page 24: ...r 1 7003897 925 DC 550 Display Controller DC 2 7016986 401 without FMS 7016986 501 with FMS installed WC 660 Weather Radar Controller 1 7008471 VAR GC 550 Guidance Controller 1 7021170 951 AV 850A Audio Panel 3 7510100 939 RM 855 Radio Management Unit RMU 2 7013270 VAR CD 850 Tuning Backup Control Head 1 7513000 VAR Remote Mounted Equipment IC 600 No 1 Integrated Avionics Computer IAC 1 7017000 82...

Page 25: ...nications Unit without Diversity Transponder 1 7510700 809 RT 910 TCAS II Computer 1 4066010 904 AT 910 TCAS Antenna 1 7514060 902 AZ 850 Micro Air Data Computer MADC 2 7014700 918 DA 800 Data Acquisition Unit DAU 2 7013348 911 AH 800 Attitude and Heading Reference Unit 2 HG2010AC02 WU 660 Radar Receiver Transmitter Antenna RTA 1 7021450 601 Optional Equipment ECP 800 Programmable Checklist 1 7021...

Page 26: ...PRIMUSr1000 Integrated Avionics System A28 1146 112 00 Introduction 1 5 1 6 blank PRIMUSâ 1000 in the Embraer 145 Cockpit Figure 1 1 ...

Page 27: ...Radio Altimeter System D PRIMUSâ 660 Weather Radar System OPTIONAL D PRIMUSâ 880 Weather Radar System D Flight Management System FMS The PRIMUSâ 1000 Integrated Avionics System is a fail passive autopilot flight director and display system that has a full complement of horizontal and vertical flight guidance modes These include all radio guidance modes optional long range navigation system trackin...

Page 28: ...he EICAS displays The two IACs are interconnected with high level data link control HDLC lines Thisand other interconnectsallow the flight guidanceand symbol generators to share compare and communicate information The PRIMUSâ II Radio System is connected to the FGS by the radio system bus RSB When engaged and coupled to the flight director commands the PRIMUSâ 1000 IACs control the aircraft using ...

Page 29: ... is disconnected from the servos Normal flight guidance functions are computed based on the No 1 AHRS Flight director operation also comes from the No 2 IAC The guidance controller contains the autopilot AP engage yaw damper YD engage and low bank switch Either side s PFD and flight director can be coupled to the autopilot Mode annunciations are displayed on the guidance controller and on the PFD ...

Page 30: ...entation flightpath commands weather presentations checklists mode and source annunciations air data parameters engine data and fault warning information The displays are organized as follows D Primary Flight Display The PFD integrates attitude heading air data information flight director modes and command bars TCAS resolution advisory RA commands weather radar and navigation information D Multifu...

Page 31: ... Wraparound signals are used for critical parameters such as pitch or roll data to ensure information accuracy The dual channel DAUs transmit all the aircraft engine information to the symbol generator for display on the EICAS display They also transmit analog data for display of some aircraft subsystem information DAU 1 inputs left engine data and DAU 2 inputs right engine data AIR DATA SYSTEM AD...

Page 32: ...stems Refer to the PRIMUSâ 660 Weather Radar System pilot s manual for ground safety information In the GMAP the system parameters are optimized to improve resolution and to better identify small targets at short ranges The reflected signals from ground surfaces are displayed as magenta yellow or cyan most to least reflective A brief description is included in Appendix B PRIMUSâ 660 Weather Radar ...

Page 33: ...ion Unit D Radio Management Unit RMU D Audio Panel D Tuning Backup Control Head The PRIMUSâ II Radio System is the source for VHF communication VOR ILS DME marker beacon ADF navigation data and air traffic control ATC transponder functions The units are connected through the RSB that is a high speed two way data exchanger The audio signals are transmitted from the remote unitsto the audio panel th...

Page 34: ...System which is fully described in Honeywell Pub No A28 1146 102 includes the following components D Weather Radar Receiver Transmitter Antenna D Weather Radar Controller The PRIMUSâ 880 Weather Radar System is an X band radar designed for weather detection and analysis The PFD and MFD show storm intensity levels in bright colors contrasted against a deep black background Areas of heaviest rainfal...

Page 35: ...splays are generated from an FMS navigation database The navigation database is normally updated every 28 days The data loader is used to load pilot defined flight plans waypoint data and aircraft performance data OTHER SWITCHES AND CONTROLS D AP Autopilot Disconnect Switch The AP disconnect switch is mounted on the control wheel When pushed it disconnects the autopilot and yaw damper D TCS Touch ...

Page 36: ... auxiliary checklist D Master Warning Master Caution Switches Located on the glareshield directly in front of each pilot these switches flash when a respective warning or caution message isdisplayed on the EICAS Pushing either side as appropriate terminates the flashing D N2 Override Switch When selected the N2 switch overrides the EICAS limits on a minimum N2 before certain crew advisory system C...

Page 37: ...cs System A28 1146 112 00 System Description 2 11 2 12 blank RM 855 RMU AH 800 AHRU AD 39738 R6 ICB T RIGHT FADEC SCI 429 IC 600 INTEGRATED AVIONICS COMPUTER S 15 12 W E 24 21 S 15 12 W E 24 21 PRIMUSÒ 1000 Block Diagram Figure 2 1 ...

Page 38: ...ic flight instrument system EFIS and EICAS Each pilot has a dedicated display controller DC and a reversionary controller In general these dedicated controllers are used to control PFD display functions Display dimming is controlled from the dimming control panel The PFD and MFD DUs have a bezel mounted controller The PFD bezel controllers are identical and the MFD controllers are also identical A...

Page 39: ...PRIMUSr1000 Integrated Avionics System A28 1146 112 00 Electronic Display System EDS 3 3 3 4 blank Cockpit Layout of EFIS Figure 3 1 ...

Page 40: ...u Selection This selection sequences through possible choices with that specific menu item key D Toggle Selection This selection sequences through possible choices with that specific menu item key D Momentary Selection The menu item is selected as long as the menu item key is held D Parameter Display Selection Pushing the menu item key boxes the menu item and the parameter is displayed on the MFD ...

Page 41: ...s boxed that parameter is being displayed on the PFD or MFD Selecting a boxed item deselects the item D Parameter Selected for Display A selected parameter is displayed only when the item is boxed on the appropriate menu If there is no box around the item it is not displayed D Parameter Selected for Setting If the parameter isnot boxed the first selection of the menu key below it boxes the paramet...

Page 42: ...AS PFD AHRS SG AD 50892 R1 System Reversionary Panel Figure 3 3 D MFD Knob This knob selects the on side MFD display between PFD NORM normal or EICAS NOTES 1 When the selection is PFD or EICAS the normal display unit for the PFD or EICAS is blanked 2 When the SG reversionary switch is selected cross side the MFD switch operates normally However under this condition the selection displays the cross...

Page 43: ...ible for both pilots to select AHRS reversionary In that case each pilot receives AHRS information from the cross side AHRS 3 Selecting reversionary AHRS disengages all flight director modes and the AP If both AHRSs are working normally the modes and AP can be re engaged Data Acquisition Unit DAU Reversionary Panel The DAU reversionary panel shown in figure 3 4 selects between NORM and reversionar...

Page 44: ...rators Part of the integrated avionics computer IAC Shared with engine instrument and crew alerting system EICAS for reversionary operation D PFD Bezel Controllers D MFD Bezel Controllers D Display Controllers DC D Guidance Controller Course Heading Controls D Remote Mounted Joystick The EFIS is an integrated system that displays flight attitudes airspeeds vertical speed altitude headings course o...

Page 45: ...N 360 50 50 PLAB1 PLAB2 PBD01 LL01 KDVT TGT TX 16 ELEC M P RNG HYD RESET FUEL ECS T O RTN STAB ENGINE REF TO TEMP REF FLX TEMP 99 DOORS REF A ICE OFF C OIL LVL 1 QT 4 QT 99 C DOOR OPEN N S 33 15 30 12 W E 24 6 21 3 25 300 15 245 TAS SAT GSPD FMS KDVT 12 5 12 NM MIN 360 50 50 PLAB1 PLAB2 PBD01 LL01 KDVT TGT TX 16 ELEC M P RNG HYD RESET FUEL ECS T O RTN STAB ENGINE REF TO TEMP REF FLX TEMP 99 DOORS ...

Page 46: ...lected D Inclinometer The ball in the glass track is used to indicate a slip or skid flight condition D STD Standard Button Pushing the STD button returns the barometric altimeter correction to standard value 29 92 inHg or 1013 hPa D BARO Barometric SET Knob The BARO SET knob is used to enter the barometric altimeter correction in either inHg or hPa NOTES 1 When the pilots are displaying cross sid...

Page 47: ...SG reversionary switch selectsthe cross side SG only the DU bezel buttons on the same side as that symbol generator are used to make MFD EICAS selections D M P RNG Map Plan Range Rotary Knob The rotary knob normally controls the range of the map or plan display in preset increments The same menu select buttons change the knob function to set specific flight parameters When weather is selected for ...

Page 48: ...PRIMUSr1000 Integrated Avionics System A28 1146 112 00 4 7 Electronic Flight Instrument System EFIS An MFD menu operation tree is shown in figure 4 5 A B AD 50909 R1 MFD Menu Tree Figure 4 5 ...

Page 49: ... the MFD system menu shown in figure 4 7 AD 50897 Main Menu Figure 4 6 SYSTEM MENU Pushing the SYS button from the main menu shown in figure 4 6 selects the system menu shown in figure 4 7 NOTE Unless weather is selected on the MFD or unless central maintenance computer CMC TCAS or checklist are selected for display a system display is always shown in the lower part of the MFD AD 50898 System Menu...

Page 50: ...n while the ECS A I page is displayed has no effect D FUEL Button This button selects the fuel system page for display on the MFD When first pushed the box around the previously selected system name and itsrespective system page are removed a RESET label is displayed above the FUEL label the FUEL label is boxed in white and the fuel system page is displayed Subsequently pushing the FUEL button arm...

Page 51: ...ted system name and its respective system page are removed the menu label ELECT is boxed in white and the electrical system page is displayed Subsequently pushing the ELECT button while the ELECT page is displayed has no effect MFD MENU Pushing the MFD button from the main menu shown in figure 4 8 selects the multifunction display menu shown in figure 4 9 or 4 10 AD 50899 Main Menu MFD Button Figu...

Page 52: ...PEEDS submenu shown in figure 4 11 AD 50896 VSPEEDS Submenu Figure 4 11 RTN BUTTON This button returns the speeds submenu to the main menu If a system page is being displayed at the time the RTN button is pushed the system page remains displayed V1 BUTTON The V1 button is used to select and set the V1 takeoff reference speed When the button is pushed for the first time after power up the cyan dash...

Page 53: ... set The selected AP speed is displayed in green NOTE Typically for landing VREF is entered as the value for AP SET BUTTON The pilot uses the SET knob to change the VSPEEDS when the two white boxes are present NOTES 1 For the VSPEEDS on power up three cyan dashes are displayed under the VSPEED labels 2 All labels and boxes are white 3 When the button is pushed for the first time after power up the...

Page 54: ...ly installed if an FMS is installed RTN RETURN BUTTON This button returns the joystick submenu to the main menu If a system page is being displayed when the RTN button is pushed the system page remains displayed SKP SKIP BUTTON Push the SKP button to skip the designator s home position to the next displayed waypoint When SKP is pushed with the designator at the last displayed waypoint the designat...

Page 55: ...a requested waypoint NOTE How the FMS displays the transmitted waypoint depends on the FMS type and installation M P RNG KNOB The map plan range knob is used to change the range scale when in either the map or plan display mode D NAV APT Button This button selects the combination of VOR DME navigation names and airport names for display Power up default is with neither selected Pushing the button ...

Page 56: ...other MFD and therefore cannot be selected on that MFD 2 When the checklist display is selected for the first time after power up the checklist disclaimer page is shown Push PAG to go to the master index of procedures 3 Normal procedures emergency procedures abnormal procedures and waypoint listing indices as available are selectable with the SKP skip button from the checklist menu first displayed...

Page 57: ...e button while on the last page moves the cursor to the first incomplete item or if none are incomplete the first item on the first checklist page D RCL Button The first push of the recall button moves the checklist cursor to the first incomplete item on the current list If the cursor is already on the first incomplete item the first push has no effect If all items on the current list are complete...

Page 58: ...button forces the active selection to be completed and advances the active selection to the next incomplete item If ENT is pushed with the active selection at the last item in a checklist the operation depends on the completion status of the checklist If the checklist is not complete one or more items skipped the system presents the page containing the lowest order incomplete item with the active ...

Page 59: ... removes the weather information WX on is annunciated by a white box NOTES 1 If the weather radar is off or not transmitting pushing the WX button has no effect 2 If the PLAN mode was being displayed when WX is pushed the display changes to the MAP mode 3 Weather radar selections are controlled from the weather radar controller MAP range is also controlled by the weather radar controller when weat...

Page 60: ...ats Power up default is MAP Repeated pushes of the button cycles from MAP to PLAN and back The selection is annunciated by a white box drawn around the selected display NOTE If WX is selected selecting the PLAN format turns the weather display off When MAP is reselected the weather display is turned back on if it has not been deselected AD 50908 MAP Plan Selection From Main Menu Figure 4 16 ...

Page 61: ...radar controller D GSPD TTG Groundspeed Time To Go Button Normally the HSI displays GSPD that is computed from the selected navigation source The GSPD TTG button toggles between groundspeed and TTG to the next waypoint or selected navaid D ET Elapsed Time Button When the ET button is pushed groundspeed or time to go is replaced with ET Pushing this button starts stops and resets the digital displa...

Page 62: ... set RA minimum altitude setting outer knob and to run the TEST function inner button When the TEST button is pushed the on side PFD and MFD enter the test mode In the test mode flags and cautions are displayed along with a check of the radio altimeter The EICAS also displays a test pattern when the integrated avionics computer IAC that is driving the EICAS page is in test Normally this is the lef...

Page 63: ...rols the onside course pointer when the NAV VOR LOC is the selected navigation source Additional information on the guidance controller is given in Section 6 Flight Guidance System FGS AD 50911 Guidance Controller Figure 4 18 When the center button in the HDG or CRS knob is pushed and released the EFIS performs a synchronization as described below D HDG Sync The heading bug centers under the compa...

Page 64: ...e system enters the initiated test mode Refer to Section 9 Troubleshooting for information about initiated testing EFIS SELF TEST D PFD Display Test Results The EFIS test isonlyfunctional when the aircraft ison the ground The radio altimeter test isfunctional at all timesexcept during GS CAP TRK Course select heading select RA set distance and GSPD TTG digital displays are replaced with amber dash...

Page 65: ...list weather displays are removed CHK EICAS message is displayed System pages digital displays and analog scales are invalid D EICAS Display Test Results Engine displays invalid Flaps and pitch trim invalid Fuel invalid Various engine annunciators invalid SWITCHING TEST Check each switch function on the DC Switching should operate as described in the EFIS preflight test INSTRUMENT TEST Perform nor...

Page 66: ...e PFD displays mode annunciations from the flight guidance system FGS HSI source selection and comparison monitor functions D ADI Attitude Director Indicator Display The ADI symbols use a truncated sphere format to display standard attitude information The attitude display receives its inputs from the AHRS When either the pitch or roll data becomes invalid all scale markings are removed the attitu...

Page 67: ...right hand corner of the mode annunciation area above the ADI Armed modes are displayed in white characters and captured modes are displayed in green characters In addition a white box surrounds a captured mode annunciation for 7 seconds after the capture logic is satisfied NOTE The annunciated flight director modes on both PFDs are the result of the flight director mode selections on the guidance...

Page 68: ...PRIMUSr1000 Integrated Avionics System A28 1146 112 00 Electronic Flight Instrument System EFIS 4 27 4 28 blank IAS RA LOC ALT HDG ILS ATT ADI and Annunciation Display Figure 4 20 ...

Page 69: ...e is linear with white markings at 10 20 30 45 and 60 of roll The 30 mark is highlighted with a double stroke tick mark A triangle marks 45 of roll The sky pointer is filled in and protected The roll pointer is also filled in and it points to the value of roll D Pitch Scale The pitch scale tape not shown consists of the white scale markings listed in table 4 5 Up Down 10_ 10_ 20_ 20_ 30_ 30_ 40_ 4...

Page 70: ...e Normally command bars are displayed on each PFD The on side PFD displays the information for the respective IAC to compute steering for the command bars Command bar display can be either single cue or cross pointer NOTES 1 The command bar display single cue or cross pointer isselected at the time of installation 2 If the FD1 FD2 switches are selected command bars are normally displayed on both P...

Page 71: ...d roll altitudes are displayed as the relationship between the aircraft symbol and the ADI sphere The aircraft is flown to align the command cue to the symbol to satisfy FD commands D Low Bank Arc When BNK is selected on the guidance controller a 14 green roll arc is displayed on the ADI roll scale D Flight Director Couple Arrow A green arrow is displayed above the ADI to indicate which PFD is cou...

Page 72: ...onnect YD 5 second flash Amber Abnormal YD Disconnect YD 5 second steady Amber Normal AP disconnect AP 5 second flash Amber Abnormal AP disconnect AP YD 5 second flash then steady Red Normal AP disconnect in CAT 2 AP 5 second flash Red Touch Control Steering TCS Steady while TCS button is held White Turn Knob Out of Detent TKNB Steady Amber Autopilot Status Annunciations Table 4 7 D Vertical Track...

Page 73: ...ion Height Set Data The RA set data is located in the lower right corner of the attitude director indicator ADI The range for radio altitude set is0 to 999 feet The minimum altitude value can be set within 10 feet above 200 feet above ground level AGL and within 5 feet below that value Above 999 feet AGL the set data is removed D Radio Altitude Display The radio altitude is displayed as a green di...

Page 74: ...econds if the current acceleration is maintained D Symbol Generator SG Source When an SG reversion mode SG1 or SG2 is selected on the system reversionary controller the source is annunciated in the upper left corner on both PFDs An amber SG1 indicates the No 1 symbol generator pilot s side is driving all five displays An amber SG2 indicates No 2 SG copilot s side is driving the displays NOTE As a ...

Page 75: ... conditions for a CAT2 approach are present and the excessive ILS deviation monitors are active on the PFD The symbol generator activates the CAT2 mode annunciator on the PFDswhenever APR approach mode is selected and the following criteria are satisfied The DC RA set data must be set to between 200 and 100 feet and both radio altimeters must be valid and indicating greater than 1000 feet Independ...

Page 76: ...other hand if CAT2 conditions were met but then lost CAT1 flashes for 5 seconds and goes on steadily D CAT2 Deviation Scale and Pointer When the CAT2 mode annunciation is displayed as shown in figure 4 21 the ILS excessive deviation monitors are active If the localizer deviation exceedsthe CAT2 window requirementswith radio altitude lessthan 500 feet the deviation pointer and scale are changed fro...

Page 77: ... D Navigation NAV Source Annunciations The selected NAV source for display on the course deviation indicator CDI is transmitted from the on side DC If the on side controller is invalid the SG reverts to on side primary NAV i e pilot VOR1 copilot VOR2 The annunciation of NAV source is displayed in the upper left corner of the HSI area D Heading Select Bug With Digital Display The cyan heading bug r...

Page 78: ...splay The pointers rotate around the compass display center in the same way as the course pointer Bearing pointer source selections come from the on side display controller If the on side DC fails the default sources are VOR1 on circle pilot s and VOR2 on diamond copilot s The annunciation for the bearing pointers is displayed in the lower left hand corner of the HSI area The annunciation color ma...

Page 79: ... center of the arc heading display With a short range NAV selected the course pointer is positioned by rotating the course knob located on the GC When the flight management system FMS is selected the course select data is generated by the FMS desired track input The course pointer data is located in the upper left hand corner of the HSI region If short range NAV has been selected the label is CRS ...

Page 80: ...r NOTE If the optional FMS is installed and selected and the FMS is operating in the approach mode full scale deflection is 0 3 nautical miles NM The TO FROM indicator is displayed as a white arrow in front of the aircraft TO or behind the aircraft FROM A TO indication is displayed aslong asthe selected course pointer is within 90_ of the selected NAV source bearing D Wind Vector Available if FMS ...

Page 81: ...WAYPOINT DME HOLD WEATHER RADAR MODES AND TILT ANGLE ANNUNCIATION WEATHER RADAR TGT VAR ANNUNCIATIONS RANGE RING VALUE WEATHER RETURN FMS MSG ANNUNCIATION INTEG WPT DR DGR ALERT TERM APP SXTK AMBER CYAN OFFSCALE ARROW FMS HEADING FHDG HEADING SOURCE ANNUNCIATION HSI Arc Display With FMS Map and Weather Radar Figure 4 23 D Heading Source Annunciations When the cross side heading source is selected ...

Page 82: ...ciator Enter the terminal area TERM Steady annunciator Approach and Terminal Annunciators Table 4 12 D Weather Returns Weather radar returns can be displayed to show the location of weather cells in relation to the range and direction from the aircraft D Weather Radar Range Ring Value The half range ring and value are controlled by the weather radar controller Normal range can be selected between ...

Page 83: ...0 Green Option RCT and Turbulence R T P880 Green Option Groundmap Mode GMAP Green Flight Plan Mode FPLN Green R T Fail FAIL Amber Note 2 R T Off OFF Green Transmitting but not selected for display TX Note 3 Amber NOTES 1 When weather radar is invalid WX is displayed in amber 2 When on the ground and the weather test display is selected failures of the weather radar are indicated by fault codes in ...

Page 84: ...r compass ring to indicate the shortest direction to its location D DME Hold The distance displayisshown to the left of thecompass display The valuesfor distance shown in table 4 14 depend on the selected navigation source Selected Source Distance Range NM DME 0 409 5 FMS 0 4095 Selected Source Distance Range Table 4 14 NOTE When DME distance is selected to HOLD an amber H is placed after the dist...

Page 85: ...TOR TAKEOFF VSPEED SET DISPLAY 2 135 2 125 R 120 1 AIRSPEED BUG DIGITAL DISPLAY ROLLING AIRSPEED DIGITAL DISPLAY MACH DISPLAY IAS ANALOG SCALE Airspeed Display Figure 4 24 D VMO Overspeed Bar The Vmo is a fixed red bar originating at VMO and extending to the scale s end This bar is located along the right side of the airspeed scale D Airspeed Mach Reference Bug and Display Using the guidance contr...

Page 86: ... the present trend is maintained D Indicated Airspeed IAS Analog Scale The airspeed tape is a moving scale display with fixed pointer and calibrated airspeed marks The white scale markings on the tape are in 10 knot increments The scale digits move such that larger numbers come from the top of the display The scale and its markings are white D VSPEED Set Bugs In addition to the airspeed bug VSPEED...

Page 87: ...resent Mach number and is shown below the airspeed tape The color of the digits always agrees with the digital airspeed display Mach speed is displayed when the airspeed increases beyond 0 45M and is removed when airspeed drops below 0 40M D Airspeed Rolling Digit Display A rolling digit displayof the actual current IAS value is contained within the display window This data is a magnification of t...

Page 88: ...nunciations described in the paragraphs that follow BAROMETRIC ALTIMETER DISPLAY IN HPA INCHES Hg HECTOR PASCALS AD 50919 R2 14500 29 92 IN 00 20 80 14500 143 14000 00 20 80 4500 43 5000 29 92 IN ALTITUDE ALERT PRESELECT DISPLAY CURRENT ALTITUDE DIGITAL DISPLAY LOW ALTITUDE AWARENESS SYMBOL ALTITUDE SELECT BUG ALTITUDE TREND VECTOR ALTITUDE ANALOG SCALE ALTITUDE REFERENCE LINE Altimeter Display Fi...

Page 89: ...feet from the select altitude after capture D Altitude Digital Display A digital display of the actual altitude value iscontained in the display window This data is a magnification of the digits on the scale and is readable to within a 20 foot resolution The digits within the pointer are green Below 10 000 feet boxed hash marks are used to show that the ten thousand foot digit is missing D Baromet...

Page 90: ... altitude trend vector D Altitude Trend Vector The altitude trend vector originates at the altitude reference line The trend vector is a magenta thermometer shape that corresponds to altitude increase or decrease rate and moves along the left side of the altitude tape The tip of the vector indicates the altitude that will be reached at the present rate in six seconds Altitude rate is output from t...

Page 91: ...ALE AMBER TCAS TEST TCAS OFF TA ONLY Vertical Speed Display Figure 4 26 D Flight Director VS Target Display and Bug Engaging the vertical speed mode brings the VS target bug into view The VS target bug moves along the right side of the VS scale The bug lines up with the value on the VS scale that is set with the guidance controller The bug is always cyan The digital readout of the target is displa...

Page 92: ...minute the digital display is removed At values beyond 500 feet per minute the digital value of vertical speed is displayed For vertical speeds greater than 3500 feet per minute the pointer is positioned in the appropriate direction near the end of the scale The digital display shows the actual vertical speed value D Vertical Speed Analog Scale The VS scale is a fixed scale with a moving pointer T...

Page 93: ...ilities they are intended to represent common presentations TAKEOFF TO MODE The aircraft has started the takeoff roll as shown in figure 4 27 TO and HDG modes have been selected The VSPEEDS are set to V1 119 VR 124 V2 132 the preselected altitude is 7000 feet mean sea level MSL and the radio altitude is 5 The roll attitude is level while the flight director cue is displaying the wings level 12_ no...

Page 94: ...old modes as shown in figure 4 28 The AP and YD are engaged Altitude select is armed and the amber altitude preselect digits indicate that the aircraft is between 1000 and 250 feet from the 7000 foot selected altitude Vertical speed is 1500 feet per minute The altitude trend vector indicates climb Flight director commands are satisfied 30 30 30 30 AD 50922 R1 Climb to Initial Altitude Figure 4 28 ...

Page 95: ...S ENROUTE CRUISE The aircraft is in straight and level flight on a preselected altitude of 31 000 feet flying HDG select and ALT hold with VOR armed for capture as shown in figure 4 29 AP and YD are engaged Airspeed is 220 knots which is 0 70 Mach AD 50923 R2 30 30 30 30 M Enroute Cruise Figure 4 29 ...

Page 96: ...nd vertical speed VS while armed for localizer LOC and glideslope GS capture as shown in figure 4 30 The glideslope and localizer displays are in view The amber ASEL digits and box indicate the aircraft is in excess of 1000 feet above the approach fixof 4000 feet Currentlythe aircraft is flying at 180 knots 5000 30 30 30 30 Setup for Approach Figure 4 30 ...

Page 97: ...erminal area flying the heading select mode with the LOC and GS armed Altitude ALT hold is on as shown in figure 4 31 A TCAS descent resolution advisory is displayed on the vertical speed scale The aircraft is in a descent to satisfy the command AP is disengaged 30 30 30 30 TCAS II Resolution Advisory Approaching the Glideslope Figure 4 31 ...

Page 98: ... setup on final approach with LOC and GS captured as shown in figure 4 32 The radio altitude of 100 feet is below the 200 foot minimum altitude therefore the amber MIN is boxed The rising brown in the altimeter is 100 feet away from the altitude reference line VAPP is set for 130 knots 1500 30 30 30 30 M Approach Capture Tracking at RA Minimums Figure 4 32 ...

Page 99: ...RISON MONITORING The amber comparison monitor annunciators shown in figure 4 33 are in various locations on the PFD Active messages are cleared when the miscompare situation has been corrected Comparison monitor parameters are given in table 4 17 I A S AD 50914 R1 Comparison Monitor Annunciators Figure 4 33 ...

Page 100: ...deviation 50 µA 1 2 dot below 1200 feet AGL Instrument Landing System ILS Active when both LOC and GS comparators are already tripped Radio Altimeter RA 1 8 x RA1 RA2 10 feet 2 CAS MSG Annunciated when there is a miscompare between the symbol generators and the processing of the EICAS CAS messages Comparison Monitor Parameters Table 4 17 NOTE The comparison is made when the pilot and copilot have ...

Page 101: ...rce that attitude source is annunciated in amber on both PFDs D Common Symbol Generator When the reversionary mode and one symbol generator is driving both pilot s and copilot s displays a reversionary warning is given in amber that indicates the information source This annunciation is displayed next to the upper left corner next to the sphere and reads SG1 or SG2 depending on whether the pilot s ...

Page 102: ...ilure In the event of a failure of the radio altimeter an amber RA replaces the digital radio altitude value D Vertical Deviation Failure An invalid condition or failure of the radio source driving the vertical navigation scale is shown by removing the deviation pointer and displaying a red X through the scale deviation dots as shown in figure 4 35 The scale and pointer are removed for invalid FMS...

Page 103: ...Status Annunciations These annunciations display the engage status of the autopilot The annunciation is displayed above and left of center of the attitude sphere Refer to table 4 3 for annunciations and colors D Yaw Damper Status Annunciations Displays the engage status of the yaw damper The annunciation is displayed above and right of center of the attitude sphere Refer to table 4 18 for annuncia...

Page 104: ... off TA ONLY White Traffic advisory only TCAS FAIL Amber TCAS system failed RA FAIL Amber Resolution advisory failure TCAS Failure Annunciations Table 4 19 D Maximum Minimum Speed MAX MIN SPD MAX MIN SPD is displayed to the left of the ADI MIN SPD is displayed when in the VS IAS modes and the indicated airspeed IAS drops below 80 knots MAX SPD is displayed anytime IAS exceeds Vmo Mmo D Windshear A...

Page 105: ...l data is indicated by removing the pitch scale markings turning the entire attitude sphere to cyan and displaying a red ATT FAIL in the top center of the attitude sphere D Micro Air Data Computer MADC Failures In the case of the IAS and altitude scales data is removed from the current value pointer the scale markings are removed and a red X is drawn through the scale The digital Mach CAS display ...

Page 106: ...g bug is removed from the display This indication is also given in the event of an invalid heading display EXCESSIVE ATTITUDE DECLUTTER The excessive attitude declutter display shown in figure 4 37 is decluttered when an unusual attitude condition is displayed The unusual attitude conditions anyone of which causes declutter are defined in table 4 20 10 10 20 20 30 30 AD 50932 R1 Excessive Attitude...

Page 107: ... and annunciator D ADI localizer scale D Speed bugs and readout D Radio altitude display D Altitude select airspeed display and vertical speed bug data D All flags and comparators except ATT and ADC IAS ALT D Low bank annunciator D RA set digits NOTE Declutter mode is inhibited when windshear flight director mode is engaged PFD TEST MODE This test can be initiated with the DC when airspeed is vali...

Page 108: ... two major format areas D MFD Map D MFD Plan In either of these formats a window area can display any of the following selection D System Displays NOTE One of several system displays is shown in the lower part of the MFD but not when weather TCAS or the checklist display is displayed D Checklist D TCAS D Central maintenance computer display only when the aircraft is on the ground ...

Page 109: ...E The symbols related to navigation are available on the MFD only if the optional FMS is installed MFD COMMON SYMBOLS Figure 4 39 shows MFD common navigation symbols VOR DME DME VOR AIRPORT TOC TOD WAYPOINT NDB AD 50933 MFD Common Symbols Figure 4 39 D Upper Right Area TRUE AIRSPEED TAS TAS is output from the MADC and is displayed in green digits STATIC AIR TEMPERATURE SAT SAT is output from the M...

Page 110: ...AR MODE ANNUNCIATIONS All modes except weather radar range are annunciated in thisarea as described in table 4 21 Weather Radar Mode Mode Annunciation Annunciation Color R T in Warm up WAIT Green REACT Mode RCT Green Forced Standby FSBY Green Standby STBY Green Test Mode TEST Green Weather Mode WX Green Weather and Turbulence WX T Green Groundmap Mode GMAP Green Flight Plan Mode FPLN Green R T Fai...

Page 111: ... the TEST mode is selected RADAR TILT Radar tilt isdisplayed in the form of a cyannumber with up or down sign If attitude compensated tilt part of the optional PRIMUSâ 880 Weather Radar only is engaged an A is displayed in this location TARGET ALERT TGT TGT alert isshown above the tilt angle It overrides the display of variable gain When armed TGT is displayed in green When activated TGT turns amb...

Page 112: ...AY HEADING REFERENCE LINE NOTE THE NORMAL MAG ON SIDE HEADING SOURCE IS NOT ANNUNCIATED HEADING SELECT BUG PILOT DESIGNATOR NAVIGATION SYMBOLS MFD Map Display Symbols Figure 4 40 D Heading Reference Line The heading reference line points to the current heading digitally displayed above it on the compass rose D Heading Display The displayed compass rose consists of an expanded 120_arc that is divid...

Page 113: ...nge distance The half range ring is changed to an arc when a vertical profile is displayed NOTE When weather radar data isdisplayed the radar controller is used to control the range D Aircraft Symbol The white aircraft symbol is a visual cue to aircraft position relative to actual heading and selected heading D FMS Lateral Deviation Digital Display Lateral deviation is shown as a combination digit...

Page 114: ...he map and plan MFD displays use common navigation symbols to describe flight plans WEATHER Weather information from the radar isdisplayed onlyon the mapformat as shown in figure 4 41 whenever the radar controller has been turned on and weather hasbeen selected for displaywith theMFD bezel menu Activating the TEST WX or GMAP modes with the aircraft on the ground and the plan mode displayed on the ...

Page 115: ...display D Heading Failure and Flags Failure of the displayed heading from the AHRS is shown by removing the flight plan from the display The digital heading readout is replaced by amber dashes As shown in figure 4 42 a red HDG FAIL label is displayed below the lubber line NOTE When the EFIS test is selected HDG FAIL is replaced with HDG TEST D MADC Failures MADC failures are indicated by replacing...

Page 116: ...r system fault codes to be displayed in amber in place of the digital tilt data Refer to the PRIMUSR 880 Digital Weather Radar System s System Description and Installation Manual Pub No A09 3944 001 for interpretation of fault codes TYPICAL MAP MODE PRESENTATIONS Figure 4 43 shows a typical map mode without weather display Figure 4 44 shows a typical map mode with weather displayed NOTE A system d...

Page 117: ...o true north A range ring showing the selected display range is centered around the active waypoint In the plan mode the aircraft symbol is always located at present position in referenced to present heading In addition to MFD symbols described under MFD common symbols this section details unique plan mode symbols The plan mode consists of the following functions D True north up map presentation D...

Page 118: ...mine the position of the active flight plan parameters The circle radius corresponds to the selected range D North Up Arrow The north up arrow is permanently displayed in the plan mode to indicate the mode s north up reference D Pilot Designator The MFD JSTK submenu functions and the remote mounted joystick still function with the designator However the primary use of the joystick and designator i...

Page 119: ...re 4 46 D MADC Failures When the MADC fails the SAT TAS and TAT numerical values are replaced with amber dashes D Heading Failures and Flags Failure of the displayed heading is shown by removing the active flight plan and wind display and placing a red HDG FAIL at the top center of the plan range ring NOTE When EFIS TEST is selected HDG FAIL is replaced with HDG TEST D WX Weather Radar Failure Wea...

Page 120: ... plan mode display S 12 6 21 3 TAS AD 50941 R1 Typical Plan Mode With Navaid Components and Flight Plan Figure 4 47 CHANGING A WAYPOINT Adding a waypoint is a routine operation on the MFD Table 4 22 describes the procedure to change a waypoint The procedure inserts a new waypoint between DRK1 and LL03 The MAP display is normally used to define a new waypoint ...

Page 121: ...as shown in the display below S 15 E 6 21 3 2 Use the ENT bezel button from the JSTK submenu to send the new waypoint designated position to the FMS control display unit When entered the display appears as shown in the display below S 12 6 21 3 3 Enter a new waypoint into the FMS NOTE The degree to which the new waypoint can be combined with the existing FMS flight plan depends on the installed FM...

Page 122: ...g 400 pages of text These pages are stored in electronically programmable memory as defined by the aircraft operator Page composition is 12 lines with a maximum of 24 characters per line All text is stroke written for sunlight readability NOTES 1 The checklist is stored in both IACs Cockpit mounted plugs are used to access each IAC 2 The checklist is generated by the operator using the operator s ...

Page 123: ...st index page that contains the lowest order incomplete and unskipped checklist with the active selection of that checklist The SKP LNBK RCL PAG and ENT menu selections control the checklists The emergency index on the master index enters the abnormal and emergency checklist display function When a selection is made an index arranged by aircraft system is displayed The crew can then select the lis...

Page 124: ... cleared when the master checklist is selected NOTE If the optional FMS is installed the remote mounted joystick can also be used to select checklist line entries and to move between pages TRAFFIC ALERT AND COLLISION AVOIDANCE SYSTEM TCAS The TCAS display is selected for display on the MFD map mode using the TCAS menu button on the MFD bezel controller The TCAS display shown in figure 4 49 has the...

Page 125: ...hen the selected TCAS range is lessthan 20 NM the 2 NM range ring is displayed At ranges greater than 20 NM the range ring is removed The TCAS display shows a mid range ring 2 TCAS range is controlled with the RMU controller D Traffic Symbols Other traffic diamond hollow blue Proximate traffic diamond blue Caution area traffic advisory circle amber Warning area resolution advisory square red D TCA...

Page 126: ...ratures anti ice system status and engine oil quantity levels In addition a synoptic of aircraft door status is displayed D Environmental Control Anti Ice System ECS A I The ECS A I display is a synopticdisplay of cabin and cockpit temperatures oxygen pressure and engine bleed air temperatures for anti ice purposes D FUEL The FUEL display is a synoptic display of aircraft fuel quantity fuel used f...

Page 127: ...ormally the quantity is green When the quantity drops to 5 quarts and below the digits are boxed and displayed in amber Once the aircraft is airborne the oil level is removed D Anti Ice REF A ICE Status Annunciation The REF A ICE indicates the current state of the bleed air anti ice system The annunciation indicates either ON or OFF D Reference T O Temperature REF TO TEMP The pilot can enter a ref...

Page 128: ...Mode Logic Table 4 23 D Engine T O Status Arrow This arrow moves up and down the three categories T O MODE REF TO TEMP and REF A ICE to indicate a valid status condition In the case of REF A ICE ON is the valid condition ENVIRONMENTAL CONTROL SYSTEM ANTI ICE ECS A I The ECS display shown in figure 4 51 displays the following information AD 50948 C Environmental Control System ECS System Display Fi...

Page 129: ...g scale and digital display are shown Color Lower Limit Upper Limit Red 250 Amber 250 410 Green 410 2080 NOTE When the pressure range is displayed in amber or red the digits are boxed in that color Oxygen Pressure Limits in PSI Table 4 24 D Engine Output Bleed Air Temperature Anti Ice An analog scale display the left and right engine bleed air temperature being supplied to the ECS The color of the...

Page 130: ...n AD 50949 Fuel Page Figure 4 52 D Tank Fuel Quantity Left and right tank fuel quantity is shown by an analog scale and pointer with a digital readout Fuel quantity can be displayed in pounds lb or kilograms kg The range of values and their color coding are described in table 4 26 Color Lb Range Kg Range Red Less than 620 lb Less than 280 kg Amber 630 880 lb 290 400 kg Green More than 890 lb More ...

Page 131: ...el Quantity Total fuel quantity is computed from the sum of the fuel in the left and right fuel tanks D Fuel Used Fuel used is determined by periodically evaluating fuel flow rate and calculating the amount of fuel used for each engineand maintaining a running total APU fuel consumption is also added to the total D Fuel Tank Temperature Wing tank fuel temperature is shown in green digits the range...

Page 132: ...em Page Figure 4 53 D HYD Pressure and Fluid Quantity The hydraulic pressure and fluid quantity limits for both systems are given in table 4 27 Color Pressure in PSI Quantity in Qts Amber low Less than 1200 Less than 1 Green 1201 3300 1 1 minimum Amber high Greater than 3300 NOTE When the status of the hydraulic pressure enters the amber re gion the digital value is boxed flashes for 5 seconds and...

Page 133: ...cales that act as a monitor reference The pointer and scale are green and remains green until the pointer enters the yellow region The color changes according to limits in table 4 28 Color Range Green Less than 200 C Amber More than 200 C Brake Temperature Limits Table 4 28 ELECTRICAL ELEC SYSTEM The electrical system display shown in figure 4 54 shows the dc electrical block diagram Bus voltage a...

Page 134: ...rces exceedances only occurs when an electrical power system message is displayed on the CAS 3 Failure of an interconnect busis indicated by a solid amber line 4 The GPU power display does not include an amperage load indication 5 APU data is displayed under the following circumstances APU master is ON APU turbine speed is greater than 10 6 GPU data is only displayed with weight on wheels WOW D Ba...

Page 135: ...D Red X on the EICAS Red X on both the pilot s PFD MFD and EICAS To recover from this failure push the SG button The NO 2 SG No 2 DGC now drives all five DUs D EFIS 2 Copilot Normal Failure A failure of the SG in DGC 2 displays a red X on the copilot s PFD and the MFD To recover from this failure push the SG on the copilot s reversionary control panel When this is done the No 1 SG No 1 DGC drives ...

Page 136: ...PFD and the MFD sources for this condition are the same as described under the Pilot DC Fails and Copilot DC Fails paragraphs Standby Navigation Display Either radio management unit RMU can be selected to display certain navigation data in an HSI arc format The RMU operation is described in Honeywell Pub No A28 1146 050 This section details the use of the RMU for the standby navigation display rol...

Page 137: ... The standby navigation display shown in figure 4 55 displays a typical enroute VOR course with the ADF and VOR bearing pointers in view AD 50953 Standby Navigation Display Typical Figure 4 55 The paragraphs that follow detail specific symbols Refer to figure 4 56 for an RMU backup navigation display ...

Page 138: ...y Display The VOR ILS tuned frequencyisshown in the upper left and the ADF frequency isshown in the upper right of the display both are white When the RMU line select key adjacent to the respective window is pushed that frequency is enclosed in the RMU yellow tuning box The tune knob is used to select the desired frequency D Digital Heading This is the digital value of the current heading D f VOR ...

Page 139: ...bearing readout and bearing label are removed The valid glideslope pointer is shown in green D Lateral Deviation Scale The lateral devaition scale is the standard four dot scale that indicates the amout of left or right deviation from the aircraft course see the course pointer below D DME Distance DME distance to the selected VOR or ILS isshown in green digits in the lower right corner D Marker Be...

Page 140: ...se Pointer With Display A green course arrow is displayed A digital readout in green of the selected course is shown in the lower left corner When the RMU line select key next to the course readout is pushed it is boxed in yellow The RMU tune knob is used to select a new course The inner knob selects1_ changes the other knob selects 10_changes NOTE The yellow tune box returns to the course window ...

Page 141: ...PRIMUSr1000 Integrated Avionics System A28 1146 112 00 4 101 4 102 blank Electronic Flight Instrument System EFIS AD 50955 RMU Backup Navigation Display With Failures Figure 4 57 ...

Page 142: ...AS Bezel Controller 1 D Electronic Flight Instrument System EFIS Reversionary Control Panels 2 D EICAS Display Reversionary Panel 1 D Backup EICAS Display on the Radio Management Units RMUs D External Master Warning Red and Master Caution Amber Lamps and Switches The EICAS is an integrated digital computer display system that replaces the majority of the traditional gauges and warning lights scatt...

Page 143: ...PRIMUSr1000 Integrated Avionics System A28 1146 112 00 Engine Instrument and Crew Alerting System EICAS 5 3 5 4 blank AD 50956 R1 S TAS NM S TAS NM EICAS Block Diagram Figure 5 1 ...

Page 144: ...ing and Caution Annunciation Switches The master caution and warning annunciation switches are located on the glare shield adjacent to the display controllers DC These switches shown in figure 5 3 are used to acknowledge the display of a warning or caution message The messages are shown on the EICAS display AD 50958 Master Warning and Caution Annunciation Switches Figure 5 3 The display of a warni...

Page 145: ...ional areas as shown in figure 5 4 The areas include the following D Primary Engine Display D Crew Alerting System D Gear Flaps Spoiler D Cabin Pressurization and Auxiliary Power Unit APU Status D Pitch Roll Yaw Trim Display PRIMARY ENGINE DISPLAYS CREW ALERTING SYSTEM GEAR FLAPS SPOILER CABIN PRESSURIZATION AND APU STATUS PITCH ROLL YAW TRIM DISPLAY AD 50959 R1 EICAS Display Functional Divisions ...

Page 146: ...uel quantity FUEL lbs or kg L R D Oil pressure temperature OIL PRESS OIL TEMP D Engine vibration for low pressure LP and high pressure HP Some engine warning and status messages are also displayed N1 ITT OIL PRESS TEMP and VIB LP HP are gauges N2 OIL fuel flow and fuel quantity are only digital readouts The round engine gauges are a fixed arc with moving pointer and digital current value window lo...

Page 147: ... and Crew Alerting System EICAS 5 8 D Annunciations are as follows Ignition IGN Thrust reverser display status Thrust rating mode Full authority digital engine control FADEC status Engine auxiliary power reserve ATTCS PSI AD 50960 EICAS Engine Instruments Display Figure 5 5 ...

Page 148: ...of rotation speed Display values range from 0 to 110 in 0 1 increments NOTE The digital readout can indicate as high as 199 9 N1 D N1 Request Bug The N1 request bug is displayed as a solid green triangle The bug indicates the throttle position as set by the pilot D FADEC N1 Bug and Digital Target The FADEC N1 bug and digital target are shown as a cyan T shaped symbol that indicates the thrust targ...

Page 149: ...e 3 R MODE Reversion Mode NOTE At the time of publication of this manual not all FADEC modes were activated FADEC Modes of Operation Table 5 2 D FADEC in Control The FADEC in control is annunciated as an A or B next to the N1 display It indicates which FADEC is controlling the engine D Automatic Takeoff Thrust Control System ATTCS When the reserve takeoff power function is selected ATTCS is annunc...

Page 150: ...different ITT limits ITT Limits Table 5 3 The scale ranges from 0 to 1000 _ C The scale from 800 to 1000 _ C is twice the rest of the range In the red range the pointer and digital display change color A red tick mark indicates the beginning of the red range D ITT Digital Display Ranges from 0 to 1000_ C in 1 0 _ C increments ENGINE IGNITION IGN ANNUNCIATION Each engine s dual ignitors are monitor...

Page 151: ...lor Lower Limit RPM Upper Limit RPM Green 0 102 4 Red 102 5 120 0 NOTE When APR is selected the white region is only to 100 0 N2 Limits Table 5 5 OIL PRESSURE OIL PSI DISPLAY The analog and digital displays for oil pressure are shown in PSI Resolution is 1 PSI Color coding of the digits is listed in table 5 6 for N2 88 and table 5 7 for N2 88 Color Lower Limit PSI Upper Limit PSI Red 0 31 Green 32...

Page 152: ... be configured for KPH If KPH is selected the value range is 0 to 1820 KPH The display is labeled FF KPH FUEL QUANTITY FUEL LB DIGITAL DISPLAY Aircraft fuel quantity in pounds is shown in digital format for the left and right wing The displays read in 10 pound increments When each wing indication reaches 880 pounds or less the digits turns amber When each wing indicates 620 pounds or less the digi...

Page 153: ... the digits is listed in table 5 8 Color Lower Limit _ C Upper Limit _ C Amber 20 Green 21 126 Red 127 126 Oil Temperature Limits Table 5 8 ENGINE VIBRATION DISPLAY The engine vibration display is an analog scale that shows both the LP and HP turbine sections The scale and pointer are described in table 5 9 Condition Limit IPS Color LP HP Green Less than 1 8 1 1 Amber 1 9 and above 1 2 and above E...

Page 154: ...r handle does not agree with the landing gear itself the annunciation is amber 2 If the MFD reversionary switch is selected to EICAS the leading gear display is on the selected MFD display Landing Gear Position Annunciations Table 5 10 D Flap Position A digital display of the degrees of flap extension is shown The digitsrange from 0 to 47 full flaps Table 5 11defines the color logic for this displ...

Page 155: ...wn by a boxed annunciation Table 5 12 defines the color coding for the spoiler position Spoiler Position Annunciation Color Closed CLD White see note Open OPN Green see note NOTE When the following conditions exist the box and annunciation turn red Any spoilers switch sensed to be open Weight on wheels WOW Thrust lever angle 60 Spoiler Color Coding Table 5 12 PITCH ROLL YAW TRIM DISPLAY The aircra...

Page 156: ...ion B Weight on wheels WOW Trim out of takeoff range Trust lever angle 60 Amber Condition C Airborne Green NOTE Digits are also enclosed in a box of the same color Pitch Trim Color Description Table 5 13 D Roll Trim An analog roll trim scale displays the current roll trim The green trim arrow indicates the trim position An amber mistrim arrow is displayed when the autopilot is engaged and the aile...

Page 157: ...eds its limits the pressure differential digits turn amber in an amber box or red in a red box When cabin altitude exceeds 8100 feet the cabin altitude digits turn amber in an amber box WHen cabin altitude exceeds 10 000 feet the digits and box turn red The cabin altitude rate has a range of from 2000 feet per minute fpm to 2000 fpm in 50 foot increments It is displayed in green Cabin pressure dif...

Page 158: ...ine Instrument and Crew Alerting System EICAS Color Percentage of RPM Amber 95 Green 96 104 Amber 104 110 Red 111 APU Turbine Speed as a Percentage of RPM Table 5 15 Color Percentage of RPM Green 680 C Amber 681 C 717 C Red 718 C APU Exhaust Temperature Table 5 16 ...

Page 159: ...AU failure is indicated on the primary engine display by removing the data pointers from all the arc displays on the failed side The current value digits are replaced with amber dashes NOTE When a DAU fails all the CAS messages supplied by the DAU are removed until DAU REV is selected D Engine Sensor Interface Failure The failure indication of an individual sensor or interface is a subset of the D...

Page 160: ...is pushed Figure 5 7 shows the gear flaps spoiler display cabin pressurization and APU status display and pitch roll yaw trim displays The following green messages are shown master caution is not activated when the messages are caused by the TEST sequence REV IGN AB ATTCS AD 50962 Engine Instrument Display With Failures Figure 5 7 NOTES 1 The CAS display goes to its test format during TEST 2 If me...

Page 161: ... Master warning caution button acknowledgement of messages D CAS computed system messages The display shown in figure 5 8 is controlled from the No 1 symbol generator normally that receives warning caution and advisory signals from various subsystems in the aircraft The symbol generator processes these aircraft inputs including multiple combinations to determine which CAS message to display Some C...

Page 162: ... scrolled 2 No messages can be scrolled if any amber messages that are displayed have not been acknowledged through the caution annunciator 3 The END message cannot be scrolled off the display CAS Messages WARNING MESSAGES RED When a red message becomes active the following indications are given D Red message displayed flashing on the CAS display D Red WARN annunciator on the warning caution annun...

Page 163: ...ircraft is on the ground either engine thrust lever is at greater than 60 and any of the following conditions exist The parking brake is on Ground spoilers are deployed Pitch trim is greater than 4 or less than 8 Flaps are not at either 9 or 22 D ELEC ESS XFR FAIL The following combination triggers this message The L air ground switch indicates airborne and Either L or K essential bus contact indi...

Page 164: ...OVERHEAT A ICE SWITCH OFF AIL SYS 1 INOP AIL SYS 2 INOP AP AIL MISTRIM AP ELEV MISTRIM APU BLD VLV FAIL APU CNTOR CLSD APU EXTBTL INOP APU FAIL APU FIREDET FAIL APU FUEL LO PRESS APU FUEL SOV INOP APU GEN OFF BUS APU GEN OVLD APU OIL HI TEMP APU OIL LO PRESS AOA 1 HEAT INOP AOA 2 HEAT INOP AURAL WARN FAIL AUTO TRIM FAIL AUTOPILOT FAIL BAGGAGE DOOR OPN BATT 1 OFF BUS BATT 2 OFF BUS BKUP BATT OFF BU...

Page 165: ...INOP D HS VLV 1 FAIL HS VLV 2 FAIL HYD SYS 1 FAIL HYD SYS 1 OVHT HYD SYS 2 FAIL HYD SYS 2 OVHT IC 1 OVERHEAT IC 1 WOW INOP IC 2 OVERHEAT IC 2 WOW INOP IC BUS FAIL ICE DET 1 FAIL ICE DET 2 FAIL ICE DETECTORS FAIL ITT 1 LIMIT FAIL ITT 2 LIMIT FAIL LG AIR GND FAIL D NO ICE A ICE ON OXYGEN LO PRESS OVER WG ICE DET OVER WG ICE INOP PACK 1 OVHT PACK 1 OVLD PACK 1 VLV FAIL PACK 2 OVHT PACK 2 OVLD PACK 2 ...

Page 166: ... INOP This message is displayed when the aircraft is on the ground either engine s N2 is above 60 and the respective pitot status sensor indicates a failure or when the pitot status sensor is valid and either N2 is less than 50 D ENG 1 2 A ICE FAIL This message is displayed when the aircraft is on the ground either power lever is advanced and the anti ice switch engine bleed air pressure sensor or...

Page 167: ...caused the message is remedied The cyan advisory messages are listed in table 5 20 All cyan messages are inhibited for takeoff and landing AHRS1 BASIC MODE AHRS2 BASIC MODE APU FUEL SOV CLSD BLD 1 VLV CLSD BLD 2 VLV CLSD CHECKLIST MISMATCH CMC FAIL CROSS BLD OPEN DAU 1 B FAIL DAU 1 REVERSION DAU 2 B FAIL DAU 2 REVERSION DU 1 FAN FAIL DU 2 FAN FAIL DU 3 FAN FAIL DU 4 FAN FAIL DU 5 FAN FAIL E1 ADC D...

Page 168: ...ivate the inhibit function are described in table 5 21 all messages must be valid for inhibit to activate Condition Parameter Description Takeoff CAS Greater than V1 15 knots Takeoff L R WOW Valid Approach Radio Altimeter Less than 200 feet Conditions for Inhibit Function Table 5 21 CAS Display Failure Indications SYMBOL GENERATOR FAILURE Under normal conditions SG1 in the display guidance compute...

Page 169: ...versionary Modes LOSS OF THE DISPLAY UNIT Setting either pilot s reversionary control panel MFD knob to EICAS displays the EICAS on that side s MFD LOSS OF DISPLAY GUIDANCE COMPUTER DGC SYMBOL GENERATOR This is indicated by a red X on the EICAS display unit Pushing the pilot s SG button on the reversionary control panel selects the other symbol generator in DGC No 2 ...

Page 170: ...o the RMUs and both DAUs to ensure display and data availability If neither DGC is outputting the EICAS display format the No 1 RMU automatically displays the first of two EICAS pages NOTES 1 Manual or automatic selection of the RMU EICAS display allows access to the first of two pages Even if the second page is selected the first page is always displayed after 20 seconds of no RMU selections 2 Re...

Page 171: ... D N1 engine fan speed analog and digital display D Digital display of ITT interstage turbine temperature N2 turbine speed FF PPH fuel flow in pounds hr OIL P oil pressure OIL T oil temperature spoiler and flap positions AD 50965 R1 TUNE ITT N2 FF PPH OIL P OIL T 4 MSGS 490 96 7 910 195 145 520 95 0 850 250 145 PAGE 2 N1 99 9 102 5 MAX TO MAX TO Backup EICAS Display on RMU Page 1 Figure 5 10 ...

Page 172: ...play of FQ LB fuel quantity in pounds FLAPS flap position Landing gear down and locked EICAS messages AD 50966 MESSAGE LINE 3 MESSAGE LINE 4 MESSAGE LINE 5 MESSAGE LINE 6 MESSAGE LINE 7 PAGE 1 MESSAGE LINE 2 LG DOWN LOCKED 1200 FQ LB FLAPS 2100 22 TUNE Backup EICAS Display on RMU Page 2 Figure 5 11 NOTE When the installation is set to display weight in kilograms the fuel quantity on the RMU page 2...

Page 173: ... figure 5 12 for an illustration of the failure indicationsof the backup EICAS display D Failure of the RMU to display engine data is annunciated with ENGINE DATA UNAVAILABLE D N1 data failure is shown with a red X and removal of the pointer D Digital data failure is shown by amber dashes AD 50967 RMU Backup Engine Display Failure Indication Figure 5 12 ...

Page 174: ...select value Selected course value When the autopilot or yaw damper are selected they are annunciated on the GC and the primary flight display PFD When the flight director mode is selected they are also displayed on the GC and PFD In most cases when a button is pushed it is annunciated with a lighted green bar on the selected button Autopilot AP Yaw Damper YD Couple CPL Buttons D AP Button The AP ...

Page 175: ...ons particularly when the FD NAV mode is selected the command bars on each side may not show the capture of a navigation course at the same time This causes a split in the right and left command bars When the system is transferred to the cross side HSI all flight director modes are cancelled Operating modes must be reselected The pointer on the right or left side of the CPL button lightsto indicat...

Page 176: ...es the vertical navigation signals D ALT Altitude Button Pushing the ALT button commands the system to hold the current altitude D SPD Airspeed Button When the SPD button ispushed the pilot can use the SPD knob or touch control steering TCS function to select an airspeed value for the aircraft to hold during a climb or descent Pushing the SPD knob sets the speed reference in knots or Mach The valu...

Page 177: ... bars lights on the GC switches and in some cases by the flight director mode annunciations FD1 FD2 Switch Operation Table 6 1 D CRS Course Knob When the navigation mode is VOR LOC or BC the CRS knob is used to set the course on the PFD HSI When in VOR pushing the PUSH SYNC button on the CRS knob points the HSI scourse pointer to the VOR station with the coursedeviation centered D HDG Knob The HDG...

Page 178: ... Under normal conditions if the autopilot is engaged it remains engaged and the AFCS commands coupled go around minimum speed hold function for the command bars If only the flight director is available a fixed pitch of 8 nose up is commanded Autopilot Power Up Test When the autopilot is powered up it performs a self test on the servo circuits and the autopilot control and disconnect paths FGS Caut...

Page 179: ...d that the yaw damper has failed Amber Caution Flight Guidance System Messages Table 6 3 AUTOPILOT CONTROLLER The autopilot controller shown in figure 6 2 is used to manually control the autopilot through the PITCH wheel and TURN knob AD 50485 TURN P I T C H DESCEND CLIMB Autopilot Controller Figure 6 2 PITCH Wheel Rotating the PITCH wheel with the autopilot engaged changes the pitch attitude prop...

Page 180: ...nter position before the autopilot can be engaged Rotating the TURN knob out of detent commands a roll The roll angle is proportional to and in the direction of TURN knob rotation Rotating the TURN knob cancels any other previously selected flight director lateral mode When the knob is returned to the detent the heading hold mode is entered ...

Page 181: ...eral Beam Sensor LBS D Lateral Gain Programming D Localizer Back Course BC Track D Navigation On Course NOC D True Airspeed TAS Gain Programming D Vertical Beam Sensor VBS D VOR Capture CAP D VOR Over Station Sensor OSS D VOR After Over Station Sensor AOSS Attitude Director Indicator ADI Command Cue When a command signal is applied to the cue input the cue either crosspointer or single cue moves l...

Page 182: ...and Vertical Speed VS Function Gain programming starts after the VBS trips The gain is programmed as a function of RA and vertical speed VS If the radio altimeter is invalid gain programming occurs at GS CAP and is controlled as a function of VS TAS and time GS Capture CAP The following conditions are required for GS CAP D Glideslope is valid D Glideslope is armed D The localizer mode is captured ...

Page 183: ...gain programming is required to adjust for the aircraft closing on the localizer antenna and beam convergence caused by the directional properties of the localizer antenna In the localizer mode lateral gain programming is controlled by the change in radio altitude RA with the aircraft below 2400 feet RA when the RA is valid If the RA is not valid then gain programming starts as a function of the l...

Page 184: ...ds of elapsed time ET D The LBS has tripped VOR Over Station Sensor OSS The OSS is used to detect the erratic radio signal encountered in the area above the VOR transmitter When these radio signals reach a certain level of deviation they are no longer useful and the OSS eliminates them from the control signal OSS is computed when with DME valid a 30_VOR station zone of confusion is assumed and cal...

Page 185: ...g Hold Roll Control Limit Pitch Control Limit Roll Angle Limit Roll Rate Limit Pitch Angle Limit Roll Angle Limit Roll Rate Limit Roll Up to 45_ Pitch Up to 30_ 30_ 3_ sec 15_Pitch 30 sec 5 5_ sec Heading Select Heading Knob Roll Angle Limit Low Bank Roll Rate Limit 27_ 14_ 4 0_ sec VOR VORAPR or FMS Course Knob NAV Receiver DME Receiver FMS Capture Beam Angle Intercept HDG SEL Roll Angle Limit Ro...

Page 186: ...in Programming Up to 90_ 27 5_ 5 5_ sec Function of Beam Beam Rate and Course Error Max trip point 175 µA Min trip point 60 µA 17_roll 30_of course error Starts at 1200 ft radio altitude gain reduction 1 to 0 5 GS GS Receiver Air Data Computer and Radio Altimeter or MLS Receiver GS Capture Beam Capture Pitch Command Limit Path Damping Pitch Rate Limit Gain Programming First Stage Gain Programming ...

Page 187: ...tch Rate Limit see note 0 to 6 000 ft min 30 ft min 20_ f TAS 0 3 g s max SPD Hold FLC Micro Air Data Computer DGC for FLC SPD Engage Range SPD Hold Engage Error Pitch Limit Pitch Rate Limit 80 to 330 kts 2 knots 20_ f TAS ALT Preselect Micro Air Data Computer Altitude Preselect on MFD Preselect Capture Range Max VS for Capture Max Gravitational Force During Capture Maneuver Pitch Limit Pitch Rate...

Page 188: ...de Rate Preselect Altitude Baro Set Baro Set feet feet ft min feet inHg hPa 1000 to 60 000 1000 to 60 000 20 000 to 20 000 0 to 60 000 22 to 32 745 to 1083 5 Airspeed Mach Indicated Airspeed Mach Knots Mach 40 to 400 0 2 1 0 Vertical Airspeed Vertical Airspeed Vertical Speed Target ft min ft min 6600 to 6600 00 to 00 Air Data Display Parameters and Ranges Table 7 2 ...

Page 189: ... than 6_ When the three conditions are met the autopilot rolls the aircraft to a wings level attitude One second after the bank angle is less than 6_ the flight guidance system FGS uses the current heading as the heading hold reference The primary flight display PFD annunciates ROL in the lateral flight director mode annunciation position Figure 8 1 shows the autopilot AP and yaw damper YD on and ...

Page 190: ...ater than 6_ but less than 35_ and D The autopilot is engaged When the three conditions are met the autopilot maintains the established bankangle The touch control steering TCS button can be used while the bank angle is being adjusted A typical roll hold mode PFD is shown in figure 8 2 The ROL annunciation is shown in the PFD lateral flight director mode annunciation area during roll hold 30 30 30...

Page 191: ...same direction as the bug was originally moving Therefore if the bug is turned to the right 270 the aircraft turns to the right in a 270 turn instead of turning left 90 The the heading select mode is cancelled by any one of the following actions D Capture of any other lateral steering mode D Selection of symbol generator SG reversionary mode D Selection of go around GA D Placing TURN knob out of d...

Page 192: ...2 Tune the coupled side navigation receiver to the frequency of the VOR in use 3 Select NAV as the navigation source on the coupled side DC 4 Set the pointer on the coupled side HSI for the course to be flown 5 Set the heading bug on the HSI to the intercept heading for the selected course 6 Push the NAV button on the GC VOR Navigation Mode Engagement Procedure Table 8 1 When the aircraft isoutsid...

Page 193: ...MUSr1000 Integrated Avionics System A28 1146 112 00 8 5 Modes of Operation VOR Navigation Mode Radial Intercept View Figure 8 3 9500 30 30 30 30 NM AD 50970 R1 VOR Navigation Mode Intercept PFD Figure 8 4 ...

Page 194: ...ect error signal is established This signal represents the difference between the actual aircraft heading and the desired aircraft course The course error signal is then sent from the SG function to the flight control function in the IAC The radio signal is routed from the navigation receiver to the IAC The IAC lateral gain programs the signal in its flight control function The lateral gain progra...

Page 195: ...dio deviation and DME gain programming if available to track the VOR signal and to compensate for beam standoff in the presence of a crosswind The system automatically compensates for a crosswind of up to 45_ course error Figure 8 7 showsthe PFD displayin the tracking mode Cancel the VOR navigation mode with any one of the following actions D Push the NAV button on the GC D Select go around D Sele...

Page 196: ... radiates upward from the station in the shape of a truncated cone In thisarea the radio signal becomeshighlyerraticand it isbest to remove it from the roll command The over station sensors OSS monitor when the aircraft enters the zone of confusion and removes radio deviation from the roll command The system also uses the co located DME signal if available to adjust tracking gains When over the VO...

Page 197: ...ach When the selected course is captured the PFD displays VAPP in green NOTE To get the best results establish the aircraft on the selected course at least 3 miles before reaching the VOR station Step Procedure 1 Couple the pilot s or copilot s flight director to the autopilot with the CPL switch on the GC 2 Tune the coupled side navigation receiver to the frequency of the VOR to be used 3 Select ...

Page 198: ...to the autopilot with the CPL switch on the GC 2 Enter the data required for navigation into the FMS 3 Select FMS as the navigation source on the coupled side DC 4 Push the NAV button on the GC FMS Mode Engagement Procedure Table 8 3 Characteristics common to FMS are described below D Instead of using course error and radio deviation from the SG a composite lateral steering command is used from th...

Page 199: ... PFD as shown in figure 8 9 The flight control function of the IAC directs the aircraft to a desired track intercept The FMS mode is cancelled by any one of the following D Pushing the NAV button on the GC D Selecting the HDG mode D Selecting go around D Selecting another navigation or heading source 30 30 30 30 AD 50977 R1 Long Range Navigation Mode Display Figure 8 9 ...

Page 200: ...lect NAV as the navigation source 6 Push the NAV button on the GC The system annunciates HDG in green and LOC in white NOTE The APR button can also be in this step However when pushing the APR button and assuming an invalid glideslope the NAV button remains the only button lit If APR is used and the glides lope is valid the FGS captures the GS at the proper time Localizer Mode Engagement Procedure...

Page 201: ...own in figure 8 11 the LBS monitors localizer beam deviation beam rate and TAS At the computed time the lateral beam sensor LBS tripsand captures localizer signal The flight director drops the heading select mode and generates the proper roll command to bank the aircraft toward the localizer beam center When the LBS trips the PFD displays LOC in green as shown in figure 8 12 LOC is enclosed in a w...

Page 202: ...e back course When the course select pointer is set on the coupled side HSI using the CRS knob on the GC the course select error signal is established This signal represents the difference between actual aircraft heading and the selected aircraft course The course error signal is routed from the IAC s SG to the IAC s flight control function The radio deviation signal is routed from the navigation ...

Page 203: ... due to the aircraft approaching the localizer antenna and beam convergence caused by the directional qualities of the antenna The localizer mode is cancelled with any one of the following actions D Pushing the NAV button on the GC D Changing the displaced heading source or NAV source D Selecting go around D Selecting the heading select mode D Pushing the CPL button on the GC D Deselecting an SG r...

Page 204: ...izer gain programming to track the localizer signal as shown in figure 8 13 and to compensate for localizer beam standoff in the presence of a crosswind The system automatically compensates for a crosswind of up to 45_course error Figure 8 14 shows the PFD in the localizer tracking mode Localizer Mode Tracking Profile View Figure 8 13 20 20 20 20 30 30 30 30 60 IN 40 AD 50983 R1 Localizer Tracking...

Page 205: ...zer approach The BC procedure is described in table 8 5 Back Course Mode Intercept Plan View Figure 8 15 Step Procedure 1 Couple either the pilot s or copilot s flight director to the autopilot using the CPL button on the GC 2 Tune the coupled side navigation receiver to the published front course localizer frequency for the runway in use 3 Set the course pointer on the coupled side HSI for the in...

Page 206: ...limits and more than 105_off the localizer front course heading the PFD annunciates BC in white and HDG in green as shown in the display below 20 20 30 30 30 30 M 2000 AD 50984 R1 7 At back course capture the PFD annunciates BC in green as shown in the display below BC is enclosed in a white box for 8 seconds 30 30 30 30 3 2 1 0 1 2 3 M 2000 AD 50986 R1 Back Course Flight Procedure Table 8 5 ...

Page 207: ...nals A gain change takes place in the computer when BC is selected because the aircraft is closer to the localizer antenna by the length of the runway plus 1000 feet At back course capture the IAC flight control function generates a roll command to capture and track the back course localizer signal as shown in figure 8 16 The BC mode is cancelled by any one of the following D Pushing NAV on the GC...

Page 208: ...gnals as shown in figure 8 17 so the pilot can fly a fully coupled ILS approach The mode is set up and flown similar to the localizer mode The mode is interlocked so that the glideslope capture is inhibited until the localizer is captured As with the localizer mode heading select is used to initiate the localizer approach intercept The procedure for ILS approach is described in table 8 6 ILS Appro...

Page 209: ...n use 3 Push the NAV button on the coupled side DC to select ILS as the navigation source 4 Set the radio altitude RA minimum altitude MIN on the PFD with the RA knob on the DC 5 Set the course pointer and heading bug on the coupled side PFD for localizer intercept using the GC HDG and CRS knobs 6 Push the APR button on the GC The PFD annunciates as shown in the display below D LOC in white D GS i...

Page 210: ... approach mode is used to automatically intercept capture and track the glideslope beam The beam is used to guide the aircraft to the runway in a linear descent Typical glideslope beam angles vary between 2_and 3_ dependent on local terrain The mode is interlocked so that glideslope capture is inhibited until localizer capture has occurred With the localizer captured and outside the normal glidesl...

Page 211: ... the computer drops any other vertical mode that was in use and automatically generates a pitch command to track the glideslope beam AD 50989 ILS Approach Mode Glideslope Capture Profile View Figure 8 18 The PFD shown in figure 8 19 annunciates D LOC in green D GS in green The annunciation is enclosed in a white box for 8 seconds The NAV and APR mode selector buttonsarealso annunciatedon theGC NOT...

Page 212: ... directional properties of the antenna as shown in figure 8 20 GS programming is normally a computed function of radio altitude if available If radio altitude is not available then GS gain programming is a function of vertical speed VS true air speed TAS and time The approach mode is cancelled by any one of the following actions D Pushing the APR or NAV buttons on the GC D Loss of ILS GS data D Se...

Page 213: ... the AP was engaged The vertical flight director mode is annunciated as PIT D The pitch reference can be changed by pushing and holding the TCS touch control steering button on the pilot s or copilot s control wheel and manually flying the aircraft to a new pitch attitude reference When the TCS button is released this new reference is held by the autopilot The pitch reference can also be changed b...

Page 214: ...e mounted go around switch sets the PFD command bars to a fixed pitch up attitude of 12 The vertical mode annunciation isa green TO asshown in figure 8 21 60 80 20 20 10 10 10 10 20 20 30 30 30 30 3 2 1 0 1 2 3 40 1120 1500 169 HDG TO 30 17 IN 180 CRS VOR1 1 8 HDG 180 NM KTS GSPD 00 M 40 00 1 110 R 124 2 132 AD 50921 R3 5 Takeoff Mode Figure 8 21 ...

Page 215: ...s annunciated in green on the PFD D The PFD displays the vertical speed target value above the vertical speed scale in plus or minus feet per minute When the VS reference is changed by using the SPD knob on the GC the target value changes and the vertical speed reference bug is repositioned Actual aircraft VS is displayed on the VS indicator When VS is selected it resets all previously selected ve...

Page 216: ...ynchronized to the IAS Mach being flown when the mode is engaged When a new reference is manually selected using the GC SPD knob the system automatically flies the new reference The IAS Mach speed target comes from the coupled side PFD Depending on whether the reference is identified as IAS or Mach input from the controller the system flies IAS or the Mach reference Switching from IAS to Mach or M...

Page 217: ... to prevent the aircraft from flying too slowly Below 120 knots the vertical mode is overridden and is replaced by SPD hold mode This is underspeed MIN SPD protection D All vertical operations must be monitored to prevent the aircraft from exceeding Vmo Mmo If however Vmo Mmo is exceeded the flight guidance system switches to the SPD hold mode This isoverspeed MAX SPD protection NOTE The only annu...

Page 218: ...ure 8 23 The pilot can maneuver the aircraft without disengaging the mode by pushing and holding the TCS button on the control wheel When TCS is released the airspeed target is the current airspeed To fly the SPD mode in a climb to a preselected altitude from a straight and level condition follow the procedure described in table 8 7 Step Procedure 1 Set alert altitude more than 250 feet from the c...

Page 219: ... on the GC D Selecting any other vertical mode on or capture D Coupling to the cross side FD D Coupled side MADC becomes invalid D If on the active side selecting SG reversionary selection NOTES 1 In a climb above 25 100 feet MSL the SPD reference automatically switches from IAS to MACH 2 In a normal descent below 24 900 feet the SPD reference automatically switches from MACH to IAS 3 The FGS cann...

Page 220: ...the aircraft When the TCS button is released the FGS returns the aircraft to the preset FLC target In FLC all armed pitch flight director modes are allowed but if any armed pitch mode is captured the FLC mode is overridden NOTE During an FLC descent the normally available airspeed Mach reference bug and digital display are removed The FLC mode is cancelled by anyone of the following actions or eve...

Page 221: ...altitude in the PFD altitude preselect window 2 Initiate the ascent or descent toward the new altitude This process arms the ASEL mode 3 Engage another vertical mode such as VS SPD or FLC on the GC The PFD displays the following messages D ASEL in white D The other vertical mode in green Altitude Preselect Mode Engagement Procedure Table 8 9 The aircraft flies toward the preset altitude using one ...

Page 222: ... is dropped The PFD displays ASEL in green At ASEL capture a command is generated to flare the aircraft onto the selected altitude The aircraft remains in the ASEL capture modes until the following conditions exist simultaneously D Altitude error less that 25 feet D Altitude rate less than 5 feet second When these three conditions exist simultaneously the system automatically switches to altitude ...

Page 223: ... PRESENT ALTITUDE 1 16 000 FEET 2 FLARE 3 4 AD 50996 Altitude Preselect Plan View Figure 8 24 Step Procedure 1 Set the selected altitude on the PFD Engage the VS mode to descend toward the selected altitude See display below 20 20 10 10 10 10 20 20 30 30 30 30 001 390 M M Altitude Preselect Mode Procedure Table 8 10 cont ...

Page 224: ... 36 Step Procedure 2 The mode is armed as shown in the display below 30 30 30 30 3 The altitude flare point ASEL capture is dependent on vertical speed as shown in the display below 15500 30 30 30 30 3 2 1 0 1 2 3 15320 M 40 00 Altitude Preselect Mode Procedure Table 8 10 cont ...

Page 225: ...6 112 00 8 37 Modes of Operation Step Procedure 4 ALT SEL capture is dropped and ALT HOLD is automatically engaged as shown in the display below 20 20 10 10 10 10 20 20 30 30 30 30 3 2 1 0 1 2 3 470 M M Altitude Preselect Mode Procedure Table 8 10 ...

Page 226: ... HOLD is active as shown in the display below 30 30 30 30 M Altitude Hold Mode Engagement Procedure Table 8 11 Altitude hold maintains the barometric altitude that exists when the mode is engaged The reference altitude can be changed by pushing the touch control steering TCS button on the control wheel maneuvering the aircraft to a new altitude and releasing the TCS button Selecting the ALT HOLD m...

Page 227: ...eater than 80 of the throttle lever angular travel When the windshear mode is active the autopilot is disconnected and the command bars are displayed The command bars guide the aircraft to gain energy or conserve energy depending on the conditions of the airmass in which the aircraft is flying This energy management is done first by maintaining a slightly negative climb flight path angle This cont...

Page 228: ...vertical mode on the GC D Selecting GA below 2500ft without a WDSHEAR annunciation present D Coupling to cross side PFD D Selecting the SG reversionary on the active side NOTES 1 Automatic vertical modes are inhibited when in windshear mode 2 PFD declutter mode is inhibited when the windshear mode is active 10 10 20 20 30 30 AP Windshear Mode PFD Figure 8 25 ...

Page 229: ...level and pitch command to hold a minimum speed of 1 3 Vs CAUTION DURING A COUPLED AUTOPILOT ENGAGED GO AROUND UN DER HEAVY AND FORWARD CG CONDITIONS AN ALTITUDE LOSS OF APPROXIMATELY 100 FEET CAN OCCUR NOTES 1 For an invalid AOA minimum speed defaults to 120 kts 2 The go around mode ensures that minimal altitude is lost during the maneuver 3 The maximum pitch angle is 12 4 Under low power conditi...

Page 230: ...PRIMUSr1000 Integrated Avionics System A28 1146 112 00 Modes of Operation 8 42 1500 20 20 30 30 30 30 151 Go Around Mode Wings Level PFD Figure 8 26 ...

Page 231: ...HIGH DEGREE OF FUNCTIONAL INTEGRITY HOWEVER THE USER MUST RECOGNIZE THAT IT IS NOT PRACTICAL TO MONITOR AND OR SELF TEST FOR ALL CONCEIVABLE SYS TEM FAILURES IT IS POSSIBLE THAT THE SYSTEM CAN OPER ATE ERRONEOUSLY WITHOUT A FAULT INDICATION IT IS THE RESPONSIBILITY OF THE PILOT TO DETECT SUCH AN OCCUR RENCE USING CROSS CHECKS WITH REDUNDANT OR CORRE LATED INFORMATION AVAILABLE IN THE COCKPIT PILOT...

Page 232: ...lot follow the commands as shown by the flight director command cue and horizontal situation indicator lateral deviation bar D Can the pilot fly the flight director commands with the autopilot disconnected D Does some problem exist with autopilot engaged in a heading hold and pitch hold mode D In radio modes are certain conditions such as another aircraft in front of LOC or GS transmitter overflig...

Page 233: ...topilot does not null command bars satisfactorily in most modes Porpoising Low frequency oscillation in the pitch axis typically 10 second period or longer Pumping The control wheel moves back and forth usually with a low frequency and typically a 1 to 10 second period Stick Bump Controls give a quick moderate movement usually with virtually no aircraft movement mostly associated with autopilot en...

Page 234: ...llustrations that show the most common lateral and vertical mode problems are included The list of problems and the illustrations are not all inclusive but are typical of the problems most often encountered LATERAL MODE PROBLEMS Refer to table 9 2 and see figure 9 1 for anin flight graphicrepresentation of lateral mode problems Mode Problems HDG Mode Slow capture Oscillates Does not hold NAV BC or...

Page 235: ...PRIMUSr1000 Integrated Avionics System A28 1146 112 00 9 5 Troubleshooting AD 51002 Lateral Mode Conditions and Problems Figure 9 1 cont ...

Page 236: ...PRIMUSr1000 Integrated Avionics System A28 1146 112 00 Troubleshooting 9 6 AD 51003 Lateral Mode Conditions and Problems Figure 9 1 ...

Page 237: ...tion of vertical mode problems Mode Problem Air data hold modes ALT VS IAS MACH Oscillates Porpoising Does not hold reference Altitude preselect ASEL Misses capture Undershoots capture Overshoots capture Standoff GS mode vertical portion of APR mode Captures early Standoff Oscillates Vertical Mode Problems Table 9 3 AD 51004 Vertical Mode Conditions and Problems Figure 9 2 cont ...

Page 238: ...PRIMUSr1000 Integrated Avionics System A28 1146 112 00 Troubleshooting 9 8 AD 51005 R1 Vertical Mode Conditions and Problems Figure 9 2 ...

Page 239: ... crew can use the PRIMUSR 1000 Integrated Avionics System to access to the status of several key internal functions in the IC 600 Integrated Avionics Computer IAC The ground maintenance test procedure is described in table 9 5 and the ground maintenance display is shown in figure 9 3 Step Procedure 1 Initiate system test by powering up the aircraft on the ground Steps 2 5 are all done on the displ...

Page 240: ...test All other tests are strictly internal IAC processing tests 5 When the test is complete release the TEST button More detailed tests are available for maintenance personnel Access to those tests are made by pushing the TEST and WX buttons and operating the RA set between 800 and 990 feet Ground Maintenance Test Procedure Table 9 5 HELPING YOU CONTROL YOUR WORLD HW ID 1 BASE PART NO DASH NO SERI...

Page 241: ...or details 2 If the PC has WindowsTM do not access the ECP 800 software from the WindowsTM prompt Instead use the DOS prompt to start the checklist software 3 Apply power to the avionics Wait for the ADI to become valid before processing 4 Using the on side DC use the RA DH knob to set 890 RA DH on the PFD 5 Push and hold the display controller TEST knob 6 While pushing in the TEST knob momentaril...

Page 242: ...structions on the PC to finish NOTE If the No 2 IAC needs a checklist upload pull the No 2 IAC cir cuit breaker move the PC s RS232 cable to the other plug by the pilot s right rudder pedal Reset the No 2 IAC circuit breaker and repeat steps 3 through 10 11 Pull the appropriate IAC circuit breaker to power down the IAC 12 Remove the RS232 cable from the airplane connector 13 Push in the appropriat...

Page 243: ...or to another serial port The PC may have a bad serial port Set the configuration in the checklist loading program to correspond to the serial port on the PC 6 The extended memory manager EMM to network drivers on the PC may interfere with the operation of the checklist loading program If network drivers are installed in the PC try to disable them and reprogram If the PC has an EMM try disabling t...

Page 244: ...trol personnel to verify proper workmanship and conformity to Type Design and to certify that the article meets all controlling documentation Reconditioned Specification criteria are on file at Honeywell facilities and are available for review All Exchange units are updated with the latest performance reliability MODs on an attrition basis while in the repair cycle When contacting a Honeywell Deal...

Page 245: ...5 After Hours AOG CUSTOMER SUPPORT CENTERS NORTH AMERICA Dallas Support Center Honeywell Inc Commercial Aviation Systems 7825 Ridge Point IRVING TX 75063 Telephone 214 402 4300 Telex 795539 Fax 214 402 4999 Central Support Center Honeywell Inc Commercial Aviation Systems 1830 Industrial Avenue WICHITA KS 67216 Telephone 316 522 8172 Telex 417444 Fax 316 522 2693 Canada Support Center Honeywell Inc...

Page 246: ...50 Telephone 65 542 1313 Telex RS 56969 Fax 65 542 1212 Germany Support Center Apparatebau Gauting Gmbh Ammerseestrasse 45 49 D 8035 Gauting GERMANY Telephone 49 89 89317 0 Telex 0521702 Fax 49 89 89317 183 France Support Center Honeywell Aerospace Ltd 1 Rue Marcel Doret 31700 TOULOUSE BLAQNAC FRANCE Telephone 33 62 121500 After Hours AOG 33 61 71 9662 Telex 52 1635 Fax 33 61 300258 Australia Supp...

Page 247: ... 4 Publication Ordering Information Additional copies of this manual can be obtained by contacting Honeywell Inc P O Box 29000 Business and Commuter Aviation Systems Phoenix Arizona 85038 9000 Attention Publication Distribution Dept M S V19A1 Telephone No 602 436 5553 FAX 602 436 1588 ...

Page 248: ...System AGL Above Ground Level AHRS Attitude and Heading Reference System AHRU Attitude and Heading Reference Unit A I Anti Ice ALT Altitude AOA Angle of Attack AOSS After Over Station Sensor AP Autopilot APP APR Approach APT Airport APU Auxiliary Power Unit ASEL Altitude Select ATC Air Traffic Control ATT Attitude ATTCS Automatic Takeoff Thrust Control System AUX Auxiliary BARO Barometer BFO Beat ...

Page 249: ...ruise cw Clockwise DAU Data Acquisition Unit DC Display Controller DES Descend DG Directional Gyro DGC Display Guidance Computer DGR Degrade DIM Dimming DL Data Loader DME Distance Measuring Equipment DN Down DR Dead Reckoning DTK Desired Track DU Display Unit ECS Environmental Control System EDS Electronic Display System EFIS Electronic Flight Instrument System EICAS Engine Instrument and Crew Al...

Page 250: ...From FSBY FSTBY Forced Standby GA Go Around GCR Ground Clutter Reduction GEN Generator GMAP Ground Mapping GPS Global Positioning System GPU Ground Power Unit GR R React and Ground Clutter Reduction Modes GS Glideslope GSPD Groundspeed HDG Heading HDLC High Level Data Link Control HDPH Headphone HF High Frequency HP High Pressure hPa Hectopascals HSI Heading Situation Indicator HYD Hydraulic IAC i...

Page 251: ...LBS Lateral Beam Sensor LN BK Line Back LOC Localizer LP Low Pressure L R Left Right LSA Low Speed Awareness MADC Micro Air Data Computer MAG Magnetic MAINT Maintenance MAX Maximum MFD Multifunction Display MIC Microphone MIN Minimum MKR Marker MM Middle Marker M P Map Plan MPEL Maximum Permissible Exposure Level MSG Message MSL Mean Sea Level NAV Navigation NB Narrow Bandwidth NDB Non Directional...

Page 252: ...ressure PSI Pounds per Square Inch RA Radio Altitude RCL Recall RCT Rain Echo Attenuation Compensation Technique REF Reference RMU Radio Management Unit RNAV Area Navigation RNG Range ROL Roll RSB Radio System Bus RT R T Receiver Transmitter RTA Receiver Transmitter Antenna SAT Static Air Temperature SECT Sector SG Symbol Generator SKP Skip SLV Slaved SPD Speed SPKR Speaker SQ Squelch SQUITTR Squi...

Page 253: ...Touch Control Steering TEMP Temperature TERM Terminal TGT Target TKNB Turn Knob TO T O Takeoff TRK Track TST Test TTG Time To Go TURB Turbulence TX Transmitter VAPP VOR Approach VAR Variable VBS Vertical Beam Sensor VHF Very high frequency VNAV Vertical Navigation VOR VHF Omnidirectional Range VS Vertical Speed VTA Vertical Track Alert WB Wide Bandwidth WDSHEAR Windshear WOW Weight on Wheels WPT W...

Page 254: ...Body linear accelerations D Body angular rates Each AHRS contains the attitude and heading reference unit AHRU configuration memory module and flux valve Both primary and auxiliary 28 V dc are supplied to each AHRU The system is controlled using the panel mounted HEADING FREE and L R switches The AHRS interfaces with the following equipment D Flight guidance system FGS D Flight management system F...

Page 255: ...TED AVIONICS COMPUTER NO 1 EDS FMS FGS INTEGRATED AVIONICS COMPUTER NO 2 EDS P650 RADAR RMU AHRU SERIAL BUS OUTPUT DISCRETE PITCH ROLL AHRS FAIL ANNUNCIATOR INPUT DISCRETES INPUT POWER AD 51007 FLUX VALVE COMPENSATION INSTALLATION ORIENTATION MAGNETIC NORTH LONG TERM STABILITY PITCH ROLL HEADING FUNTIONS CONTROL MAINTENANCE ACCESS MEMORY MODULE FLUX VALVE MADC 2 MADC 1 FLIGHT RECORDER AHRU Block D...

Page 256: ...play functions through digital bus interconnect In addition an externally mounted memory module stores the flux valve compensation data and aircraft AHRU orientation data The power supplies receive dual input dc power from the aircraft The AHRU supplies 26 Vac for the flux valve True airspeed TAS information is supplied by the MADCs The system can be tested and has troubleshooting functions that a...

Page 257: ...after the bank is reduced to a small value and occurs at 1_per minute 2 While in MAG no display of flux valve slaving occurs D CW CCW Clockwise Counterclockwise Switch When a DG heading is displayed the CW CCW switches let the pilot enter the desired heading EICAS Annunciations Table A 1 lists AHRS annunciations that are displayed on the EICAS Annunciation Color Definition AHRS 1 2 OVHT Amber The ...

Page 258: ...ting the DG mode the AHRS automatically synchronizes the heading outputs to the present flux valve magnetic heading This feature can also be used if a heading error develops while in the slaved mode The error can be quickly removed by momentarily entering the DG mode and returning to the slaved mode This is done by selecting DG mode with the MAG DG switch NOTES 1 In normal operation no flux valve ...

Page 259: ...AG annunciation on the PFD isreplaced with a DGabove the compass display AHRS DG mode operation acts like a free directional gyro It is subject to drift and turn error For this reason the AHRS DG mode operates with reduced heading accuracy While in the DG mode the heading card can be manually set to any heading using the CW CCW switch to enter an initial heading value The control can not be used i...

Page 260: ...s e g basicor DG are not affected by the test sequence The test function can extended beyond 10 seconds by continuing to hold the TEST button In this case the test ends when the button is released If the test is valid the TEST annunciation clears at the end of the test GROUND INITIALIZATION The AHRS system requires approximately 2 minutes to initialize after the system is turned on The initializat...

Page 261: ...d engine run up procedures can be performed during the initialization Wind buffeting is not limiting in this respect The aircraft cannot be towed nor can it taxi during AHRS initialization D Two 2 minutes after power isconnected to the dcbuses verifythat the attitude and heading flags are not displayed If the timer has stopped the AHRS is not serviceable and it should be reinitialized With the air...

Page 262: ...c Keep the aircraft properly trimmed NOTE If an attitude error develops while in the basic mode it cannot be removed by the pilot The system attempts to maintain the error within bounds FLIGHT OPERATIONS IN DG MODE If a heading flag is observed during a flight set the MAG DG switch to DG The AHRS heading must be checked every 5 minutes with reference to a known accurate heading source Any errors c...

Page 263: ... No A28 1146 111 WARNING THE SYSTEM PERFORMS ONLY THE FUNCTIONS OF WEATHER DETECTION OR GROUND MAPPING IT IS NOT INTENDED THAT THIS SYSTEM EITHER BE USED OR RELIED UPON FOR PROX IMITY WARNING OR ANTICOLLISION PROTECTION DESCRIPTION The system consists of a receiver transmitter antenna RTA and a single controller dual controllers are optional Radar information is normally displayed on the multifunc...

Page 264: ...rolled by the dimming bus that controls the aircraft panel AD 52931 R1 SECT TGT STAB RCT GAIN RADAR SLV TILT MIN MAX PULL VAR OFF SBY WX GMAP FP TST 1 2 3 4 5 6 9 8 7 OFF Weather Radar Controller Figure B 1 1 RANGE SWITCHES The range switches are two momentary contact buttons that are used to set the operating radar range WX ranges can be set from 5 to 300 NM full scale In the flight plan FPLN mod...

Page 265: ...ects or deselects the stabilization function that automatically compensates for for aircraft roll and pitch maneuvers 4 TGT TARGET BUTTON The TGT button is used to enable and disable the radar target alert feature Target alert is selectable in all but the 300 mile range When selected target alert monitors beyond the selected range and 7 5_on each side of the aircraft heading If a return with certa...

Page 266: ...the tilt angle of the antenna beam with relation to the aircrafts longitudinal axis Clockwise cw rotation tilts the beam upward to 15_ counterclockwise ccw rotation tilts the beam downward to 15_ A digital readout of the antenna tilt angle is displayed on the MFD WARNING TO AVOID FLYING UNDER OR OVER STORMS FREQUENTLY SE LECT MANUAL TILT TO SCAN BOTH ABOVE AND BELOW THE AIRCRAFT S FLIGHT LEVEL ALW...

Page 267: ... on the ground to eliminate the X band microwave radiation hazard The controller is wired to the weight on wheels WOW switch The RTA is in forced standby mode when the aircraft is on the ground In the forced standby mode the transmitter and antenna scan are both inhibited the memory is erased and the cyan FSBY legend is displayed in the MFD mode field When in FSBY pushing the STAB button 4 times w...

Page 268: ...MAP MODE FOR WEATHER DETECTION As a constant reminder that GMAP is selected the green GMAP legend is displayed and the color scheme is changed to cyan yellow magenta Cyan represents the least reflective return yellow is a moderate return and magenta is a strong return If GMAP is selected before the initial RTA warm up period is over approximately 45 seconds a green WAIT legend is displayed In the ...

Page 269: ...tch is pushed the system enters the preset calibrated gain mode Calibrated gain is the normal mode and is used for weather avoidance In calibrated gain the rotary function of the GAIN control is disabled When the GAIN switch is pulled the system enters the variable gain mode Variable gain is used for additional weather analysis and for ground mapping In the WX mode variable gain can increase recei...

Page 270: ...f GAIN Control Preset Position TILT Control 15 PRECAUTIONS If the radar system is operated in any mode other than standby while the aircraft is on the ground follow the precautions given in table B 3 Step Precautions 1 Direct nose of aircraft so that antenna scan sector is free of large metallic objects such as hangars or other aircraft for a minimum distance of 100 feet and tilt antenna fully upw...

Page 271: ...or 45 seconds to let the magnetron warm up Power sequences ON OFF ON lasting less than the initial 45 second wait result in a 6 second wait period After warm up select the TEST mode and verify that the weather radar test pattern shown in figure B 2 for the PFD and figure B 3 for the MFD is displayed Check the function of the TGT control 30 30 30 30 169M PFD Display Weather Radar Test Pattern Figur...

Page 272: ...PRIMUSr1000 Integrated Avionics System A28 1146 112 00 PRIMUSâ 660 Weather Radar System B 10 S 12 6 21 AD 53423 R2 MFD Display Weather Radar Test Pattern Figure B 3 ...

Page 273: ...ed by the flat plate radiator during level flight with 0_tilt and shows a representative low altitude situation with antenna adjusted for 3 95_up tilt ELEVATION IN FEET 80 000 70 000 60 000 50 000 30 000 20 000 10 000 0 0 25 50 RANGE NAUTICAL MILES 100 AD 35693 CENTER OF RADAR BEAM 20 000 FT 20 000 FT 41 800 FT 41 800 FT 10 500 FT 10 500 FT 7 9 ZERO TILT Radar Beam Illumination High Altitude 12 In...

Page 274: ...iation Safety Precautions for Ground Operation of Airborne Weather Radar The radius R distance to the maximum permissible exposure level boundary is calculated for the radar system on the basis of radiator diameter rated peak power output and duty cycle The greater of the distances calculated for either the far field or near field is based on the recommendations outlined in AC No 20 68B The Americ...

Page 275: ... use bythe automaticflight control system AFCS both of which are resident in the IACs Navigation data also goes to the flight management system FMS computer It is a dual system with system No 1 being the left pilot s side and system No 2 being the right copilot s side The cockpit controls consist of a radio management unit RMU an audio panel and a tuning backup control head A functional block diag...

Page 276: ...PRIMUSr1000 Integrated Avionics System A28 1146 112 00 PRIMUSâ II Radio System C 3 C 4 blank 12 2 3 PRIMUSâ II Radio System Interface Block Diagram Figure C 1 ...

Page 277: ...e a self test of any individual function through the RMU Third key parameters in the radios are monitored at all times If a discrepancy occurs it is recorded in nonvolatile memory located in the remote module The discrepancy is recorded in the memory and remains there even after power down Discrepancy information includes the discrepancy itself the time into flight it took place and the temperatur...

Page 278: ...an be changed bypushing the line keynext to the parameter and then rotating the dual concentric controller tuning knobs The RMU display is divided into five dedicated windows Each window groups the data associated with a particular function of the radio system The windows COM NAV transponder ATC TCAS and ADF each control of the frequency code and operating mode of the associated function The RMU h...

Page 279: ... operating procedures A third frequency control method uses the tuning backup control head The RMU is also used to control the TCAS a TCAS II system that displays conflict resolution advisories in the form of vertical guidance The RMU screen is divided into several dedicated windows Each window groups the data associated with a function The windows COM NAV transponder ATC TCAS and ADF each control...

Page 280: ...e functions additional pushes of the line select key toggles modes or recalls stored frequencies The line select key if held for certain functions recalls automatic direction finder ADF and ATC memories and enters and exits the direct tune mode for COM and NAV D Tuning Knobs The tuning knobs are used to change the frequency values or mode in the data field enclosed by the cursor D Cursor The yello...

Page 281: ...n the cross side display STO STORE KEY Pushing the STO key stores a temporary TEMP COM NAV preselect frequency stored in memory and assigns a numbered location if the cursor has first been placed around that frequency The ADF and ATC each have one memory location When the cursor is placed around the current ADF frequency or ATC code push the STO key to store it in memory ID IDENTIFICATION KEY Push...

Page 282: ...2 seconds for COM transceiver 5 to 7 seconds for DME ATC ADF and about 20 seconds for NAV VOR ILS Releasing the TST button at any time immediately returns the function to normal operation If the TST button is held for 30 seconds or more the radios automatically return to normal operation DME DISTANCE MEASURING EQUIPMENT KEY This key disassociates the DME from the active VOR frequency so a differen...

Page 283: ...es up to six frequencies Pushing the COM or NAV line select key a second time moves the cursor around the third line of the COM or NAV window Frequencies stored in memory and their corresponding memory labels can be scrolled in the preset window by using the tuning knob AD 51017 COM Frequency Storage Page Figure C 4 System SYS On Off Page The SYS ON OFF page is selected from the page menu shown in...

Page 284: ...N ERROR MESSAGE FOR THE TURNED OFF MODULE DURING POWER ON SELF TEST AD 51018 System On Off Page Figure C 5 NOTES 1 This feature is dependent upon installation but typically only one side s COM and NAV is wired for ON OFF controls The COM and NAV VOR that are the emergency radios and therefore cannot be turned ON or OFF have an N A annunciation in place of ON or OFF In some installations the RMU ca...

Page 285: ...n the COM preset area Storing overwrites anything previously in the memory location When overwriting occurs the nomenclature beneath the bottom COM frequency changes back to MEMORY Pushing the upper left transfer key on the RMU bezel Y y B swaps the preset frequency and the active frequency location and function This switches the COM so it channels the new active frequency previously the preset fr...

Page 286: ...Sâ II Radio System C 14 AD 51019 R2 RMU in COM Tuning Mode Figure C 6 Use the tuning knobs to set the frequency i e 123 55 as shown in figure C 7 The TEMP 1 label indicates that the temporary frequency can be stored in MEMORY 1 AD 51021 R2 RMU Tuning Figure C 7 ...

Page 287: ... Exchanging the Preset and Active Frequencies Figure C 8 Stored frequenciesare selected bycycling the COM preset key until the tuning box encloses the memory mnemonic Rotating the tuning knob scrolls through the stored frequencies and displays them in the preset area NOTE The frequency that is displayed in the top section of the window whether on the main tuning page or a memory page is ACTIVE COM...

Page 288: ...off AUX ON AUX ON indicates that the auxiliary COM control head is turned on or clearance delivery control is in emergency mode The respective COM is being channeled by the AUX control head or the clearance delivery control The RMU is locked out from control of that COM TX TX indicates that the transmitter is ON SQ SQ indicates that the squelch has been opened with the SQ button NB NB indicates th...

Page 289: ...ch associated with frequencies AD 51024 R2 NAV Frequency Select Window Figure C 10 BASIC NAV TUNING NAV radio tuning is done using the same procedure as COM radio tuning The NAV tuning window can also accommodate split DME tuning Normal NAV tuning is as follows D The top line of the NAV box displays active VOR or ILS frequency D The bottom line displays the memory frequency or a scratchpad frequen...

Page 290: ...the message INHIBIT is displayed in the NAV window The upper right transfer key on the RMU bezel shown in figure C 11 toggles the active and preset frequencies to channel the NAV receiver to what had been the preset frequency The old active frequencymoves onto the line below and becomes the preset frequency NOTE Whatever frequency is displayed in the top section of the window is ACTIVE whether it ...

Page 291: ...OR ILS DME operations one of the six DME channels is paired with the active frequency and another with the preset frequency Pushing the DME function key splits the NAV box on the main tuning page and the active DME channel can be selected separately from the active VOR ILS frequency Cycling the DME select button sequences the NAV window as described in table C 2 Push Mode 1 Normal 2 VOR ILS and DM...

Page 292: ...e NAV window splits with the upper half VOR ILS tuning and the lower half DME channel tuning 2 Move the cursor to the DME window lower and tune 115 60 as shown in figure C 13 PXR is the identifier for that channel An amber H is shown 3 Move the cursor to the upper VOR ILS window with the top line select key and tune 108 30 4 When it is no longer necessary to hold the DME channel cycle the DME func...

Page 293: ...ects that data field to the TUNE knobs so that the ATC TCAS mode or transponder code can be changed D Code Line Select Key Push this key to place a cursor around the four digit transponder code The code can be changed using the large outer TUNE knob to control the left two digits and the smaller inner TUNE knob to control the right two digits The code line select key can also be used to retrieve a...

Page 294: ...the 1 2 key to toggle between transponder 1 active and transponder 2 active Turn either TUNE knob to change the active mode The available selections are listed in table C 4 Annunciation Mode ATC ON Replies on modes A and S no altitude reporting ACT ALT Replies on modes A C and S with altitude reporting TA ONLY The TCAS traffic advisory mode is selected TA RA The TCAS traffic advisory resolution ad...

Page 295: ...primary TCAS selection in the lower left window The selections are as follows TCAS DSPY 1 2 Thisannunciation showswhether the pilots 1 or copilots 2 TCAS display features are being controlled When the cursor is in the window the 1 2 button is used for the selection The selections are stored when the aircraft is powered down FLIGHT LEVEL 1 2 This is a display of the transponder s encoded altitude a...

Page 296: ...ction only is not operating properly this only slightly reduces the TCAS reply time It is preferable to use the other side transponder If a transponder fails i e it doesnot accept a commandfrom theRMU the RMU displays an ATC1 INOP or ATC2 INOP warning message in red at the bottom of the ATC window If ATC INOP is displayed the affected transponder should not be used The independent other side trans...

Page 297: ...its The frequency select key may also be used to retrieve an ADF frequency that has been stored in memory To retrieve the stored frequency from memory push and hold the frequency select key for three seconds D ADF Mode Select Key Pushing this key moves the cursor to the ADF mode line Repeated pushes sequences modes that are described in table C 6 The modes can also be selected by turning the frequ...

Page 298: ...y when the yellow cursor surrounds ADF frequency line and can also be used to select the ADF operating mode when the yellow cursor is surrounding the ADF mode line Turning the knob clockwise raises the frequency and counterclockwise decreases the frequency The large outer knob functions in 10 kHz increments the small inner knob in 5 kHzsteps Slow knob movement produces slow frequency change Rapid ...

Page 299: ...nd replicate the co pilot s No 2 system active frequencies modes and codes but not memory or preset frequencies on the No 1 RMU Both RMU displays are identical except for memory and preset frequencies but the pilot s RMU shows the function legends on the main tuning and memory pages in magenta to indicate that cross control is being exercised In addition to having access to the No 2 system the pil...

Page 300: ...rance range NOTE The errors identified bythe self test indicate that one or more internal parameters were measured to be outside their self test limit but may not necessarily indicate non operation of the function The pilot should verify operation of the function If any question remains an authorized service agency should be consulted The BIT also monitors important parameters and temperatures on ...

Page 301: ...st indicate one or more internal parameters were outside their self test limit but do not necessarily indicate non operation of the function The pilot should verify operation of the function If any question remains an authorized service agency should be consulted 2 Later release RMUs may inhibit PAST during flight The following tables gives the procedures for the individual modules VHF COM PAST Re...

Page 302: ...e holding the TST button The words ATC TEST are displayed indicating that the transponder is performing self test 4 Continue holding the TST button Upon completion of the test the words ATC PASS in green or ATC ERR in red are displayed in the ATC TCAS window In addition the TCAS aural warning sounds TCAS TEST TCAS PASS or TCAS FAIL separately 5 Repeat for transponder 2 NOTES 1 If a Honeywell TCAS ...

Page 303: ...e in the order of 400 Hz outer 1300 Hz middle and 3000 Hz inner D Localizer and glideslope deviation bars indicate a centered course for approximately 2 seconds with flags out of view D Localizer and glideslope deviation bars deflect left localizer and up glideslope one dot deflection for approximately 2 seconds with flags out of view D If course selector is on zero VOR deviation bar centers on a ...

Page 304: ...rmal operating mode and displays a menu that the operator can use to enter a maintenance mode of operation This menu can be called up only when the aircraft is on the ground During this mode various pages are used to give maintenance personnel access to software versions strap option settings maintenance log data and operating conditions of the radio system Pushing the bottom left line select key ...

Page 305: ...udio from remote radio units decodesthe audio controlsthe gain volume and routing of the various channels filters audio signals and outputs the audio to various speakers and headphones It controls microphone inputs to various radios interphone and passenger address systems Amplifiers are included for driving headphones and speakers The audio panel also has inputs for intercom crew annunciation cre...

Page 306: ...tone volume is controlled by the sidetone S T and headphone HDPH volume controls The speaker sidetone volume is controlled by the S T and speaker SPKR volume controls During audio panel power loss no sidetones are available During passenger address operations all other audio outputs except warning audios are deselected D Emergency EMER Microphone Switch When any audio panel EMER button is pushed t...

Page 307: ...hone is turned off and when the control is in the unlatched out position the on side cockpit speaker headphone ison D Marker Beacon MUTE and HI SENS LO SENS Sensitivity Controls The MUTE control is used to temporarily silence the marker beacon audio When the MUTE button is momentarily pushed the audio is muted The audio remains muted for the time it takes the aircraft to leave the influence of the...

Page 308: ...by the co pilot on the No 2 RMU or by the pilot using the No 1 RMU in the cross side operating mode are also displayed on the tuning backup control head The normal mode is not annunciated Emergency Mode In the emergency mode the tuning backup control head becomes the exclusive source for frequency control of the COM 2 and NAV 2 units In this mode No 2 RMU inputs are inhibited the tuning backup con...

Page 309: ...e source other than what the unit is tuned to D Tuning Cursor The tuning cursor is a lighted triangle that is controlled by the transfer key It indicates which frequency can be changed by the tuning knobs D Navigation Audio NAV AUDIO On Annunciator When displayed this annunciator indicates that NAV audio has been selected on D Emergency EMRG Mode Annunciator The EMER annunciator indicates when the...

Page 310: ...e COM squelch on or off D Norm Emergency MODES Switch This rotary switch knob selects the normal and emergency modes D Transfer Key Y y B The transfer key alternately selects either the COM frequency top or the NAV frequency bottom to be connected to the tuning knobs D Radio Tuning Annunciators These four annunciations are lit individually to identify source of the frequencies on the top and botto...

Page 311: ...TC transponder and TCAS operations C 20 ATC failure warnings C 24 Controls and annunciations C 20 ATC ident ID button C 23 ATC reply annunciator C 23 Code line select key C 21 Code mode select TUNE knobs C 23 Line select keys C 21 Mode line select key C 22 Range line select key C 22 TCAS extended altitude select key C 22 TCAS operational select PGE button C 23 Transponder code storage STO button C...

Page 312: ...itches C 34 Emergency EMER microphone switch C 34 ID VOICE control C 34 Marker MKR beacon volume control C 35 Marker beacon MUTE and HI SENS LO SENS sensitivity controls C 35 Passenger address PAX microphone switch C 34 S T level control C 35 SPKR and HDPH controls C 35 General C 33 Autopilot controller 6 6 PITCH wheel 6 6 TURN knob 6 7 Autopilot power up test 6 5 B Back course BC mode 8 17 Flight...

Page 313: ...r course and heading controls 4 22 Multifunction display MFD bezel controller 4 6 Checklist menu 4 15 Map plan 4 19 MFD main menu 4 8 MFD menu 4 10 System menu 4 8 TCAS 4 17 WX weather 4 18 Primary flight display PFD bezel controller 4 5 Crew alerting system CAS 5 22 CAS display failure indications 5 29 EICAS test 5 29 Symbol generator failure 5 29 CAS messages 5 23 Advisory messages Cyan 5 28 Cau...

Page 314: ...9 CAS messages 5 23 EICAS display 5 6 EICAS reversionary modes 5 30 Loss of display guidance computer DGC symbol generator 5 30 Loss of the display unit 5 30 MFD system displays 4 86 Electrical ELEC system 4 93 Environmental control system anti ice 4 88 Fuel system 4 90 Hydraulic HYD system 4 92 Takeoff T O 4 86 Multifunction display MFD 4 68 Changing a waypoint 4 80 Checklist option 4 82 Map disp...

Page 315: ...mperature ITT display 5 11 Oil pressure OIL PSI display 5 12 Oil temperature OIL C display 5 14 Pitch roll yaw trim display 5 16 Primary engine displays failure indications 5 20 Primary flight display PFD 4 25 Airspeed display 4 45 Altimeter display 4 48 ARC display 4 41 Full compass display 4 37 Functional divisions 4 25 PFD attitude director indicator ADI 4 26 Vertical speed VS display 4 51 Stan...

Page 316: ... course and heading controls 4 22 Multifunction display MFD bezel controller 4 6 Primary flight display PFD bezel controller 4 5 Displays 4 25 MFD system displays 4 86 Multifunction display MFD 4 68 PFD caution and failure display 4 61 Primary flight display PFD 4 25 Standby navigation display 4 96 System display failure annunciation 4 95 Typical PFD presentations 4 53 Introduction 4 1 Engine inst...

Page 317: ... 8 Weather Radar System 2 6 2 8 F Flight guidance system FGS 2 3 6 1 6 2 Autopilot controller 6 6 PITCH wheel 6 6 TURN knob 6 7 Guidance controller GC 6 1 Autopilot AP yaw damper YD couple CPL buttons 6 1 Autopilot power up test 6 5 FGS caution and advisory messages 6 5 Flight director FD mode selection 6 3 Remote autopilot switches and annunciators 6 5 Flight level change FLC mode 8 31 Descend an...

Page 318: ...in basic mode A 11 Flight operations in DG mode A 11 In air initialization A 11 Takeoff in basic mode A 10 Takeoff in DG mode A 10 Ground maintenance test 9 9 Test procedure 9 9 Guidance controller GC 6 1 Autopilot AP yaw damper YD couple CPL buttons 6 1 AP button 6 1 AP disengage 6 2 CPL button 6 2 YD button 6 2 YD disengage 6 2 Autopilot power up test 6 5 FGS caution and advisory messages 6 5 Am...

Page 319: ...and heading controls 4 22 CRS sync 4 22 HDG sync 4 22 H Heading hold mode wings level 8 1 Heading select mode 8 3 Honeywell product support 10 1 10 2 Customer support centers North America 10 2 Publication ordering information 10 4 Support centers 10 2 10 3 24 hour exchange rental support centers 10 2 I Instrument landing system ILS approach mode 8 20 Procedure 8 21 Integrated communication unit C...

Page 320: ...ltages and operating temperatures 4 94 Bus voltage and amperage loads 4 94 DC power interconnect buses 4 94 Environmental control system anti ice 4 88 Cabin and cockpit CKPT temperature 4 89 Engine output bleed air temperature 4 89 Oxygen pressure 4 89 Fuel system 4 90 Fuel boost pump status 4 91 Fuel tank temperature 4 91 Fuel used 4 91 Tank fuel quantity 4 90 Total fuel quantity 4 91 Hydraulic H...

Page 321: ...ode wings level 8 1 Heading select mode 8 3 Instrument landing system ILS approach mode 8 20 Procedure 8 21 Localizer LOC mode 8 12 Engagement procedure 8 12 Pitch hold mode 8 25 AP engaged 8 25 AP not engaged 8 25 Roll hold mode 8 2 Speed hold mode 8 28 Engagement procedure 8 30 TakeOff mode 8 26 VOR approach VAPP mode 8 9 Engagement procedure 8 9 VOR navigation NAV mode 8 4 Engagement procedure ...

Page 322: ...window 4 82 MFD plan mode 4 77 Plan mode failure and warning displays 4 79 FMS failure 4 79 Heading failures and flags 4 79 MADC failures 4 79 WX weather radar failure 4 79 Traffic alert and collision avoidance system TCAS 4 84 2 NM range ring 4 85 No bearing target readout 4 85 Proximity advisory arrow 4 85 TCAS altitude display submodes 4 85 TCAS auto 4 85 TCAS mode and failure annunciations 4 8...

Page 323: ...Main menu MFD button 4 10 Vspeeds submenu 4 11 MFD menu tree 4 7 System menu 4 8 ECS environmental control system A I anti ice button 4 9 ELECT electrical button 4 10 FUEL button 4 9 HYD hydraulic button 4 9 RTN return button 4 9 T O takeoff button 4 9 TCAS 4 17 WX weather 4 18 Multifunction display MFD checklist upload procedure 9 11 Error code 500 9 12 Troubleshooting procedure 9 13 Error code 5...

Page 324: ...ertical deviation failure 4 62 Windshear annunciation WDSHEAR 4 64 Yaw damper status annunciations 4 63 Excessive attitude declutter 4 66 Parameters 4 67 Failure RED annunciations 4 65 Attitude reference system failure 4 65 Heading HDG select failure 4 66 Micro air data computer MADC failures 4 65 PFD test mode 4 67 Pilot self test A 9 Pilot initiated self test annunciations A 9 Pilot writeup 9 1 ...

Page 325: ...ntrol 5 10 FADEC mode annunciations 5 9 FADEC N1 bug and digital target 5 9 Fan digital display 5 9 N1 analog scale 5 9 N1 request bug 5 9 Reverse thrust annunciation 5 10 Fuel flow FF PPH FLOW digital display 5 13 Fuel quantity FUEL LB digital display 5 13 Gear flaps spoiler positions 5 15 Flap position 5 15 Landing gear position 5 15 Spoiler position 5 16 Interstage turbine temperature ITT displ...

Page 326: ...Altitude reference line 4 50 Altitude select bug 4 50 Altitude trend vector 4 50 Barometric altimeter display 4 49 Low altitude awareness symbol 4 49 ARC display 4 41 Approach and terminal annunciators 4 42 DME hold 4 44 FMS heading FHDG annunciation if available 4 44 FMS status annunciation 4 41 FMS to waypoint 4 44 Heading source annunciations 4 41 Off scale arrows 4 44 Weather 4 42 Weather rada...

Page 327: ...tude trend vector 4 32 Attitude source annunciation 4 34 Autopilot status annunciations 4 32 CAT2 category 2 ILS annunciations 4 34 CAT2 deviation scale and pointer 4 36 Command bar display logic normal mode 4 30 Comparison monitor annunciation 4 33 Flight director couple arrow 4 31 Flight director mode annunciations 4 26 Low altitude awareness display 4 31 Low bank arc 4 31 Marker beacon 4 33 MAX...

Page 328: ...nch radiator B 11 Radar beam illumination low altitude 12 inch radiator B 11 Weather radar controller B 2 Controls and indicators B 2 Normal operation B 8 PRIMUSâ 880 Weather Radar System Option 2 8 PRIMUSâ II Integrated Radio System 2 7 PRIMUSâ II Radio System C 1 C 5 C 6 Audio panel operation C 33 Controls C 33 General C 33 Introduction C 1 Radio management unit RMU operation C 7 ADF operation C...

Page 329: ... a new waypoint procedure 4 81 DME function key operating procedure C 20 FMS mode engagement procedure 8 10 Ground maintenance test procedure 9 9 ILS approach mode procedure 8 21 Localizer mode engagement procedure 8 12 MFD checklist upload procedure 9 11 Speed mode engagement procedure 8 30 Troubleshooting procedure 9 13 VHF COM PAST procedure C 29 VOR approach mode engagement procedure 8 9 VOR n...

Page 330: ...le DME installation C 18 VHF communications transceiver operation C 13 Basic COM tuning C 13 COM messages C 15 Radio management unit RMU operation C 7 Controls C 8 Cursor C 8 Function keys C 9 Line select keys C 8 Transfer key C 8 Tuning knobs C 8 System SYS on off page C 11 Remote autopilot switches and annunciators 6 5 AP disconnect switch 6 5 Go around button 6 5 Pitch wheel and Turn knob contr...

Page 331: ... ADF bearing 4 100 Digital heading 4 98 Digital VOR bearing 4 100 DME distance 4 99 Glideslope pointer 4 99 Glideslope scale 4 99 Heading arc compass rose 4 100 Heading compass 4 99 Lateral deviation indicator 4 100 Lateral deviation scale 4 99 Marker beacon 4 99 Selected course 4 100 Standby navigation display failure indications 4 100 TO FROM indicator 4 99 Tune box 4 100 VOR bearing pointer 4 9...

Page 332: ...splay failure annunciation 4 95 Display controller failures 4 95 Both pilot s and copilot s DC fail 4 96 Copilot s DC fails 4 96 Pilot s DC fails 4 95 Display system reversionary modes 4 95 EFIS 1 pilot normal failure 4 95 EFIS 2 copilot normal failure 4 95 System file 1 1 1 2 System limits 7 1 7 2 Glossary of terms 7 1 Attitude director indicator ADI command cue 7 1 Glideslope GS gain programming...

Page 333: ...Pilot writeup 9 1 Commonly used terms 9 3 Typical problems 9 4 Tuning backup control head C 7 Controls and annunciations C 37 Emergency mode annunciator C 37 NAV AUDIO On Off switch C 38 Navigation audio NAV AUDIO on annunciator C 37 Norm emergency modes switch C 38 Radio tuning annunciators C 38 Remote tune annunciator C 37 Squelch SQ annunciator C 37 Squelch on off switch C 38 System installatio...

Page 334: ...cedure 8 9 VOR navigation NAV mode 8 4 Engagement Procedure 8 4 W Weather radar controller B 2 Controls and indicators B 2 GAIN switch B 7 MODE switch B 5 Range switches B 2 RCT rain echo attenuation compensation technique switch B 3 SECT sector switch B 4 SLV slaved annunciator B 4 STAB stabilization B 3 Target alert characteristics B 4 TGT target button B 3 TILT knob B 4 Normal operation B 8 Pow...

Reviews: