


Installation
Installation Overview
12
HercuLine™ 2000 Series Actuator - Installation, Operation and Maintenance Manual
Revision 7
7/08
Installation
Installation Overview
The procedures to install the HercuLine
®
2000 Series actuator and place it in service require that you:
•
Select a suitable location for installation. (See Installation Considerations below.)
•
Mount the actuator securely.
•
Install mechanical connections or linkage between control arm and final control element. Use HAL software
application to aid in mechanical installation.
•
Make all electrical connections for actuator according to local and national electrical codes.
•
Power up actuator.
•
Enter, verify and adjust set up parameters for proper operation.
•
Adjust control arm linkage for accurate operation of final control element.
This section provides you with mechanical and electrical installation information required to mount and connect
the HercuLine
®
2000 Series Actuator to your specific application. Unpacking instructions, installation
consisderations, electrical and safety precautions also included in this section should be observed.
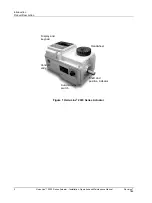
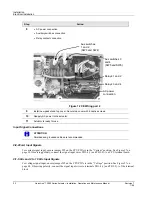
Mechanical Stops
Factory set at 90° or 150° (+/-5°).
See Figure 2 for location.
Attention: Do not adjust the mechanical stops. Adjusting the stops will void the warranty.