


■
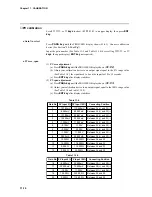
Cold junction sensor calibration
Scroll
↑
,
↓
,
←
, or
→
keys
to show (
2.0.2.2.
) on upper display, then press
ENT
key
.
●
The cold junction input 0%
(1) Press
SETUP key
until the PROG/SEG display shows (
02-01
).
(2) Press
ENT key
after display stabilizes, AD count is shown on lower display.
●
The cold junction AD count data
(1) Press
SETUP key
until the PROG/SEG display shows (
02-02
).
(2) Press
ENT key
after display stabilizes, AD count is shown on lower display.
●
The cold junction temperature data
(1) Press
SETUP key
until the PROG/SEG display shows (
02-03
).
(2) Connect the thermometer (55).
(3) Scroll
↑
,
↓
,
←
, or
→
keys
to set above temperature value(°C).
(4) Press
ENT key.
■
Current output calibration
Scroll
↑
,
↓
,
←
, or
→
keys
to show (
4.0.4.4.
) on the upper display, then press
ENT
key
.
Connect the digital ammeter across terminals (See Figure 11-9).
●
OUT CH1 output calibration
(1) Press
PARA key
until the PROG/SEG display shows (
04-01
).
Scroll
↑
,
↓
,
←
, or
→
keys
until meter indicates 4.00mA, then press
ENT key
.
(2) Press
PARA key
until the PROG/SEG display shows (
04-02
).
Scroll
↑
,
↓
,
←
, or
→
keys
until meter indicates 20.00mA, then press
ENT key
.
●
OUT CH2 output calibration
(1) Press
PARA key
until the PROG/SEG display shows (
06-03
).
Scroll
↑
,
↓
,
←
, or
→
keys
until meter indicates 4.00mA, then press
ENT key
.
(2) Press
PARA key
until the PROG/SEG display shows (
06-04
).
Scroll
↑
,
↓
,
←
, or
→
keys
until meter indicates 20.00mA, then press
ENT key
.
●
OUT CH1 output calibration
(1) Press
PARA key
until the PROG/SEG display shows (
04-05
).
Scroll
↑
,
↓
,
←
, or
→
keys
until meter indicates 4.00mA, then press
ENT key
.
(2) Press
PARA key
until the PROG/SEG display shows (
04-06
).
Scroll
↑
,
↓
,
←
, or
→
keys
until meter indicates 20.00mA, then press
ENT key
.
11-12
Chapter 11. CALIBRATION