background image

246

Re
ar

 Ent

e

rt

a

inment

 Syst

em

Rear Entertainment System

The Rear Entertainment System (RES) is operable from both the front control panel 
and the rear control panel.

2

Front Control Panel Operation 

P. 261

2

Rear Control Panel Operation 

P. 250

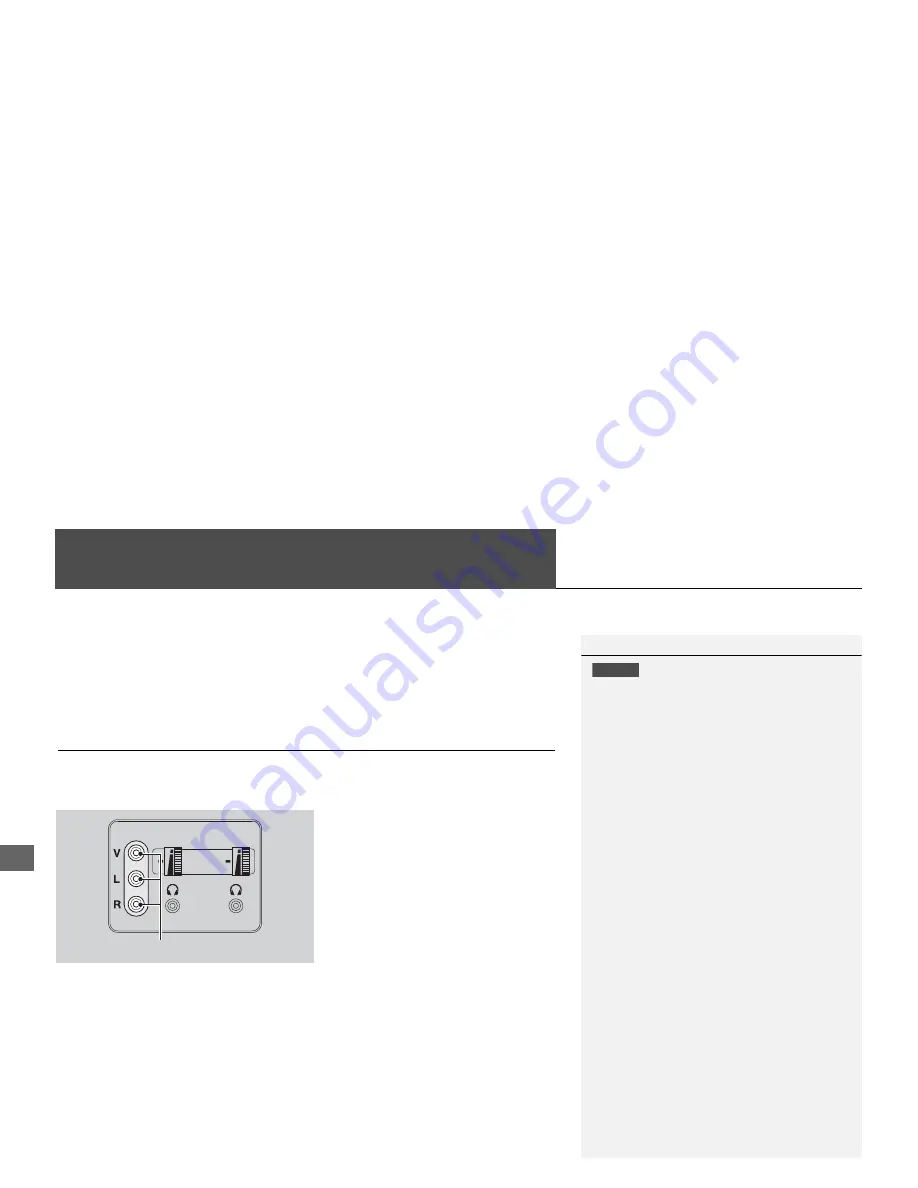
Auxiliary Console Panel

Auxiliary input jacks and headphone connectors for the rear entertainment system 
are above the third row seat armrest on the driver’s side.

V = Video jack

L = Left audio jack

R = Right audio jack

Auxiliary Input Jacks

The system will accept auxiliary inputs from standard video games and video 
equipment. Some video game power supplies may cause poor picture quality.

Headphone Connectors

There are two headphone connectors for the rear passengers. Each connector has its 
own volume control.

1

Rear Entertainment System

This vehicle’s overhead mounted video display, if 
so equipped, includes mercury-containing 
components. Upon removal, please reuse, 
recycle, or dispose of as hazardous waste.

NOTICE

AUXILIARY INPUT JACK

Summary of Contents for 00X31-TK8-8200

Page 1: ...formatted for printing instead of web use This is due to changes in content and specifications of the vehicle that happen throughout the model year This manual will be replaced with a hyperlinked vers...

Page 2: ...Safety Information Avoid focusing on the screen or manually operating the system controls while driving Enter information before you begin driving or when stopped As you drive listen to the audible i...

Page 3: ...tooth Audio 199 2 Bluetooth HandsFreeLink P 203 Bluetooth HandsFreeLink 204 Text Message E mail 233 2 Rear Entertainment System P 245 Rear Entertainment System 246 Rear Control Panel Operation 250 Fro...

Page 4: ...ination Store home address P42 Register 1 home address Store contacts P37 Store up to 200 contacts in an address book Enter destination P84 Select your destination using 12 methods Select route P109 S...

Page 5: ...etooth Audio P199 Hard Disk Drive HDD P165 Internet Radio P189 Rear Entertainment System P246 Rear seat passengers can enjoy a completely separate entertainment source than front passengers including...

Page 6: ...ntrol Audio 1 PHONE Button P206 lj AUDIO Button Models without RES 9 FRONT AUDIO Button 0 REAR AUDIO Button P261 lb REAR 9 Power Button Models with RES lc Microphone P22 lg h Pick Up Button P204 lh J...

Page 7: ...to enter supported commands for the current screen A voice help tutorial is also available Voice Help P15 During the voice control mode press and hold the J Hang Up Back button to return to the Voice...

Page 8: ...category XM cx Select to search the selected band for a station with a strong signal AM FM Select the channel In channel mode select and hold to change the channel rapidly XM Select a song Pandora or...

Page 9: ...anges scale Map screens Highlights menu options Menu screens Rotate dial Press ENTER Move up Move left Move down Move right Scrolls map 8 directions Map screens Selects labeled function Menu screens S...

Page 10: ...m 5 Say d Up or d Previous to scroll up one page Say d Down or d Next to scroll down one page Using the Interface Dial Rotate i to highlight a character Select to display upper lower case characters S...

Page 11: ...h Moderate approx surface 21 to 30 mph freeway 25 to 52 mph Congestion Incident Weather Construction Road Closed Traffic incident icons P120 Current street name Current vehicle position P74 Traffic st...

Page 12: ...nce of the actual route Estimated time to destination waypoint Waypoint P124 Destination icon Calculated route unverified roads P112 Tracking dots P113 Guidance indicator Street name of guidance point...

Page 13: ...select Edit Go Home Press u d Rotate i to select Name Press u SETTINGS e Enter a name f Rotate i to select Address Press u g Enter an address h Rotate i to select Phone No Press u i Enter a phone num...

Page 14: ...i to select Street Press u d Enter the name of your destination street MENU e Rotate i to select your destination street from the list Press u f Enter the street number Move r to select OK when finish...

Page 15: ...r methods you can use to specify a new destination during route guidance Say d Find Nearest P131 Searches for the nearest place landmark on the map screen e g d Find nearest gas station Say d Go Home...

Page 16: ...l Radio or a folder Disc USB TUNE SKIP Bar Find stations FM AM Skip to start end of tracks or press and hold to fast reverse fast forward Disc USB DVD CATEGORY Bar Select a category XM Play Pause Butt...

Page 17: ...a list of available commands by category e g d Navi commands e Press and release the d Talk button f Say one of the options for a list of available commands by category e g d Route commands g The syst...

Page 18: ...ecify a destination when an entered city or street could not be found Try entering the street first Some cities are lumped in with a major metro area In rural unverified areas or new subdivisions stre...

Page 19: ...ng for e g entering a destination from the Address Book Then go to that chapter to view a more specific table of contents Searching the Index P325 Menu items displayed on the navigation screen e g Add...

Page 20: ...nu options can also be activated with voice commands Press the hard button on the system control panel Press the MENU button Select the menu option with the Interface Dial Rotate i to select Address B...

Page 21: ...46 Routing 49 Route Preference 50 Unverified Routing 51 Traffic Rerouting 53 Edit POI Search Radius Along Route 54 Avoided Area 55 Guidance 57 Guidance Mode 58 Street Name Guidance 60 Non map screens...

Page 22: ...iod of time Your current position is displayed on the map screen 2 Press the NAV button if a different mode is selected Your current position is displayed on the map screen 1 Start up If the navigatio...

Page 23: ...abled or inoperable while the vehicle is in motion You cannot select a grayed out option using the Interface Dial until the vehicle is stopped Voice commands are still operable while the vehicle is in...

Page 24: ...ion If you do not wish to hear this feedback you can turn it off However listening to the feedback will help familiarize you with the way the system expects commands to be phrased If the system cannot...

Page 25: ...dashboard and side vents so air does not blow onto the microphone on the ceiling Speak clearly in a clear natural speaking voice without pausing between words Reduce any background noise if possible...

Page 26: ...level Voice Prompt Turns the voice prompt on or off On factory default Provides the voice prompts Off Disable the feature Song by Voice Turns the Song By VoiceTM on or off 2 Song By VoiceTM SBV P 184...

Page 27: ...make the adjustment Press u The following items are available Brightness Adjusts the screen s brightness Contrast Adjusts the screen s contrast Black Level Adjusts the screen s black level 1 Display...

Page 28: ...ature Auto factory default Reads the selection only when the vehicle is moving Message Auto Reading Selects whether the system automatically reads out messages and if selected whether only when drivin...

Page 29: ...different time zones On factory default Adjusts the clock automatically Off Disables the feature Auto Daylight The navigation system automatically adjusts the clock spring ahead or fall back by one ho...

Page 30: ...Clock Wallpaper Type Clock 1 Rotate i to select an option to change the design Press u 2 Move r to select OK Press u H SETTINGS button System Settings Clock Clock Adjustment 1 Rotate i to select an i...

Page 31: ...Import Press u The confirmation message will appear Then the display will return to the wallpaper list Import wallpaper 1 Wallpaper Settings When importing wallpaper files the image must be in the US...

Page 32: ...eft side on the screen The pop up menu appears on the screen 2 Rotate i to select Set Press u The display will return to the wallpaper list Select wallpaper 1 Select wallpaper From the pop up menu rot...

Page 33: ...wallpaper that you want to delete Press u The preview is displayed on the left side on the screen The pop up menu appears on the screen 2 Rotate i to select Delete Press u The confirmation message wil...

Page 34: ...ace Settings Unit Settings System Setup Unit Settings H SETTINGS button System Settings Others Units Sets the map units to either miles factory default or kilometers km Rotate i to select the map unit...

Page 35: ...ge used on all screens You can choose from three languages English Fran ais French Espa ol Spanish Rotate i to select the system language Press u 1 Language Settings Voice confirmation of cities and s...

Page 36: ...Background Color System Setup Background Color H SETTINGS button System Settings Others Background Color Changes the background color of the navigaiton screen and the touchscreen Rotate i to select a...

Page 37: ...H SETTINGS button System Settings Others Header Clock Display Selects whether the clock display comes on Rotate i to select an option Press u The following option are available On factory default The...

Page 38: ...Stores new addresses or edits your address book 2 Address Book P 37 Edit Go Home Sets or edits your home address 2 Home Address P 42 PIN Number Sets or changes your PIN 2 PIN Numbers P 43 Previous Des...

Page 39: ...ns how to enter the name and address 1 Move r and rotate i to select Add New Address Press u 1 Address Book If you have PIN protected your address book enter your PIN when prompted Press u to select O...

Page 40: ...hone number of the entry Category Specifies the category of the entry Alert Alerts you when you approach the address entry On Beeps and displays a message when your vehicle gets near the entry Off fac...

Page 41: ...2 Place Category P 94 More Search Methods Displays additional search method entries 2 Entering a Destination P 84 H SETTINGS button Navi Settings Personal Info Address Book 1 Rotate i to select the ad...

Page 42: ...ame and select an icon when prompted The created category is displayed in the list of categories Deleting or Editing a Category 1 Move r and rotate i to select Delete or Edit Press u 2 Delete an exist...

Page 43: ...s Book 1 Rotate i to select the address to delete Press u 2 Move r and rotate i to select Delete Press u 3 Rotate i to select Yes Press u to delete the address Deleting an Address Book Entry 1 Deletin...

Page 44: ...es enter your PIN when prompted Press u to select OK PINs are optional 2 PIN Numbers P 43 If your home street is not in the system database park on the nearest verified street to your home When enteri...

Page 45: ...digit PIN 3 Re enter the new PIN when prompted to confirm the number you just entered Press u to select OK If you have not entered the same number both times an INCORRECT PIN message is displayed Ente...

Page 46: ...future You can delete some or all of your previous destinations from the list 1 Rotate i to select the destination to delete Press u Repeat the procedure as necessary Items to be deleted are indicated...

Page 47: ...n the future You can delete some or all of your recently used categories from the list 1 Rotate i to select the category to delete Press u Repeat the procedure as necessary Items to be deleted are ind...

Page 48: ...ton on map More Search Methods Download POI 1 Connect a USB flash drive with stored POI data to the USB connector 2 Move r and rotate i to select Import from USB Press u Importing POI Categories 1 Imp...

Page 49: ...Download POI System Setup 3 Rotate i to select a category to import Press u H SETTINGS button Navi Settings Personal Info Download POI 1 Rotate i to select the downloaded POI category to edit Press u...

Page 50: ...Setting Alerts you when you approach the places landmarks in the category On Beeps and displays a message when your vehicle gets near the places landmarks in the category Off factory default Disables...

Page 51: ...s calculating method 2 Route Preference P 50 Unverified Routing Sets whether you use the route guidance in unverified areas 2 Unverified Routing P 51 Traffic Rerouting Sets whether you use automatic r...

Page 52: ...r to select OK Press u 1 Route Preference The calculated route may be the shortest route or the route you would choose For safety reasons the system generally applies the following rules to your rout...

Page 53: ...line Differences Off On factory default On or Off The driver wishes to manually navigate using the navigation map and choose the streets that lead to the destination The driver chooses to let the nav...

Page 54: ...obey all traffic restrictions when entering an unverified street Guidance map voice There is no turn by turn map or voice guidance Voice guidance commands end with the phrase if possible to remind yo...

Page 55: ...0 Rotate i to select an option Press u The following options are available On The system reroutes automatically based on traffic information Off factory default Disables the feature 1 Traffic Reroutin...

Page 56: ...P 124 You can specify a different search distance for freeways and surface streets 1 Rotate i to select an item Press u 2 Rotate i to select a search distance Press u The following items are availabl...

Page 57: ...e i to select Area to define the area to avoid Press u The following options are available after an area is set View Area Displays the selected avoid area on the map Delete Deletes the selected avoid...

Page 58: ...t P 105 6 If you select Map Input scroll the map to position the cursor over your desired start point adjusting the map scale as necessary Press u to mark the start point To redo the area selection pr...

Page 59: ...treet names during voice guidance 2 Street Name Guidance P 60 Non map screens models without LaneWatch Sets whether the guidance screen interrupts the screen display 2 Non map screens P 61 Next Maneuv...

Page 60: ...options are available Map factory default Displays only the map screen When you approach a guidance point the next guidance point appears 1 Guidance Mode The guidance mode can also be selected from t...

Page 61: ...guidance point the next guidance point appears Next Maneuver Displays the map and next guidance point simultaneously on the map screen Guidance direction list Near the next guidance point Next guidan...

Page 62: ...es during voice guidance e g Turn right on Main Street Rotate i to select an option Press u The following options are available On factory default Voice guidance includes the street names Off Disables...

Page 63: ...arily interrupts the screen display to view the guidance screen as you approach a guidance point Rotate i to select an option Press u The following options are available On The guidance screen interru...

Page 64: ...Press u The following items are available LaneWatch Sets whether to view the guidance screen while displaying the LaneWatch screen On factory default The guidance screen interrupts the LaneWatch scree...

Page 65: ...oint Set the guidance point to display on the map screen Rotate i to select an option Press u The following options are available Destination factory default Displays the remaining arrival time and di...

Page 66: ...ated Time Select the estimated time to display on the screen Rotate i to select an option Press u The following options are available Arrival Displays the arrival time to the destination or the next w...

Page 67: ...Map Selects the icons to display on the map 2 Showing Icons on Map P 67 Color Day Selects the color of the map for the Day mode 2 Color P 69 Color Night Selects the color of the map for the Night mode...

Page 68: ...e map 2 Display Tracking P 79 Delete Tracking Deletes the tracking dots on the map 2 Deleting Tracking Dots P 79 Correct Vehicle Position Adjusts the position of the vehicle on the map 2 Correct Vehic...

Page 69: ...K Press u The following options are available All On Displays the landmark icons 2 Map Screen Legend P 9 Customize Fine tunes the icon display 2 Fine tuning the Icons P 68 Off Hides the landmark icons...

Page 70: ...categories can be fine tuned to display or hide 1 Rotate i to select the icons to display on the map Press u Pressing u toggles the icon display on or off Repeat the procedure as necessary 2 Move r a...

Page 71: ...ct a color for the Day mode Press u H SETTINGS button Navi Settings Map Color Night Rotate i to select a color for the Night mode Press u Color Day 1 Color Day Set to White factory default is Beige to...

Page 72: ...a few seconds Rotate i to adjust the brightness Press u 2 Press the a button again Repeat the procedure to switch the display modes Switching Display Mode Manually 1 Switching Display Mode Manually A...

Page 73: ...hoice Dash illumination adjustment buttons see your Owner s Manual for location 3 When headlights are turned on and you wish to have the Day display mode adjust the illumination to the full brightness...

Page 74: ...e traveling is always pointing up 3D Map Displays the bird s eye view map 1 View Map Orientation d Display Heading up on Voice Portal screen d Display North up on Voice Portal screen d Display 3D map...

Page 75: ...ate i to adjust the angle Press u Straight Line Guide H SETTINGS button Navi Settings Map Straight Line Guide Set whether to display a straight guideline to the destination or waypoint Rotate i to sel...

Page 76: ...and category 2 Address Book P 37 3 Move r and rotate i to select OK Press u 1 Current Location d Display Current Location on Voice Portal screen You can also save the current location by saying d Reg...

Page 77: ...Navi Settings Map Map Legend See an overview of the map lines areas routes traffic information and navigation icons Move w or y select an item The system displays the map legend 1 Map Legend A visual...

Page 78: ...0 Icon display Landmark icon 9 Exit info 9 One way traffic 9 Waypoint flag 10 Traffic incident 9 Map orientation Heading up 72 North up 72 3D map 72 Others Tracking dots 113 Unverified road 9 Map feat...

Page 79: ...n Bank No icon No Yes Parking garage Yes Yes Yes Parking lot Yes Yes Yes Freeway exit info Yes Yes No 1 Map Icons and Functions You can display or hide the icons using voice commands on the map screen...

Page 80: ...rchable Traffic incident Yes No Yes 1 Traffic Incident When you use the Interface Dial to position the cursor round red circle over the traffic incident icon you can view the summary of the incident P...

Page 81: ...screen Rotate i to select an option Press u The following options are available On The system displays the white tracking dots 2 Tracking Dots P 113 Off factory default Disables the feature H SETTING...

Page 82: ...the arrowhead in the correct direction the vehicle is facing 5 Press u to select OK 1 Correct Vehicle Position An apparent position error can occur where buildings tunnels and other objects block or...

Page 83: ...l appear 2 Rotate i to select Yes Press again to reset the settings The confirmation message will appear Press to select OK 1 Defaulting All the Settings When you transfer the vehicle to a third party...

Page 84: ...adjustable screen settings Brightness Adjusts the screen s brightness Contrast Adjusts the screen s contrast Black Level Adjusts the screen s black level Display Changes between the daytime or nightti...

Page 85: ...on 104 Map Input 105 Coordinate 107 Calculating the Route 108 Viewing the Routes 109 Driving to Your Destination 110 Viewing the Route 110 Listening to Voice Guidance 114 Reaching a Waypoint 115 Map M...

Page 86: ...an address 2 Address P 86 Address Book Sets a destination by selecting an address stored in your Address Book 2 Address Book P 92 Previous Destination Sets a destination by selecting a previous destin...

Page 87: ...GAT SURVEY Rating information 2 ZAGAT P 99 Download POI Sets a destination by using a list of the imported POI category and places data you created 2 Download POI P 102 Scenic Route Sets a destination...

Page 88: ...The following items are available City Selects your destination city 2 Selecting a City P 88 Street Selects your destination street 2 Selecting a Street P 89 House Number Enters the house number to se...

Page 89: ...estination 2 Move r to select OK Press u Selecting the State or Province 1 Selecting the State or Province Move w or y to select the following areas USA for the U S mainland Alaska Hawaii and Puerto R...

Page 90: ...a City 1 Selecting a City Vehicle position may not be displayed when The automobile is traveling off road The vehicle position data cannot be updated You do not need to enter spaces or symbols e g Par...

Page 91: ...larger metropolitan area Try entering the street first Non detailed area mark Try entering the street first and then select the city Selecting a Street 1 Selecting a Street When entering the names of...

Page 92: ...t the top of the list Matching letters are highlighted 3 Enter the street number Only valid street numbers can be entered 4 Move r to select OK Press u 5 Set the route to your destination 2 Calculatin...

Page 93: ...can be entered 2 Move r to select OK Press u If you did not yet select a street name enter a street name when you are prompted 3 Rotate i to select your destination street from the list Press u Select...

Page 94: ...w or y to display only the entries in the categories you have created 2 Selecting an Address Book Category P 40 1 Address Book If you have PIN protected your address book enter your PIN when prompted...

Page 95: ...elect a destination from the list Press u 2 Set the route to your destination 2 Calculating the Route P 108 1 Previous Destination If Previous Destination is grayed out there are no previous destinati...

Page 96: ...2 1 Place Category This option is convenient if you do not know the exact name of a place or if you want to narrow down the number of matches returned for places with a common name Move y to select Ca...

Page 97: ...Sort by Distance to Travel Displays all the places in the subcategory sorted by distance from your current location The closest place is displayed at the top 4 Rotate i to select a place name from the...

Page 98: ...list Press u If the place name is in multiple categories the categories are displayed when you select it 2 Place Name in Multiple Categories P 97 4 Set the route to your destination 2 Calculating the...

Page 99: ...ultiple categories in the map database the following screen is displayed 1 Rotate i to select a place name Press u 2 Rotate i to select a subcategory Press u Place Name in Multiple Categories 1 Place...

Page 100: ...ination Place Name Navigation 3 Rotate i to select a place Press u 4 Set the route to your destination 2 Calculating the Route P 108 1 Place Name in Multiple Categories Move r to select Sort by City o...

Page 101: ...hborhood and restaurant type when prompted 1 Place Phone Number All 10 digits must be entered Phone numbers of private residences entered in your address book are not stored in the database and thus c...

Page 102: ...aurants Press u The following options are available Food D cor Service Lists the restaurants by the rating value Cost Lists the restaurants by the average cost of a meal including drink and tip 3 Rota...

Page 103: ...he surveyed restaurants 1 Rotate i to select a restaurant with the z icon from the place list Press u 2 Rotate i to select ZAGAT Review Press u Press u or say d Read List to have the system read the Z...

Page 104: ...select a category from the list Press u 2 Rotate i to select a place Press u 3 Set the route to your destination 2 Calculating the Route P 108 1 Download POI Move r and rotate i to select the followi...

Page 105: ...oad as a destination U S and Canada only 1 Rotate i to select a state Press u 2 Rotate i to select a scenic road Press u 3 Set the route to your destination 2 Calculating the Route P 108 1 Scenic Rout...

Page 106: ...treet Selects the two intersecting streets The city or cities that the streets are located in are displayed 2 Selecting a Street P 89 Change State Selects the state or province 2 Selecting the State o...

Page 107: ...rompted to define the map area to display 1 Rotate i to select an item Press u The following items are available Current Position Your current location is centered on the map State You are prompted to...

Page 108: ...alculating the Route P 108 4 Rotate i to select Set as Destination Press u 1 Map Input Auto Zoom Press u repeatedly on the map to zoom in to the scale 1 4 mile while scrolling the map Information icon...

Page 109: ...tude and select OK 3 Move w to scroll the map to position the cursor over your desired destination adjusting the map scale as necessary If the address is not the desired location scroll to another loc...

Page 110: ...unverified areas avoid areas or areas with traffic restrictions 1 Calculating the Route The straight line distance as the crow flies not driving distance and direction to the destination are shown You...

Page 111: ...o your destination Rotate i to select a route Press u The travel distance and estimated travel time is displayed for each route The system calculates and displays the route line on the map screen 2 Ro...

Page 112: ...the map scale using voice commands e g say d Display 2 mile scale 2 Map Scale Commands P 310 You can also change the map scale by rotating i You can control the icons displayed on the map screen using...

Page 113: ...ers an alternative way to view your route The next guidance point is displayed as you approach each guidance point on the route You can also view a list of guidance directions Guidance Screen 1 Guidan...

Page 114: ...verified Routing is On the route line changes to a blue pink line to indicate that the route line uses unverified streets Route Line 1 Route Line You can set Unverified Routing to Off to follow your o...

Page 115: ...g P 79 Deviating From the Planned Route Tracking Dots 1 Tracking Dots A message Not on a digitized road may appear when you drive half a mile away from a mapped road Breadcrumbs may occasionally be di...

Page 116: ...i to select Voice in the Map Menu If you select Voice between guidance points voice guidance for the next guidance point is provided 1 Listening to Voice Guidance d Voice on the map screen You can tu...

Page 117: ...Rotate i to select No to pause the route guidance Press u Select Yes to continue the guidance You can resume the route guidance in the following ways Restart the engine when you stop your car e g to r...

Page 118: ...item Press u The following items are available Voice Select to hear the voice guidance when en route 2 Listening to Voice Guidance P 114 1 Map Menu If you scroll the map while en route press the NAV...

Page 119: ...e Guidance Resumes your current route This item is displayed while the route guidance is paused Cancel Route Cancels your current route 2 Canceling the Route P 123 Directions Displays a list of the gu...

Page 120: ...guidance point 2 Press u to select Back to list or press the BACK button to return to the previous screen 1 Directions Guidance points with exit information are indicated by a freeway exit information...

Page 121: ...rmation for different exits You can set the route to your destination 2 Calculating the Route P 108 Freeway Exit Information 1 Freeway Exit Information d Display Freeway Exit Information You can scrol...

Page 122: ...specific incidents and or congestion on your route 1 Rotate i to select an incident from the list Press u The system displays the map screen and the incident location 1 Traffic Rerouting Automatic tra...

Page 123: ...You can choose to avoid up to 10 traffic incidents It is not always possible for the system to calculate a route that avoids all traffic incidents or specific traffic incidents you select The On Route...

Page 124: ...Shows a list of waypoints You can delete waypoints or edit the order of them 2 Editing the Destination List P 128 Pause Guidance Pauses your current route 2 Pausing the Route P 123 Resume Guidance Re...

Page 125: ...nd return to the map screen The destination icons and all waypoint flags remain displayed on the map Press the MENU button when en route and select Resume Guidance to resume the route guidance Canceli...

Page 126: ...are listed in the Destination List 1 Adding Waypoints Waypoints allow you to stop for gas or food for example and then continue on to your destination Press the NAV button to return to the map screen...

Page 127: ...t Press u The following items are available Search Around Searches in a spiral pattern around the location you select Search Along Searches within a corridor on either side of the locations you select...

Page 128: ...elect a place Press u The waypoint is added to the Destination List 4 Rotate i to select a location and move the order of destinations Press u 5 Move r and rotate i to select Start Route Press u The r...

Page 129: ...ering a Destination P 84 A new destination is added to the end of the Destination list 2 Move r and rotate i to select Start Route Press u The route is automatically recalculated and displayed on the...

Page 130: ...u 2 Rotate i to select a list item to move Press u 3 Rotate i to select a new location Press u 4 Move r and rotate i to select Start Route Press u The route is automatically recalculated and displayed...

Page 131: ...1 Rotate i to select a list item to delete Press u 2 Rotate i to select Delete Press u 3 Rotate i to select Yes Press u Deleting Waypoints 1 Deleting Waypoints Move r and rotate i to select Delete All...

Page 132: ...lculate Route Press u The system calculates a new route 1 Taking a Detour The detour option is convenient if you encounter an unexpected obstacle such as a road closure or extremely heavy traffic cong...

Page 133: ...select a category type Press u 3 Rotate i to select a place Press u 4 Rotate i to select Set as Destination Press u 5 Move r to select Clear Current Route Press u The route is automatically recalculat...

Page 134: ...s not the desired location press the BACK button and repeat the procedure 2 Rotate i to select Set as Destination Press u 2 Calculating the Route P 108 3 Move r to select Clear Current Route Press u T...

Page 135: ...enter a new destination 2 Entering a Destination P 84 After entering a new destination the address is displayed on the Calculate Route screen 2 Rotate i to select Set as Destination Press u 3 Move r t...

Page 136: ...Resuming Your Trip The Continue Trip screen has the same options as when you calculate a route 2 Calculating the Route P 108 You can also cancel your destination by pressing any hard button except the...

Page 137: ...u 149 Playing XM Radio 153 Selecting XM Mode 153 Audio Screen Control 153 Audio Menu 155 XM Radio Service 157 Playing a Disc 158 Selecting Disc Mode 158 Audio Screen Control 159 Audio Menu 160 Recomme...

Page 138: ...ntact a dealer 2 XM Radio Service P 157 XM Radio is available in the United States and Canada except Hawaii Alaska and Puerto Rico XM is a registered trademark of Sirius XM Radio Inc Video CDs DVDs an...

Page 139: ...drive using a hub Do not use a device such as a card reader or hard disk drive as the device or your files may be damaged We recommend backing up your data before using the device in your vehicle Dis...

Page 140: ...1 Open the AUX cover 2 Connect a standard audio device to the input jack using a 1 8 inch 3 5 mm stereo miniplug The audio system automatically switches to the AUX mode 1 Auxiliary Input Jack You can...

Page 141: ...dio security code using the touchscreen If you enter an incorrect digit continue to the last digit then try again If you do not enter code correctly after 10 tries leave the system for one hour before...

Page 142: ...select a song 2 Playing FM AM Radio P 147 2 Playing XM Radio P 153 2 Playing Hard Disc Drive HDD Audio P 165 3 Select Edit or No Entry If you select No Entry go to step 6 4 Select Add 5 Select the pr...

Page 143: ...Audio System Setting Audio Shortcuts Audio 1 Select Shortcuts 2 Select Edit 3 Select Delete 4 Select the preset icon with the radio station or a song you want to delete Deleting a preset station or s...

Page 144: ...uetooth Audio Press N To skip to the next song Press B To go back to the beginning of the current or previous song Press and hold N To go to the group up Bluetooth Audio only Press and hold B To go to...

Page 145: ...the audio system automatically switches to the digital radio waves or receives the analogue waves only Cover Art CD MP3 WMA AAC iPod USB Pandora or Aha mode Turns on and off the cover art display Conn...

Page 146: ...ailable on the DVD Subtitle Language DVD mode Selects a language for the subtitle that is available on the DVD Menu Language DVD mode Selects a language for the DVD menu that is available on the DVD A...

Page 147: ...modes Off Low Mid and High SVC adjusts the volume level based on the vehicle speed As you go faster audio volume increases As you slow down audio volume decreases DTS Neural Surround is a trademark o...

Page 148: ...re 2 Select Sound Settings 3 Use N B or other icon to adjust the setting Touchscreen 1 Adjusting the Sound Select Off Low Mid or High for the SVC setting 2 Adjusting the Sound P 145 Select to go back...

Page 149: ...e i to select a preset station Press u Press and hold u for a few seconds to store the current station Press MENU button to display the menu items 2 Audio Menu P 149 1 Playing FM AM Radio d Display au...

Page 150: ...l Select Presets to listen a preset station Select and hold the preset number you want to store that station Select More to display the menu item 2 Audio Menu P 149 Select TAG to tag the song if it is...

Page 151: ...available Scan Scans for stations with a strong signal in the current band and plays a 10 second sample Select Cancel Scan to stop scanning and play the current selection Station List Displays the sto...

Page 152: ...e frequency you select Rotate i to select a frequency then Move u HD subchannel Displays the subchannel list when an HD RadioTM station is selected 1 Audio Menu iTunes Tagging iTunes in iTunes Tagging...

Page 153: ...stations with a strong signal in the current band and plays a 10 second sample Select Cancel Scan to stop scanning and play the current selection Save Preset Stores the station into the preset memory...

Page 154: ...st Provides text data information related to your selected RDS capable FM station To find an RDS station from Station List Rotate i to select the station Press u Manual update Updates your available s...

Page 155: ...nnel Press u Press and hold u for a few seconds to store the current channel Press MENU button to display the menu items 2 Audio Menu P 155 1 Playing XM Radio You can control the XM radio using voice...

Page 156: ...channel In channel mode select and hold to change the channel rapidly Select Presets to listen a preset station Select and hold the preset number you want to store that channel on the preset screen Se...

Page 157: ...Select Cancel Scan to stop scanning and play the current selection Save Preset Stores the station into the preset memory Change Source Changes the audio source mode Channel List Displays the list of a...

Page 158: ...e preset memory Screen Settings Adjusts the screen s preferences 2 Changing the Screen Settings P 82 Scan Scans for channels with a strong signal in the selected mode and plays a 10 second sample Sele...

Page 159: ...al The signal is too weak in the current location Ch unavailable No such channel exists the channel is not part of your subscription or the artist or title information is unavailable Check antenna The...

Page 160: ...use CDs with adhesive labels The label can cause the CD to jam in the unit WMA and ACC files protected by digital rights management DRM cannot be played The audio system displays Unplayable File then...

Page 161: ...ss MENU button to display the menu items 2 Audio Menu P 149 1 Select n to skip to the next folder and b to skip to the beginning of the previous folder in MP3 WMA or AAC 2 Select c or x to change trac...

Page 162: ...first file in each of the main folders Scan Tracks Provides 10 second sampling of all tracks on the CD all files in the current folder in MP3 WMA or AAC Random Repeat Repeat Folder MP3 WMA AAC Repeat...

Page 163: ...2 1 Select More 2 Select a setting item The following items are available depending on the type of disc Sound Settings Displays the sound preferences screen 2 Adjusting the Sound P 145 Random Repeat R...

Page 164: ...Playing a Disc Audio Menu Audio H MENU button in CD mode Music Search Rotate i move w or y to select a file from the Music Search list Press u How to Select a File from the Music Search List MP3 WMA...

Page 165: ...y standard round shaped CDs Some software files may not allow for audio play or text data display Some versions of MP3 WMA or AAC formats may be unsupported 1 Recommended CDs A Dual disc cannot play o...

Page 166: ...objects into the CD player Keep CDs out of direct sunlight and extreme heat Do not place stabilizer rings or labels on the CD Avoid fingerprints liquids and felt tip pens on the CD 1 Protecting CDs Do...

Page 167: ...ically created for each album when a music CD is recorded You can customize up to six user playlists provided on the HDD by adding tracks from your original playlists 1 Select Audio Source 2 Select th...

Page 168: ...match tracks from other CDs recorded on the HDD 2 Editing an Album or Playlist P 171 2 Editing Track Information P 173 If you stop the engine or the power system is turned off while recording a CD th...

Page 169: ...track from the list Press u Press MENU button to display the menu items 2 Audio Menu P 149 1 Select n skip to the next playlist album and b to skip to the beginning of the previous playlist album 2 S...

Page 170: ...ges the audio source mode Random Repeat The following menu items vary depending on the category you selected by the Music Search list Repeat Artist Repeats all tracks in the current artist Repeat Albu...

Page 171: ...in the current artist Repeat Album Repeats all tracks in the current album Repeat Track Repeats the current track Random in Artist Plays all tracks in the current artist in random order Random in Albu...

Page 172: ...HDD Audio Audio Menu Audio H MENU button in HDD mode Music Search 1 Move w or y to select a search category Press u 2 Rotate i to select a track from the Music Search list Press u How to Select a Trac...

Page 173: ...n also delete tracks Editing an Album or Playlist 1 Editing an Album or Playlist The maximum number of songs in each of the six user playlists is 999 Adding new songs overwrites the oldest songs The m...

Page 174: ...D Audio Audio Menu Audio H MENU button in HDD mode Edit Delete Playlists Create New Playlist 1 Enter the playlist name using the interface dial or the touchscreen 2 Select tracks from the music search...

Page 175: ...genre and composer You can also delete tracks Rotate i select a track you want to edit or delete Press u The pop up menu appears on the screen The following items are available Edit Name Enter the tra...

Page 176: ...quired by accessing the Gracenote Album Info 1 Rotate i to select Albums Press u 2 Rotate i to select an album that you want edit or delete Press u The pop up menu appears on the screen 3 Rotate i to...

Page 177: ...the update 2 Rotate i to select Update Gracenote Album Info Press u 3 Rotate i to select Update by CD or Update by USB Press u The system starts updating and the confirmation message appears on the sc...

Page 178: ...176 Playing Hard Disc Drive HDD Audio Audio Menu Audio H SETTINGS button Audio Settings Delete all HDD Data Delete all music data on the HDD Rotate i to select Yes Press u Deleting all HDD Data...

Page 179: ...device model and software version Your audio system may not work with all software versions of these devices If the audio system does not recognize your iPod try reconnecting it a few times or reboot...

Page 180: ...iPod Press u 2 Select Audio Source 3 Select the iPod icon 1 Playing an iPod You can control an iPod using voice commands 2 Voice Control Operation P 5 2 Song By VoiceTM SBV P 184 Available operating f...

Page 181: ...1 Rotate i or press u o display the song list 2 Rotate i move w or y to select a song from the list Press u Press MENU button to display the menu items 2 Audio Menu P 149 1 Audio Screen Control This f...

Page 182: ...ayed 2 Select c or x to search for an album When the album image you are looking for appears select it to play Select More to display the menu item 2 Audio Menu P 149 Touchscreen Song AAA Song AAA Son...

Page 183: ...Song from the Music Search List P 183 Change Source Changes the audio source mode Shuffle Repeat Repeat Song Repeats the current track Shuffle Albums Plays all available albums in a selected list play...

Page 184: ...at Repeat Song Repeats the current track Shuffle Albums Plays all available albums in a selected list playlists artists albums songs genres or composers in random order Shuffle All Songs Plays all ava...

Page 185: ...Audio Menu Audio H MENU button in iPod mode Music Search 1 Move w or y to select a search category Press u 2 Rotate i to select a file from the Music Search list Press u How to Select a Song from the...

Page 186: ...and play music from your HDD or iPod using voice commands H SETTINGS button System Settings Song by Voice Rotate i to select On or Off Press u The following items are available On factory default Son...

Page 187: ...song continues playing Searching for music using Song By VoiceTM SBV 1 Searching for music using Song By VoiceTM SBV Song By VoiceTM Commands List 2 Song By VoiceTM commands P 314 NOTE Song By VoiceT...

Page 188: ...sier for SBV to recognize artists songs albums and composers in voice commands when searching for music on the HDD or iPod 1 Move u and i rotate to select New Modification Press u 2 Rotate i to select...

Page 189: ...ected item appears on the screen 4 Rotate i to select an entry e g No Name Press u The pop up menu appears on the screen 5 Rotate i to select Modify Press u The listen to the current phonetic modifica...

Page 190: ...spelling you wish to use e g Artist A when prompted 7 Move r to select OK to exit The artist No Name is phonetically modified to Artist A When in the SBV mode you can press the d Talk button and use t...

Page 191: ...Media Inc used with permission Pandora is currently available exclusively in the United States To find out if your phone is compatible with this feature visit www handsfreelink honda com or call 1 888...

Page 192: ...anging the Screen Settings P 82 Interface Dial Skip Forward Dislike Play Pause Bookmark Track Station List Bookmark Artist Like 1 Pandora Menu You can control Pandora using voice commands 2 Voice Cont...

Page 193: ...e radio stations You can access podcasts internet radio location based services and audio updates from social media sites You can control AhaTM Radio using voice commands 2 Voice Control Operation P 5...

Page 194: ...192 Playing Internet Radio AhaTM Radio Menu Audio H MENU button in AhaTM mode Stations Rotate i to select a station form the Station list Press u How to Select a Station from the Station List...

Page 195: ...a USB Flash Drive 1 Connecting a USB Flash Drive Do not connect your USB flash drive using a hub Do not use a device such as a card reader or hard disk drive as the device or your tracks may be damag...

Page 196: ...ress u 2 Select Audio Source 3 Select the iPod icon 1 Playing a USB Flash Drive You can control a USB flash drive using voice commands 2 Voice Control Operation P 5 Files in WMA ACC format protected b...

Page 197: ...ct a song from the list Press u Press MENU button to display the menu items 2 Audio Menu P 149 1 Select b to skip to the next folder and n to skip to the beginning of the previous folder 2 Select c or...

Page 198: ...ond sampling of all files in the current folder Random Repeat Repeat Folder Repeats all files in the current folder Repeat Track Repeats the current file Random in Folder Plays all files in the curren...

Page 199: ...the current folder Repeat Track Repeats the current file Random in Folder Plays all files in the current folder in random order Random All Tracks Plays all files in random order Scan Scan Folders Pro...

Page 200: ...Drive Audio Menu Audio H MENU button in USB mode Music Search 1 Move w or y to select a search category Press u 2 Rotate i to select a file from the Music Search list Press u How to Select a File fro...

Page 201: ...ge Source Press u 4 Rotate i to select Bluetooth Audio Press u 2 Select Audio Source 3 Select the Bluetooth icon Interface Dial Touchscreen 1 Playing Bluetooth Audio Not all Bluetooth enabled phones w...

Page 202: ...s a song Change Source Changes the audio source mode 2 Selecting Disc Mode P 158 Music Search Selects a song from the Music Search list 1 Audio Screen Control To play the audio files you may need to o...

Page 203: ...ay the menu items then select a setting item The following items are available Sound Settings Displays the sound preferences screen 2 Adjusting the Sound P 145 Screen Settings Displays the screen pref...

Page 204: ...202...

Page 205: ...ell phone Bluetooth HandsFreeLink 204 Using HFL 204 Pairing a Phone 206 Importing Phonebook Data 212 Setting Up Speed Dialing 213 Phonebook Phonetic Modification 216 Phone Settings 221 Making a Call 2...

Page 206: ...ng procedures and special feature capabilities Visit www handsfreelink honda com or call 1 888 528 7876 Voice control tips Aim the vents away from the ceiling and close the windows as noise coming fro...

Page 207: ...Display 1 Bluetooth HandsFreeLink Bluetooth Wireless Technology The Bluetooth word mark and logos are registered trademarks owned by Bluetooth SIG Inc and any use of such marks by Honda Motors Co Ltd...

Page 208: ...and search for Bluetooth devices using your phone From your phone select HandsFreeLink 1 Pairing a Phone Your Bluetooth compatible phone must be paired to HFL before you can make and receive hands fr...

Page 209: ...iring is successful H SETTINGS button Phone Settings Connect Phone 1 Rotate i to select Add Bluetooth Device 2 Make sure your phone is in search or discoverable mode Press u HFL automatically searches...

Page 210: ...search again If your phone still does not appear move r to select Phone not Found and search for Bluetooth devices using your phone From your phone select HandsFreeLink 4 HFL gives you a pairing code...

Page 211: ...t Fixed or Random Press u Changing the Pairing Code 1 Changing the Pairing Code The pairing code may be six or four digits depending on your phone The default pairing code is 0000 until you change the...

Page 212: ...o select Replace This Device Press u 3 HFL enters the pairing process and searches a new phone Follow the prompts to pair a new phone 4 You will receive a notification on the screen if pairing is succ...

Page 213: ...Device List 1 Rotate i to select a paired phone you want to replace Press u 2 Rotate i to select Delete This Device Press u 3 You will receive a confirmation message on the screen Rotate i to select...

Page 214: ...g Phonebook Data When you select a person from the list in the cellular phonebook you can see up to three category icons The icons indicate what types of numbers are stored for that name On some phone...

Page 215: ...Press u 2 Rotate i to select a number entry method Press u The following options are available Import from Call History Select a number from the call history Manual Input Input the number manually Imp...

Page 216: ...s u 3 Rotate i to select Voice Tag Press u 4 From the pop up menu rotate i to select Record Press u 5 Using the d button follow the prompts to complete the voice tag Registering a Voice Tag to a Speed...

Page 217: ...ss u 3 Rotate i to select Voice Tag Press u 4 From the pop up menu rotate i to select Clear Press u 5 You will receive a confirmation message on the screen Rotate to select Yes Press u To delete a spe...

Page 218: ...dd phonetic modifications or a new voice tag to the phone s contact name so that it is easier for HFL to recognize voice commands To add a new voice tag 1 Rotate i to select the phone you want to add...

Page 219: ...name Press u The pop up menu appears on the screen 4 Rotate i to select Modify Press u 5 Using the d button follow the prompts to complete the voice tag 6 You will receive a confirmation message on t...

Page 220: ...e i to select a contact name you want to modify Press u The pop up menu appears on the screen 3 Rotate i to select Modify Press u 4 Using the d button follow the prompts to complete the voice tag 5 Yo...

Page 221: ...to select the phone you want to delete phonetic modification Press u 2 Rotate i to select a contact name you want to delete Press u The pop up menu appears on the screen 3 Rotate i to select Delete th...

Page 222: ...all modified voice tags 1 Rotate i to select the phone you want to delete phonetic modification Press u The contact name list appears 2 Move r and rotate i to select Delete All Press u 3 You will rec...

Page 223: ...Rotate i to select the phone you want to add a security PIN to Press u 2 Rotate i to select Edit PIN Press u 3 Enter a new four digit number Rotate i to select OK to enter the security PIN Move w to d...

Page 224: ...gs Bluetooth Device List Edit the user name of a paired phone as follows 1 Rotate i to select a phone you want to edit Press u 2 Rotate i to select Edit Device Name Press u 3 Enter a new name of the p...

Page 225: ...f you get into the vehicle while you are on the phone the call can be automatically transferred to HFL Rotate i to select On Press u H SETTINGS button Phone Settings Auto Answer You can set HFL to aut...

Page 226: ...You can change the ring tone setting Rotate i to select your desired setting item Press u The following items are available Fixed The fixed ring tone sounds from the speaker Mobile Phone The ring tone...

Page 227: ...to select On or Off Press u H SETTINGS button Phone Settings Use Contact Photo You can display a caller s picture on an incoming call screen Rotate i to select On Press u Automatic Phone Sync setting...

Page 228: ...aking a Call Any voice tagged speed dial entry phonebook name or number can be dialed by voice from most screens Press the d button and say Call and the voice tag name Call by name and the phonebook n...

Page 229: ...on the touch screen for an alphabetical search 2 Rotate i to select a number Press u Dialing starts automatically Using the Phonebook 1 Using the Phonebook This function is disabled while the vehicle...

Page 230: ...an display a caller s picture on an incoming call screen Rotate i to select Dial Press u Dialing starts automatically Entering a Phone Number 1 Entering a Phone Number This function is disabled while...

Page 231: ...selector wheel right to select Call History 3 Roll the left selector wheel to select a number 4 Push the left selector wheel or the h button Dialing starts automatically Using Call History 1 Using Cal...

Page 232: ...g starts automatically Using Speed Dial 1 Using Speed Dial Move r to select More Speed Dials to view another paired phone s speed dial list You can make a call from that list using the currently conne...

Page 233: ...creen appears 1 Press the h button to answer the call 2 Press the J button to decline or end the call 1 Receiving a Call Call Waiting Press the h button to put the current call on hold to answer the i...

Page 234: ...when Mute is selected Select Mute again to turn it off The following options are available during a call Mute Mute your voice Transfer Transfer a call from HFL to your phone Touch Tones Send numbers...

Page 235: ...s u H SETTINGS button Phone Settings New Text Email Alert Rotate i to select On or Off Press u The following items are available On A pop up notification comes on every time you receive a new text mes...

Page 236: ...n System Settings Message Auto Reading Rotate i to select On Off or Auto Press u The following items are available On A text message Email is always read aloud Off A text message Email is not read alo...

Page 237: ...il accounts you can select one of them to be active and receive notifications Rotate i to Text Messages or an E mail account you want Press u 1 Selecting a Mail Account You can also select a mail acco...

Page 238: ...he system automatically starts reading out the message 3 To discontinue the message read out Press u 1 Receiving a Text Message E mail The system does not display any received messages while you are d...

Page 239: ...ext message is displayed The system automatically starts reading the message aloud Displaying text messages 1 Displaying Messages The icon appears next to an unread message If you delete a message on...

Page 240: ...lect a folder Press u 2 Rotate i to select a message Press u The text message is displayed The system automatically starts reading the message aloud Displaying E mails 1 Displaying E mails Received te...

Page 241: ...e message aloud 2 Displaying Messages P 237 2 Press u to stop reading Press u again to start reading the message from the beginning 1 Go to the text message or E mail screen The system automatically s...

Page 242: ...en the reply message was successfully sent 1 Go to the text message screen The system automatically starts reading the message aloud 2 Displaying text messages P 237 2 Move r and rotate i to select Ca...

Page 243: ...the screen when the vehicle is moving and the operation is canceled Edit the user name of a paired phone Phone Edit Device Name Connect phone Bluetooth Device List Existing entry list Replace This Dev...

Page 244: ...elete a voice tag Delete a previously stored speed dial number Set calls to automatically transfer from your phone to HFL when you enter the vehicle Auto Transfer Auto Answer Ring Tone Set whether to...

Page 245: ...New Entry Import from Call History Import from Phonebook Select a phone number from the phonebook to store as a speed dial number Enter a phone number to store as a speed dial number More Speed Dials...

Page 246: ...ved message using one of six fixed phrases Make a call to the sender Select Account Select a message and press Select a mail or text message account Redial 1 Redial the last number dialed in the phone...

Page 247: ...ol Panel Operation 250 Selecting the Audio Source 250 Rear DVD Menu 251 Screen and Surround Settings 254 DVD Initial Settings RES only 257 Dual Screen Mode Ultrawide RES only 258 Replacing the Batteri...

Page 248: ...the driver s side V Video jack L Left audio jack R Right audio jack Auxiliary Input Jacks The system will accept auxiliary inputs from standard video games and video equipment Some video game power su...

Page 249: ...nt System HDMI Input Jack Ultrawide RES only There is an HDMI input jack above the third row seat armrest on the passenger s side The system will accept HDMI input from video games and video equipment...

Page 250: ...FM Radio XM Radio CD DVD 1 HDD USB iPod Bluetooth Audio Pandora AhaTM AM FM Radio Yes Yes Yes Yes Yes Yes Yes Yes XM Radio Yes Yes Yes Yes Yes Yes No No CD Yes Yes Yes Yes Yes Yes Yes Yes DVD Yes Yes...

Page 251: ...y Rovi Corporation Reverse engineering and disassembly are prohibited Manufactured under license under U S Patent Nos 5 956 674 5 974 380 6 487 535 other U S and worldwide patents issued pending DTS t...

Page 252: ...anel 3 Select the audio source Press the ENTER button You can also change the audio source by the front control panel 2 Selecting the Audio Source using front control panel P 261 4 Select a station ch...

Page 253: ...ing and changes the DVD s audio subtitle or angle settings 2 Setting the Play Mode P 252 Initial Settings Displays while a DVD is not playing and changes the DVD preferences 2 DVD Initial Settings RES...

Page 254: ...Play Mode 1 Select an item Press the ENTER button 2 Select an option Press the ENTER button The following items are available Audio Selects the language of the DVD audio Subtitle Selects the language...

Page 255: ...n 2 Select a number Press the ENTER button The following items are available Title Skips to a title you specify Chapter Skips to a chapter you specify NumInput Enters a number of a title or chapter to...

Page 256: ...ance Ultrawide RES only Selects the color of the rear menu screen Display Adjust Adjusts the screen s preferences 2 Adjusting the Screen P 255 Aspect Ratio Selects an aspect ratio of the image 2 Setti...

Page 257: ...utton 2 Make the adjustment Press the ENTER button The following items are available Brightness RES only Adjusts the screen s brightness Contrast Adjusts the screen s contrast Black Level Adjusts the...

Page 258: ...R button H MENU button in the DVD mode Aspect Ratio 1 Select an item Press the ENTER button 2 Select an item Press the ENTER button The following items are available Wide Selects the wide screen optio...

Page 259: ...elect an option Press the ENTER button The following items are available Language Settings Selects a menu language of the DVD top menu 2 Selecting the DVD Menu Language P 258 Dynamic Range Sets whethe...

Page 260: ...wide RES only Select between the two screen modes single or dual Single Mode The selected source is displayed in the center of the screen Dual Mode Two separate screens are displayed side by side You...

Page 261: ...ar Entertainment System Single mode to Dual mode Dual mode to Single mode DVD Press the DUAL button Select the side e g Left Select a source e g AUX VIDEO Press the SWAP button DVD AUX VIDEO AUX VIDEO...

Page 262: ...e Batteries 1 Remove the rear control panel 2 Overhead Screen and Rear Control Panel P 14 2 Open the cover 3 Change the batteries Battery type BR3032 1 Replacing the Batteries An improperly disposed o...

Page 263: ...Rear 9 Power button on the front control panel 2 Press the REAR AUDIO button The rear source is displayed on the front audio screen and the touchscreen The rear source is heard from the front speakers...

Page 264: ...the rear control panel to control the RES On factory default Operates the RES using the rear control panel Off Disables the feature Rear Speaker Sets the front audio source to play through the rear s...

Page 265: ...ess u Select Other Function to display additional menu entries 2 Rotate i to select an option Press u The following items are available Top Menu Displays the top menu of the DVD Menu Displays the menu...

Page 266: ...the DVD menu Number Input Enters a number of a title or chapter to skip Search Skips to a title or chapter by Interface Dial 1 Select More 2 Select a setting item The following items are available So...

Page 267: ...ight earpiece 3 Wear the headphones correctly with the left and right earpieces on the correct sides L left and R right are marked on the sides of the frame 1 Using the Wireless Headphones When you re...

Page 268: ...e left and right side screens Slide the tab to L for the left side or R for the right side Wireless Headphone 1 Changing the Sound Source Ultrawide RES only You can switch the sound source from the se...

Page 269: ...ew battery in the earpiece as shown in the diagram next to the battery slot Battery Type AAA battery 5 Slide the cover back into place on the earpiece then press down on the back edge to lock it in pl...

Page 270: ...268...

Page 271: ...nto the navigation system to help make your journey easier and more enjoyable Trip Computer 270 Calendar 271 Information Functions 272 System Device Information 272 Map Data Update 272 Info Screen Pre...

Page 272: ...reset Trip A Delete History Deletes the trip information Move r on the Trip A screen to select Delete History then press u You will receive a confirmation message on the screen Rotate i to select Yes...

Page 273: ...271 Other Features Calendar H INFO button Calendar View the calendar screen Move w or y to select the months of the year...

Page 274: ...information Map Data Update H SETTINGS button Navi Settings Map Map Data Update Check the map data update status when updating the map database 1 System Device Information You will need this informat...

Page 275: ...S button Info Settings Other Info Screen Preference Select the top menu when the INFO button is pressed Rotate i to select your desired setting item Press u The following options are available Info To...

Page 276: ...e rear camera view is restricted You cannot see the corner ends of the bumper or what is underneath the bumper Its unique lens also makes objects appear closer or farther than they actually are Visual...

Page 277: ...ess u The following items are available Fixed Guideline On factory default Guidelines appear when you shift into Reverse Off Guidelines do not appear when the dynamic guideline is off Dynamic Guidelin...

Page 278: ...276...

Page 279: ...ations 280 Traffic 282 Guidance Routing 283 Update Coverage Map Errors 285 Display Accessories 285 Miscellaneous Questions 285 Error Messages 286 Navigation System 286 CD Player 287 Hard Disc Drive HD...

Page 280: ...n directly from the map 2 Map Input P 105 Why do some letters become grayed out when I enter an address As you enter each letter in an address or a place landmark the navigation system looks in the da...

Page 281: ...maximum 2 Press the SETTINGS button Select Navi Settings Map Color Night Set the Night color to Black for the best contrast 2 Switching Display Mode Manually P 70 The screen is dark when I drive durin...

Page 282: ...see your Honda dealer for assistance The navigation system sometimes provides a detour route when I am driving a route on the freeway If Traffic Rerouting is set to On the navigation system provides a...

Page 283: ...t reception remove items from the dashboard such as radar detectors cell phones or loose articles Metallic tinting or other aftermarket devices can interfere with the GPS reception Please consult a de...

Page 284: ...s being used when routing When you draw your area to avoid make sure to select sections of roads that include at least one intersection 2 Avoided Area P 55 My elevation shown when I display the curren...

Page 285: ...ico and Mexico The navigation system will not work in other countries 2 Map Coverage P 299 How do I report errors I find in the database Minor errors are bound to occur in a large database If you enco...

Page 286: ...on system atmospheric pressure is too low For protection the system will shut off until the pressure returns to safe levels The HDD is inoperable due to low atmospheric pressure Move your vehicle to t...

Page 287: ...at the disc is not damaged or deformed and insert the disc again 2 Protecting CDs P 164 If the error message reappears press the button and pull out the disc Insert a different disc If the new disc pl...

Page 288: ...ion the system will shut off until the display cools down Turn the audio system off and allow the player to cool down until the error message is cleared The navigation system temperature is too low Fo...

Page 289: ...error Unsupported Version Appears when an unsupported iPod is connected If it appears when a supported iPod is connected update the iPod software to the newer version Connect Retry Appears when the s...

Page 290: ...st on the device Use the device to create a station Music licenses force us to limit the number of tracks you may skip each hour Appears when you try to skip a song or select Dislike over the predeter...

Page 291: ...ct a dealer Error Message Solution Cannot connect to HondaLink When stopped check your mobile device Appears when the AhaTM app is not activated Check your device Incompatible USB Device Please Check...

Page 292: ...292...

Page 293: ...dress Calculation 296 Database 296 Customer Assistance 298 Resolving Problems 298 Reporting Errors 298 Honda Automobile Customer Service Contact Information 298 Visiting a Dealer 298 Map Coverage 299...

Page 294: ...ystem is reactivated when the system s control unit recognizes that the system is in your vehicle If the control unit fails to recognize ENTER CODE appears on the navigation screen 3 If necessary ente...

Page 295: ...ng is the process of using the acquired GPS information to locate your position on the map screen If you are on a mapped road the name of the road is displayed along the bottom of the map screen when...

Page 296: ...ss Calculation The destination icon shows only the approximate location of a destination address This occurs if the number of possible addresses is different from the number of actual addresses on a b...

Page 297: ...y Availability or proximity of law enforcement Emergency rescue medical or other assistance Construction work zones or hazards Road and lane closures Legal restrictions such as vehicular type weight l...

Page 298: ...se do not report errors in places landmarks such as changes in business names Information about points of interest are constantly being updated An updated database is available for purchase usually in...

Page 299: ...s on the most recent update 4 Click Map Coverage Details to display a PDF document with a full listing of all coverage areas Adobe Reader is required for viewing and printing the Portable Document For...

Page 300: ...ation in Alaska Hawaii Canada Puerto Rico and Mexico All roads displayed on the map screens are verified roads Information in this manual relating to unverified roads or areas is not applicable Enteri...

Page 301: ...rovisions If for any reason you do not wish to be bound by the terms of this Agreement please return the HDD to your dealer The HDD may not be copied duplicated or otherwise modified in whole or in pa...

Page 302: ...oyama Minato Ku Tokyo 107 8556 JAPAN Alpine Electronics Inc 20 1 Yoshima Kogyodanchi Iwaki Fukushima 970 1192 JAPAN NAVTEQ Corporation 425 W Randolph St Chicago IL 60606 USA You have acquired a device...

Page 303: ...ND DISASSEMBLY You may not reverse engineer decompile or disassemble the SOFTWARE except and only to the extent that such activity is expressly permitted by applicable law notwithstanding this limitat...

Page 304: ...no rights to use such content All rights not specifically granted under this EULA are reserved by MS Microsoft Corporation their affiliates and suppliers Use of any on line services which may be acces...

Page 305: ...cenote its features and downloads are Gracenote Music Recognition Service CDDB available at www honda com in U S or www honda ca in Canada CD and music related data from Gracenote Inc copyright 2000 t...

Page 306: ...tifier to track queries for statistical purposes The purpose of a randomly assigned numeric identifier is to allow the Gracenote service to count queries without knowing anything about who you are For...

Page 307: ...user to be notified that any changes or modifications made to this device that are not expressly approved by the party responsible for compliance may void the user s authority to operate the equipmen...

Page 308: ...308...

Page 309: ...Commands Voice Commands 310 Navigation Commands 310 Voice Portal Commands 312 Phone Commands 312 Info Commands 313 Climate Control Commands 313 Audio Commands 314 On Screen Commands 318 Spelling Assis...

Page 310: ...ocation shows current latitude longitude and elevation Display Hide specify icon type ATM gas station restaurant post office grocery store lodging hotel motel parking garage parking lot school hospita...

Page 311: ...tel Resort Recreation Amusement park Golf course Historical monument Marina Movie theater Museum Park Performing arts Sports complex Tourist attraction Restaurant ZAGAT restaurant American restaurant...

Page 312: ...splay destination map Display entire route Cancel route Repeat guidance These commands are not available if you scroll through the map while en route to a destination Route Commands Voice Portal Comma...

Page 313: ...emperature down Passenger temperature up Passenger temperature down Temperature max heat Temperature max cool Driver temperature max heat Driver temperature max cool Passenger temperature max heat Pas...

Page 314: ...stening to Who am I listening to Who is this What s playing Who s playing What album is this Hard Disc Drive play Hard Disc Drive play track 1 to 30 Hard Disc Drive skip forward Hard Disc Drive skip b...

Page 315: ...sc folder repeat 1 Disc folder scan 1 Disc normal play 1 These commands toggle the function on and off so the command may not match your intended action iPod play iPod play track 1 to 30 iPod skip for...

Page 316: ...he AhaTM is playing Aha radio play Aha radio skip forward Aha radio skip back Aha radio station up Aha radio station down Aha radio resume Aha radio pause Aha radio like Aha radio dislike AUX commands...

Page 317: ...Rear CD skip forward Rear CD skip back Rear CD track random Rear CD track repeat Rear CD track scan Rear CD normal play resumes Play from the random repeat or scan play Rear CD folder up Rear CD fold...

Page 318: ...bum shuffle Rear iPod track repeat Rear iPod normal play resumes Play from the shuffle or repeat play These commands toggle the function between on and off so the command may not match your intended a...

Page 319: ...Or say A Apple Alpha B Boy Bravo C Charlie D Dog Delta E Edward Echo F Frank Foxtrot G George Golf H Henry Hotel I Igloo India J John Juliet K King Kilo L Larry Lima M Mary Mike N Nancy November O Os...

Page 320: ...lex A umlaut C cedilla E grave E acute E circumflex E umlaut I acute I circumflex I umlaut O acute O circumflex O umlaut U grave U acute U circumflex U umlaut Say Say or Symbol Symbols Say Say or Symb...

Page 321: ...le quote Comma Apostrophe Inverted exclamation point Inverted question mark Left pointing double angle quotation mark Right pointing double angle quotation mark Percent _ Underscore Less than Greater...

Page 322: ...s All Types Check Cashing Money Transfer Marina Tourist Attraction Home Improvement ATM Currency Exchange Movie Theater Travel Bank Restaurant All Types Parking Garage House Community All Types Indian...

Page 323: ...anish 0401 Dutch 1412 English 0514 Esperanto 0515 Estonian 0520 Faroese 0615 Fijian 0610 Finnish 0609 French 0618 Frisian 0625 Galician 0712 Georgian 1101 German 0405 Greek 0512 Greenlandic 1112 Guara...

Page 324: ...and 1907 Sanskrit 1901 Scottish Gaelic 0704 Serbian 1918 Serbo Croatian 1908 Seth Thu 1920 Setswana 2014 Shona 1914 Sindhi 1904 Sinhalese 1909 SiSwati 1919 Slovak 1911 Slovene 1912 Somali 1915 Somoan...

Page 325: ...Audio Playing 199 Voice Commands List 316 Bluetooth HandsFreeLink Editing User Name PIN 221 222 Importing Phonebook Data 212 Making a Call 226 Pairing a Phone 206 Phone Settings 221 Receiving a Call...

Page 326: ...e Point 63 H HDD Playing 165 Voice Commands List 314 Home Address 11 42 Honda Automobile Customer Service 298 House Number 91 I Import Phonebook Data 212 Interface Dial 7 Intersection 104 iPod Connect...

Page 327: ...197 Restaurant Place Category 94 Route Option 122 Route Preference 50 Routing 49 S Scan Disc 160 161 FM AM Radio 149 151 HDD 168 169 USB Flash Drive 196 197 Scenic Road Information 272 Scenic Route 1...

Page 328: ...i Settings 72 View Area Map 55 View Routes 109 Voice Map Menu 114 Voice Commands Basic Operation 8 Help 15 Voice Commands List 310 Voice Control System 22 Voice Control Operation Basic Operation 5 Voi...

Reviews: