Congratulations and Thank-you for your purchase of Hogtunes
572.2-AA speakers! Since positive word of mouth is the best way
to grow our business, we want your new speakers to work as well
as they were designed to. If you have any questions or concerns,
we are here to help. Email [email protected], or call us during
regular business hours (EST) at 705-719-6361. You can see a video
of these speakers being installed at www.hogtunes.com/videos/
videos/5x7RG.html If you still need help, then please consider a
professional installation by your dealer.
IMPORTANT:
Hogtunes 572.2-AA’s are 2 ohm (2
Ω
) speakers
and will cause damage if wired directly to 1998-2005 factory
radios built in power! These will also cause damage to most car
radios if wired directly to the car radios built in power. Please
check your car radios specifications to make sure it is 2 ohm
stable. Hogtunes 572.2-AA speakers can be used in 1998-2005 or
bikes with a car radio if being powered by a Hogtunes amp, or
any amplifier capable of powering a 2 ohm load.
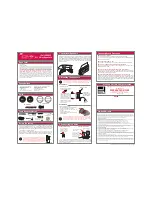
572.2-AA Speaker Installation Instructions:
Step #1: Make sure your ignition switch stays in the “OFF” posi-
tion. Remove your outer fairing/headlamp assembly, and set
aside. Refer to a service manual if you need help with this. It’s
always a good idea to have a towel or something similar on your
front fender to avoid dings or scratches if anything is dropped—
this can and most likely will happen!
Step #2: Unplug the factory wires at each front speaker. Locate
and remove the 3 torx head screws, and single “speed nut” that
holds each speaker grill to the bike. The speakers and grills will
come off as one unit. Put these aside.
Step#3: In the kit is a bag with screws. Using the supplied longer
Philips head screws, install each 572.2-AA grill to the bike, and re-
install the stock “speed nut” on each side. Using the shorter sup-
plied Philips head screws, install the 5”x7” speakers to the grills,
noting that the speakers must be oriented so the wire connectors
are closest to the radio.
DO NOT (REPEAT—DO NOT) USE
THE FACTORY SCREWS FOR THIS STEP!
Step#4: Re-attach the factory wires to each speaker. Note: It is a good
idea to take a pair of pliers and gently squeeze the female connectors
of the speaker wires onto the male connectors of the speakers to in-
sure a very snug fit! If wiring to a car radio, the smaller connector is
the positive (+) , and the larger connector is the negative (-).
Step#5: Turn the radio on and test your speakers. Re-install the
bikes fairing/headlamp assembly. Your new Hogtunes speakers are
ready to enjoy!
Note-There are many different options for you to add amplifiers,
tweeters, or more speakers to your system depending on the body-
work on your bike. Please visit www.hogtunes.com to see all the
options,. Feel free to call us to discuss or visit your local dealer.
Warranty Information:
Hogtunes speakers are warranted for a period of 20 years to the
original purchaser. Proof of purchase is required for all warranty
claims. All Warranty claims must be made through the dealer this
product was originally purchased from. Products found to be de-
fective during the warranty period will be replaced (with a product
deemed to be equivalent) at Hogtunes sole discretion.
What Is Not Covered:
1)Any expense related to the removal or re-installation of
these speakers.
2)Repairs to these speakers performed by anyone other
than Hogtunes Inc.
3)Subsequent damage to any other components.
4)Any product purchased from a non-authorized Hogtunes dealer.
5)Damage to speakers from an accident or collision.
Here at Hogtunes, we design all products from the ground up, and
specify all parts right down to the adhesives used to hold the
speakers together. Since we are constantly testing and investigat-
ing different technologies, any and all specifications or features are
subject to change without notice.