background image

VIZIT-M44

OPERATING INSTRUCTION

VIZIT-M44

PAL

!

1MG

1MG

VIZIT

PARTS LIST

SAFETY INSTRUCTIONS

CAUTION

27V

is a colour monitor (

) with a built-in memory for 64 B/W images. The Monitor is intended for use as

a subscriber device within

video doorphones.

The Monitor does not contain voltage above

.

Do not perform any connections or repair when the power supply unit is on. Take care not to spill any liquids or chemically

active substances on the product. Unplug the power supply unit before cleaning the Monitor. Clean by wiping with dry soft
cloth. Do not use any liquid cleaners, aerosol cleaners or abrasive agents.

Do not attempt to service the product by yourself. Please refer all services to qualified service personnel.
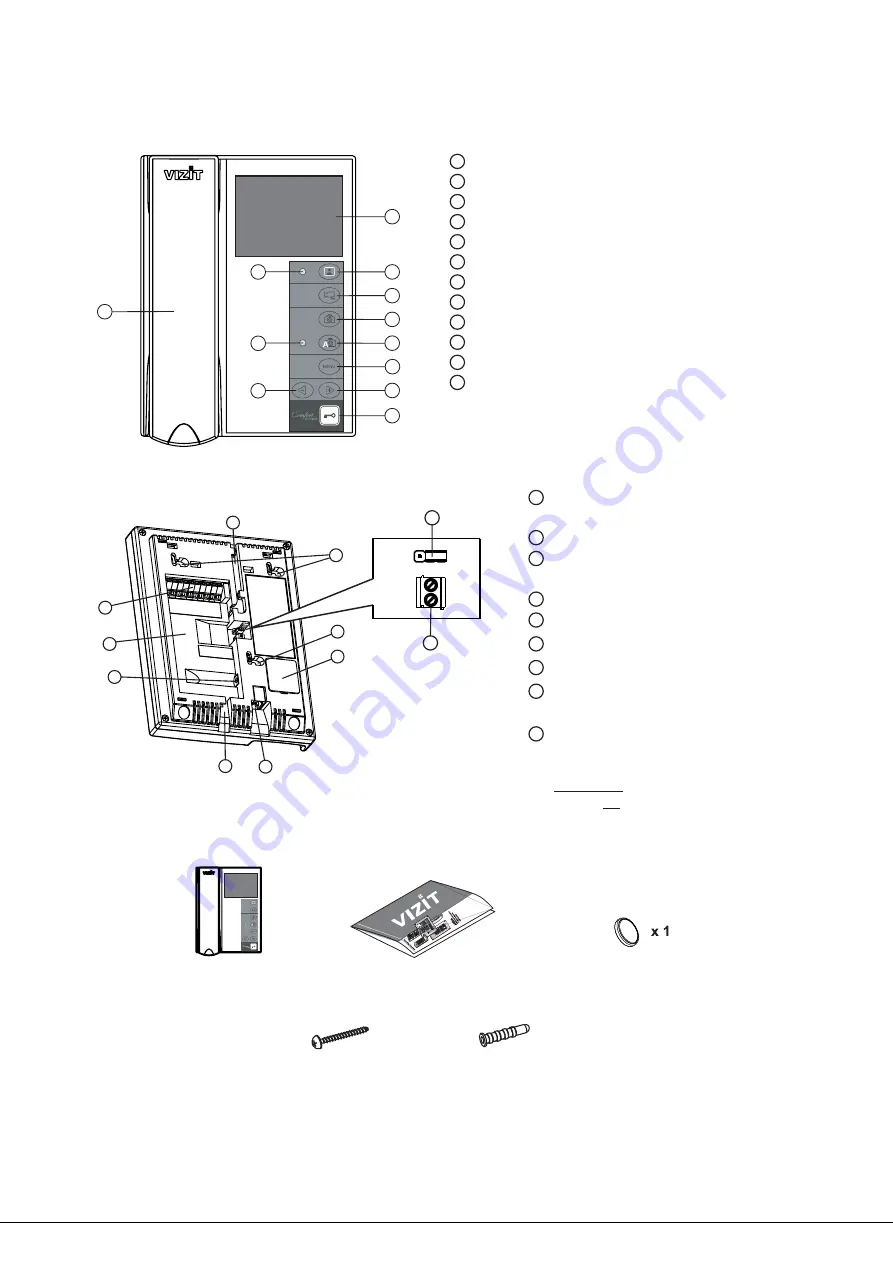
Figure

Appearance and controls layout

1 -

Handset
Door Open button
Increase value / view next image button
Decrease value / view previous image button
On-screen menu button

AWAY mode LED indicator
Image capture button
Switch to additional camera button
MONITOR button
Power LED
Screen

AWAY mode button

www.

2016-0 )

VIZIT-M441MG Operating Instruction (revision

7

vizit-group.com

1 1

/1

Figure

Rear view

2 -

1

3

2

Connecting terminals (to video doorphone
and an outdoor camera)

DC IN to connect a power supply unit
19w/14.4v/EU(18V/1.0A)

Recess for cables

4

6

5

Inlets for cables

Battery cover

Socket for the handset jack

1

3

2

4

6

5

7

8

9

10

11

12

7

Fixing lugs

Screw 3.5 25

-

х

Anchor 6х30

x 3

x 3

Fasteners

Operating Instruction

x 1

x 1

- 44

Monitor

VIZIT M

1MG

Battery CR2032

1

7

3

9

2

4

5

10

12

11

6

8

Jumper
The jumper shall be set to

position, if an

additional apartment handset UKP is

to the Monitor, or to

position in

case of

additional apartment handset UKP.

E

HS

E

QV./HS

QV.

connected

no

8

Terminals to connect an additional
apartment handset UKP

9

4

7

5

4

1

3

2

HS+
HS-

HS

EQV.

6

7

8

9

Summary of Contents for VIZIT-M441MG

Page 1: ... view next image button Decrease value view previous image button On screen menu button AWAY mode LED indicator Image capture button Switch to additional camera button MONITOR button Power LED Screen AWAY mode button www 2016 0 VIZIT M441MG Operating Instruction revision 7 vizit group com 1 1 1 Figure Rear view 2 1 3 2 Connecting terminals to video doorphone and an outdoor camera DC IN to connect ...

Page 2: ...a Figure Installation order 3 Choose the place for the Monitor Recommended altitude is cm above the floor 150 INSTALLATION Drill three holes in the wall Drive anchors into the holes and fasten screws the fasteners are supplied with the Monitor 3 2 1 Connect wires to the Monitor terminals as shown on Figures 4 9 Match the Monitor s fixing lugs with the screws in the wall and hook the Monitor on the...

Page 3: ...orstation control unit operating instruction Acceptable cross sections of wires to connect the Monitor to the commutator Fig 6 9 are given in the commutator BKM operating instruction examples of wiring diagrams BKM Terminal LN LN GND VI1 E DATA Data exchange between Monitor and commutator BKM Supply voltage for Monitor Video in from doorstation camera Ground Intercom line between Monitor and commu...

Page 4: ...AMPLES OF WIRING DIAGRAMS Figure 4 Monitor with outdoor camera additional UKP and Door Bell button within multi apartment video doorphone VIZIT M441MG LN GND LN VI1 E DATA Ec1 Ec2 GND VI2 44 Monitor VIZIT M 1MG Door Bell button may be installed near the apartment door and connected between DATA and GND terminals GND E DC IN HS EQV HS HS 18 А Power supply unit 19w 14 4v EU 18V 1 0A V 1 VO Ec GND Ou...

Page 5: ...MV 18 18 12 12 Power Supply Unit BPD18 12 1 1 Main Monitor Individual storey doorstation activation Switching of video channels Intercom priority over additional apartment handset UKP LN GND LN VI1 E DATA Ec1 Ec2 GND VI2 44 Monitor VIZIT M 1MG HS EQV HS HS VO Ec GND Outdoor camera 12V max 0 3А 2 4 5 1 3 2 3 2 1 1 6 3 2 4 5 1 6 3 Electromechanical lock or electromechanical strike V max 12 0 6А 1N40...

Page 6: ...ND VI2 44 Monitor VIZIT M 1MG HS EQV HS HS 2 4 5 1 6 3 2 4 5 1 6 3 LN GND LN VI1 E DATA Ec1 Ec2 GND VI2 44 Monitor VIZIT M 1MG HS EQV HS HS 2 4 5 1 3 2 4 5 1 3 18 18 12 12 Power supply unit BPD18 12 1 1 1 2 1 2 2 1 Electromechanical strike or electromechanical lock V max 12 0 6А 1N4007 DL DL 1 2 3 4 5 2 1 LINE GND E VO Ec LC Doorstation BVD 405CP 1 2 4 5 1 3 18 18 12 12 Power supply unit BPD18 12 ...

Page 7: ...E GND LNM2 VOM2 LNM2 DATA_M2 HS HS C 1 Н CН2 CН3 CН4 CН5 CН6 LN GND LN VI1 E DATA Ec1 Ec2 GND VI2 44 Monitor VIZIT M 1MG HS EQV HS HS 2 4 5 1 3 LN GND LN VI1 E DATA Ec1 Ec2 GND VI2 44 Monitor VIZIT M 1MG HS EQV HS HS 2 4 5 1 3 6 6 to next commutators To next commutator 4 1 2 3 1 4 3 2 VOA FA LN G VOB FB LN G VOC FC LN G VOD FD LN G FB FA FC FB FD FC VO VG VG VI E G LINE GND Ek SEL Commutator BK 4A...

Page 8: ...nit 19w 14 4v EU 18V 1 0A V 1 Commutator BKM 441 VI1 GND LN1 L 1 N GND LN2 E LN2 VI2 Ec2 E GND LN VO LN DATA GND DL DBB GND E DC IN 1 4 2 3 To other apartments on the storey V4 FD LN VG V3 FC LN VG V2 FB LN VG V1 FA LN VG 1 4 3 2 Electromechanical strike or electromechanical lock V max 12 0 6А DL DL LN GND LN VI1 E DATA Ec1 Ec2 GND VI2 44 Monitor VIZIT M 1MG HS EQV HS HS 2 4 5 1 3 6 To main entran...

Page 9: ... Push to decrease or to increase volume Every time you push either or the test sound is ringing to present the volume level After you have chosen the volume level push the button The cursor bar jumps back to select a corresponding line in the menu Push the button and image from the selected device appears in the screen In the lower part of the screen an adjustment bar is displayed Set a preferred ...

Page 10: ...will go to stand by You can unlock the door without picking up the handset When called just press and hold until the beep The door is unlocked now After you release the Monitor will go to stand by To activate the individual storey doorstation i e start intercom and video monitoring on your initiative see Fig 5 pick up the handset Image is displayed on the screen intercom is available You can push ...

Page 11: ...tor additional apartment handset will be disengaged push the button on your Monitor when image from the camera is on the screen push the button when the Monitor is on stand by The LED indicator for AWAY mode is illuminating The Monitor captures image in 3 seconds after the call starts The LED indicator is blinking if there are new images in the Monitor s memory To quit automatic image capture mode...

Reviews: