


English
_1
ALL-IN-ONE SECURITY SYSTEM
Quick Start Guide
KIT MODEL
SNK-B73040BW
NVR MODEL
SNR-73200W
Thank you for purchasing the NVR Security System.
Follow the simple steps in this guide to set up and start using your new security system.
If you have any questions or need help installing your new product, please contact our free technical support.
US:
Telephone: +1-877-349-3149 (Toll free)
6am - 6pm PST (7 days a week)
Web: www.samsungsv.com
Europe:
Telephone: 00800-801-08022 (Toll free)
8am - 4pm CET, Monday - Friday (5 days a
week)
Web: www.hanwha-security.eu
Australia:
Telephone: 1800-665-397 (Australia) or
09-363-7877 (New Zealand)
9:00AM - 5:00PM Australian Eastern
Web: www.ddlaustralia.desk.com
CAUTION!
`
The transmission range of the wireless signal may weaken if heavy obstructions, such as concrete, brick, or metal walls are
between the NVR and cameras.
`
If there are multiple Wi-Fi routers and devices in your environment, it may reduce the wireless bandwidth available. Weak
network bandwidth may reduce the videoquality or video loss.
❒
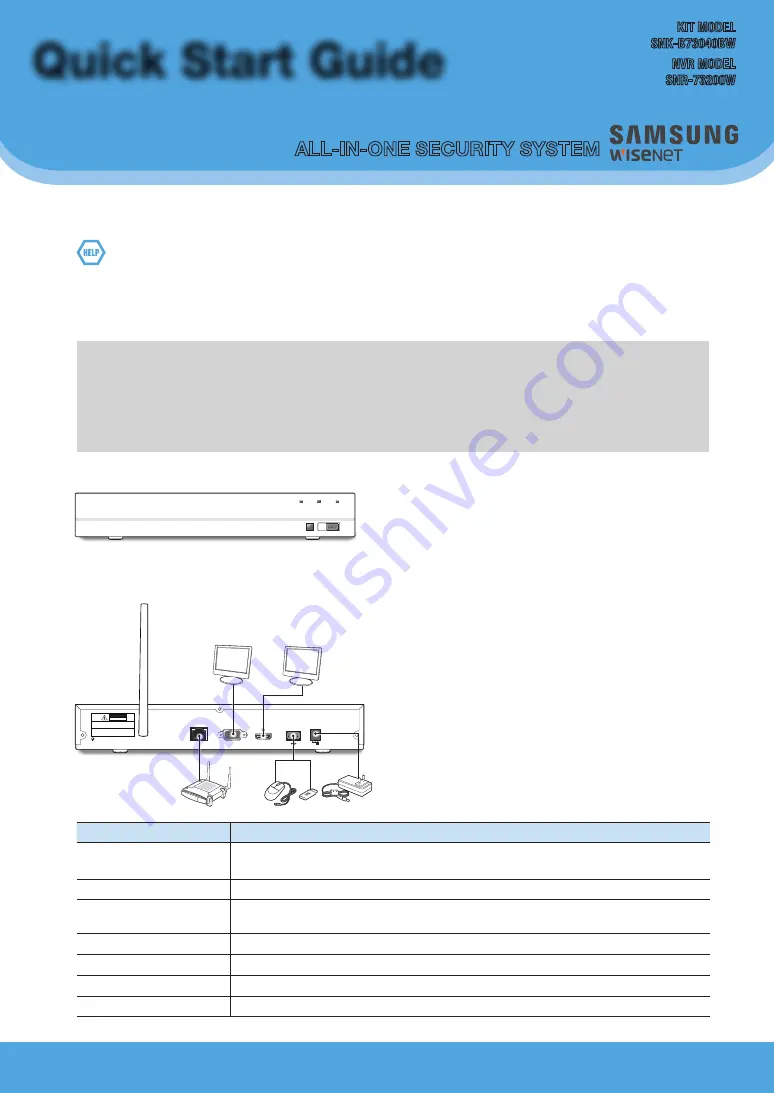
Front
❒
Back
`
The appearance of power adaptor differs depending on sales region.
Part Name
Function
1
Ground connection
A terminal to connect a separate ground cable.
`
Make sure to add a ground cable in order to use the equipment safely.
2
Antenna
Receive signal from wireless camera.
3
WAN: (RJ45)
Network port
Connect with WAN, Ethernet cable.
4
VGA port
Connect with VGA display devices, such as PC monitor.
5
HDMI
Connect with HDMI display devices, such as PC monitor.
6
USB port
Connect with USB.
7
Power port
Connect with the power supply DC12V 2A, included with the device
USB
REC
NET
PWR
HDMI
VGA
12V
CAUTION
RISK OF ELECTRI SHOCK
DO NOT OPEN
CAUTION : TO REDUCE THE RISK OF ELECTRICAL SHOCK
DO NOT OPEN COVERS. NO USER SERVICEABLE
PARTS INSIDE. REFER SERVICING TO QUALIFIED
SERVICE PERSONNEL.
WARNING : TO PREVENT FIRE OR SHOCK HAZARD. DO NOT
EXPOSE UNITS NOT SPECIFICALLY DESIGNED
FOR OUTDOOR USE TO RAIN OR MOISTURE.
WAN
2
4
5
6
3
1
7
Summary of Contents for Wisenet SNK-B73040BW
Page 14: ...14_ English MEMO...
Page 16: ...16_ English MEMO...


