Hobbico Mini Switch Instruction Manual Download Page 3

3

3.  You must take time to 

build straight, true

 and 

strong

.

4.  You must use an R/C radio system that is in fi rst-class 

condition, and a correctly sized motor and components 
throughout the building process.

5.  You must correctly install all R/C and other components 
so that the model operates correctly on the ground and in 
the air.

6.  You must check the operation of the model before 

every


fl ight to ensure that all equipment is operating and that the 
model has remained structurally sound. Be sure to check 
clevises or other connectors often and replace them if they 
show any signs of wear or fatigue.

7.  If you are not an experienced pilot or have not fl own 

this type of model before, we recommend that you get 
the assistance of an experienced pilot in your R/C club for 
your fi rst fl ights. If you’re not a member of a club, your local 
hobby shop has information about clubs in your area whose 
membership includes experienced pilots.

8.  While this kit has been fl ight tested to exceed normal use, 
if the plane will be used for extremely high stress fl ying, such 
as racing, or if a motor larger than one in the recommended 
range is used, the modeler is responsible for taking steps to 
reinforce the high stress points and/or substituting hardware 
more suitable for the increased stress.

We, as the kit manufacturer, provide you with a top quality, 
thoroughly tested kit and instructions, but ultimately the 
quality and fl yability of your fi nished model depends 
on how you build it; therefore, we cannot in any way 
guarantee the performance of your completed model, 
and no representations are expressed or implied as to the 
performance or safety of your completed model.

Remember: 

Take your time and follow the instructions to 

end up with a well-built model that is straight and true.

ADDITIONAL ITEMS REQUIRED

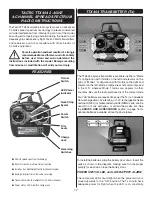
Radio Control System

The Mini Switch Tx-R (transmitter ready) comes with the 

servos and a Tactic

 TR624 receiver installed, so all that is 

required is a basic 4+ channel transmitter. The Tactic TTX404 
2.4GHz spread spectrum 4-channel radio control system 

(TACJ2404) is included with the RTF (ready to fl y) version of 

the Mini Switch, so this same radio system will work for your 

Tx-R version, too.

  Tactic TTX404 2.4GHz 4-channel system (TACJ2404)

  (4) AA batteries will be required to operate the 

recommended transmitter (FUGP4304).

A more versatile transmitter is the Tactic TTX650 digital 

programmable transmitter.  The TTX650 is loaded with features 
which will be useful with the Mini Switch such as a fl ight timer, 
dual rates, end-point adjustment, and exponential. Built-in 
mixes and user programmable mixes will accommodate your 
radio needs for future, more advanced models as well.

  Tactic TTX650 2.4GHz 6-channel computer Tx only 

(TACJ2650)

If you already own a transmitter that you plan to use with the 
Mini Switch, fi rst make sure it is in the compatibility list at www.

Tx-Ready.com/anylink-chart.html. If so, you can purchase 

the AnyLink 2.4GHz Universal Radio Adapter to allow your 
transmitter to communicate with the pre-installed Tactic receiver.

  Tactic AnyLink

 2.4GHz Universal Radio Adapter 

(TACJ2000)

  Tactic AnyLink SLT

 2.4GHz Adapter Cable Futaba

®


Hitec

®

 Round (TACM0003)

  Tactic AnyLink SLT 2.4GHz Adapter Cable Hitec 

Aurora (TACM0004)

  Tactic AnyLink SLT 2.4GHz Cable Spektrum

®


DX4e/5e/7s/8 (TACM0005)

  Tactic AnyLink SLT Cable Fut 12Z/14MZ/18MZ/4YF 

2.4GHz (TACM0007)

  Tactic AnyLink SLT Cable Spek DX4e/5e/7s/8/10t/18/

Deans (TACM0008)

  Tactic AnyLink SLT Power Combo Spektrum DX4e 

5e 18T Hit (TACM0015)

Battery and Charger

The Mini Switch RTF comes complete with a motor battery 

and charger. The Tx-R version requires a 1300 mAh 11.1V 
LiPo battery and LiPo Charger. The Mini Switch was designed 
for the Flyzone 1300 mAh 11.1V LiPo battery (FLZA6014). 
Other LiPo batteries similar in size with the same voltage 
and capacity may also work, but they may not fi t properly in 
the battery compartment or have the same type of battery 
connector. In addition to a battery, a LiPo battery charger is also 
required and there are several that will work (depending on your 
budget and requirements). A safe, economical charger is the 
ElectriFly

®

 3S (3-cell/11.1V) LiPo Smart Charger (GPMM3318). 

The Smart Charger includes adapters to charge from a 110V 

wall outlet or a 12V DC outlet from a car. The Smart Charger 
will take approximately 3-1/2 hours to fully charge the battery. 

The Smart Charger will time out after 2 hours and 40 minutes 

when charging the recommended battery. An additional hour 
on the charger will bring the capacity of the battery to near full. 
Some pilots prefer to have several batteries and charge them 
faster so they can fl y more. For charging up to four batteries 
faster at the same time, the Great Planes PolyCharge4

 DC-

powered LiPo charger (GPMM3015) is recommended. But 
unlike the Smart Charger, the PolyCharge4 does not have 
an internal LiPo cell balancer which is a critical component in 
making sure your LiPo batteries charge effi ciently and evenly. 

So, for each LiPo battery you wish to charge simultaneously, 
one Great Planes Equinox

 LiPo Cell Balancer (GPMM3160) 

will also be required. Finally, the PolyCharge4 does not have 

AC capability, so if wall charging is a priority, a separate AC 

12-Volt power source must also be purchased separately. A 

suitable power supply for the PolyCharge4 is the Great Planes 

12V 12A DC power supply (GPMP0901).

Summary of Contents for Mini Switch

Page 1: ...ser accepts all resulting liability If the buyer is not prepared to accept the liability associated with the use of this product the buyer is advised to return this kit immediately in new and unused condition to the place of purchase To make a warranty claim send the defective part or item to Hobby Services at the address below Hobby Services 3002 N Apollo Dr Suite 1 Champaign IL 61822 USA Include...

Page 2: ...741 0057 Or via the Internet at http www modelaircraft org http www modelaircraft org parkflyer aspx IMPORTANT Two of the most important things you can do to preserve the radio controlled aircraft hobby are to avoid flying near full scale aircraft and avoid flying near or over groups of people SAFETY PRECAUTIONS PROTECT YOUR MODEL YOURSELF OTHERS FOLLOW THESE IMPORTANT SAFETY PRECAUTIONS 1 Your Mi...

Page 3: ...ixes and user programmable mixes will accommodate your radio needs for future more advanced models as well Tactic TTX650 2 4GHz 6 channel computer Tx only TACJ2650 If you already own a transmitter that you plan to use with the Mini Switch first make sure it is in the compatibility list at www Tx Ready com anylink chart html If so you can purchase the AnyLink 2 4GHz Universal Radio Adapter to allow...

Page 4: ...t full retail prices and shipping and handling charges will apply Illinois and Nevada residents will also be charged sales tax If ordering via fax include a Visa or MasterCard number and expiration date for payment Mail parts orders Hobby Services and payments by 3002 N Apollo Drive Suite 1 personal check to Champaign IL 61822 Be certain to specify the order number exactly as listed in the Replace...

Page 5: ...hrough the plastic hoop on the underside of the rudder 3 Use two 3x 30 mm machine screws to secure the stabilizer in place Setting Up the High Wing Configuration We recommend flying the Mini Switch first in the high wing configuration The high wing position will make the orientation of the airplane more visible at high altitudes 1 Connect the clevises on the pushrods to the outer holes in the elev...

Page 6: ...e center of the canopy hatch The alignment pin fits into the small tube pre glued in the wing Push the joiner tube into the wing until it bottoms out against the outer screws in the wing panels 5 With both panels securely in place tighten the inner screws in the wing panels Pull on the wing panels to confirm they won t separate in flight 6 Attach the aileron servo leads to the Y harness connected ...

Page 7: ...alled You will need to reassemble it onto the motor in the same order 2 Fit the prop adapter onto the motor shaft followed by the drive washer 3 Install the spinner backplate onto the prop adapter followed by the propeller prop washer prop spacer and prop nut Tighten the prop nut thoroughly If the spinner backplate contacts the foam fuselage after tightening the prop nut loosen the nut and slide t...

Page 8: ... the high wing configuration canopy hatch by disconnecting the aileron Y harness loosening the wing joiner screw and sliding the panels off of the joiner tube 2 Remove the battery hatch by sliding the lever forward and lifting the hatch away Push the wing pocket plugs out and set them aside for later use 3 Loosen the outer wing screws three complete turns 4 Insert the wing joiner tube through the ...

Page 9: ...th the charging procedure of the included LiPo battery Read the charger manual completely 3 Fully charge the LiPo battery 4 Test fit the battery in the airplane The battery wires should be tucked neatly along the side of the battery Lithium Battery Handling Usage WARNING Read the entire instruction sheet included with the battery Failure to follow all instructions could cause permanent damage to t...

Page 10: ...ge 15 of this manual 2 Disconnect the battery from the ESC Then move the throttle reversing switch on the transmitter Confirm that the throttle stick is still in the idle position and reconnect the battery to the ESC FULL THROTTLE RUDDER MOVES RIGHT ELEVATOR MOVES DOWN RIGHT AILERON MOVES UP LEFT AILERON MOVES DOWN 4 CHANNEL RADIO SETUP STANDARD MODE 2 3 View the model from behind and move the rud...

Page 11: ...dvanced so use caution When you are done running the motor or flying the plane simply disconnect the battery and turn off the transmitter Check the Control Throws The Mini Switch is setup from the factory with the recommended control throws for the high wing configuration If at any time you wish to return to the default control throws or if you simply want to confirm the throws use the following m...

Page 12: ...b flying sites and AMA sanctioned flying events Fill out the identification tag on page 24 and place it on or inside your model Balance Propellers Carefully balance your propeller and spare propellers before you fly An unbalanced prop can be the single most significant cause of vibration that can damage your model Not only will motor mounting screws and bolts loosen possibly with disastrous effect...

Page 13: ...h the other side for spectators Only personnel involved with flying the aircraft are allowed at or in the front of the flight line Intentional flying behind the flight line is prohibited 4 I will operate my model using only radio control frequencies currently allowed by the Federal Communications Commission 5 I will not knowingly operate my model within three miles of any pre existing flying site ...

Page 14: ...ith you Tell him to remind you to throttle back once the plane gets to a comfortable altitude While full throttle is usually desirable for takeoff most models fly more smoothly at reduced speeds Take it easy with the Mini Switch for the first few flights gradually getting acquainted with it as you gain confidence Adjust the trims to maintain straight and level flight After flying around for a whil...

Page 15: ...s been calibrated and the Mini Switch is ready to fly FULL PROGRAMMING INSTRUCTIONS 1 Access the Programming Menu A Turn on the transmitter and advance the throttle stick all the way forward B Connect the battery to the ESC Listen Three tones 1 2 3 two short beeps beep beep a 5 second pause five tones 1 2 3 4 5 Now the ESC is in the Programming Menu and will loop through a sequence of beeps each o...

Page 16: ...e If the motor fails to start within 2 seconds of advancing the throttle the ESC will automatically cut power To restart lower the throttle stick then advance again This can happen if there is a poor connection between the ESC and motor or if the propeller or motor is impeded for any reason 2 Over heat protection If the ESC temperature ever rises to about 110 Celsius the ESC will automatically red...

Page 17: ...smitter binds to multiple Tactic 2 4GHz receivers Power status LED built in charge jack TTX404 TRANSMITTER Tx The TTX404 airplane transmitter is available in either a Mode 2 configuration with throttle on the left and elevator on the right or Mode 1 configuration with throttle on the right and elevator on the left Mode 2 radios are most commonly used in the U S whereas Mode 1 radios are popular in...

Page 18: ...plane s tail and will rotate the airplane about the yaw axis an imaginary line from the top of the airplane s fuselage to the bottom of the fuselage located near the center point of the fuselage Position the rudder reversing switch so that moving the rudder stick to the right causes the rudder to deflect to the right thus causing the nose of the airplane to point to the right Moving the rudder sti...

Page 19: ...instructions included with the charge kit WARNING It s not recommended to charge batteries at greater than 1 amp through this charge jack Fast charging of NiCd and NiMH batteries should ONLY be done with chargers that are specifically designed to include the peak detection function which can automatically stop charge when full charge is detected Misuse improper charging or over charging of recharg...

Page 20: ...y to bind the Tx and Rx together electronically This ensures sole communication between the two and prevents other transmitters from being able to control the receiver 1 Turn on the Tx 2 Apply power to the Rx 3 If the Rx LED flashes once and then stays on the Rx is already bound to the Tx and you can skip to the next section Otherwise insert a small diameter screwdriver through the hole marked BIN...

Page 21: ...stick result in an equal adjustment of the throttle in the model Depending on whether the airplane is electric or glow powered a Electric confirm that when the throttle stick is at maximum position the electronic speed control gives the appropriate indications LED and or audible indicators for full forward flight And when the throttle stick is at minimum position the electronic speed control gives...

Page 22: ... in extremely hot or cold locations in direct sunlight or in locations with high humidity Store R C equipment in cool and dry locations Do not allow chemicals to come in contact with any parts of the radio system Substances such as glow fuel gasoline CA glue etc could permanently damage plastic parts of the radio system If NiCd batteries were installed in the transmitter remove the batteries befor...

Page 23: ...iance could void the user s authority to operate the equipment FCC ID IYFTTX404B CE COMPLIANCE INFORMATION FOR THE EUROPEAN UNION Instructions for Disposal of Waste Equipment by Private Users in the European Union This symbol on the product or its packaging indicates this product must not be disposed of with other household waste Instead it is the user s responsibility to dispose of their waste eq...

Page 24: ...od Tactic will at its option repair or replace it for a service charge not greater than 50 of its then current retail list price Be sure to include your daytime telephone number in case we need to contact you about your repair This warranty gives you specific rights You may have other rights which vary from state to state For service on your Tactic product send it post paid and insured to HOBBY SE...

Reviews: