


2
ENGLISH
GENERAL INFORMATIONS
•
Read this manual and its safety precautions carefully! Keep this manual
and if you give the model to a third party, put this manual to the model.
•
Take care, that you are familiar with your transmitter and all electronic
components, used in your plane.
•
Take care of all safety instructions of tools, which are you using to
assemble this model.
•
Only take glues, which are recommended for the specific materials and
which are approved for model business.
•
Before assembling please check all parts of this kit. If some parts are
missing or have a mistake, please call.
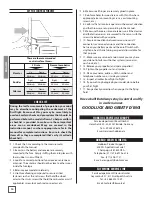
ENVIRONMENT PROTECTION INFOS
•
The symbols on the package show you, that the model and its accessories
should not be put to waste. All electric and electronic parts should be deposed
to places of waste management.
•
Batteries and accumulators must be removed from
the devices and should be deposed to the correct
waste management organisation. Take information
from your home town government.
TABLE OF CONTENTS
Introduction
........................................................................................
2
General informations
......................................................................
2
Environment protection infos
....................................................
2
Safety Precautions
...........................................................................
3
Additional items required
............................................................
3
RecomMended accessories
..........................................................
3
Kit check
................................................................................................
4
Spare parts
...........................................................................................
4
Contenu du kit
....................................................................................
5
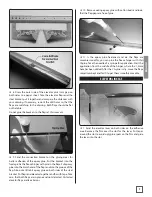
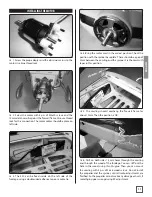
Installing the elevator
....................................................................
6
Elevator linkage
.................................................................................
7
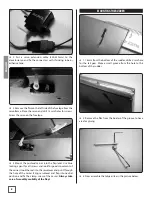
Mounting the rudder
......................................................................
8
Rudder linkage
...................................................................................
9
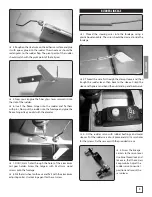
Installing the landing gear
........................................................
10
Installing the motor
......................................................................
11
Mounting the main wings
..........................................................
12
Installing the RC components
..................................................
12
Installing the battery
...................................................................
13
Final flight preparation
...............................................................
13
Center of gravity (C.G.) .............................................................
13
Balance the Model Laterally ..................................................
13
Check the Control Directions ................................................
13
Set the Control Throws ............................................................
14
Check-List
..........................................................................................
14
Hobbico Service Line Europe
...................................................
14
Hobbico Service Line USA
..........................................................
14
Flitework Service Line
..................................................................
14
Introduction
The Flitework Edge 540 1.2m is a handy sized model, which is constructed for a big range of aerobatic- or 3D flight.
In case of the light weight construction the flight characteristics are very good-natured. This Edge is a nice designed
trainer for every day.
The original plane is located in Hangar 7 of Red Bull - Salzburg/Austria. Red Bull uses it for air shows, flown by the
multiple champion of the Red Bull Airrace - Hannes Arch.
Attention please!
Remote controlled model planes are not a toy! For assembling, flying and servicing such models, you need a high
grade of technical comprehension and liability. Careless assembling and operation may cause personal and material
damage.
Because the Flitework GmbH has no influence on assembly, RC installation, operation and servicing of the flight
device, any liability is rejected under explicit advice to these dangers.
Summary of Contents for Edge 540 RB FLWA4140
Page 15: ...15 ENGLISH NOTES...


