


Model Menu Programming
Model Menu Programming
9 CHANNEL 2.4GHz AIRCRAFT COMPUTER RADIO SYSTEM
9 CHANNEL 2.4GHz AIRCRAFT COMPUTER RADIO SYSTEM
34
35
Ok, are you ready? You have your model all prepared and ready to program? Let’s go!
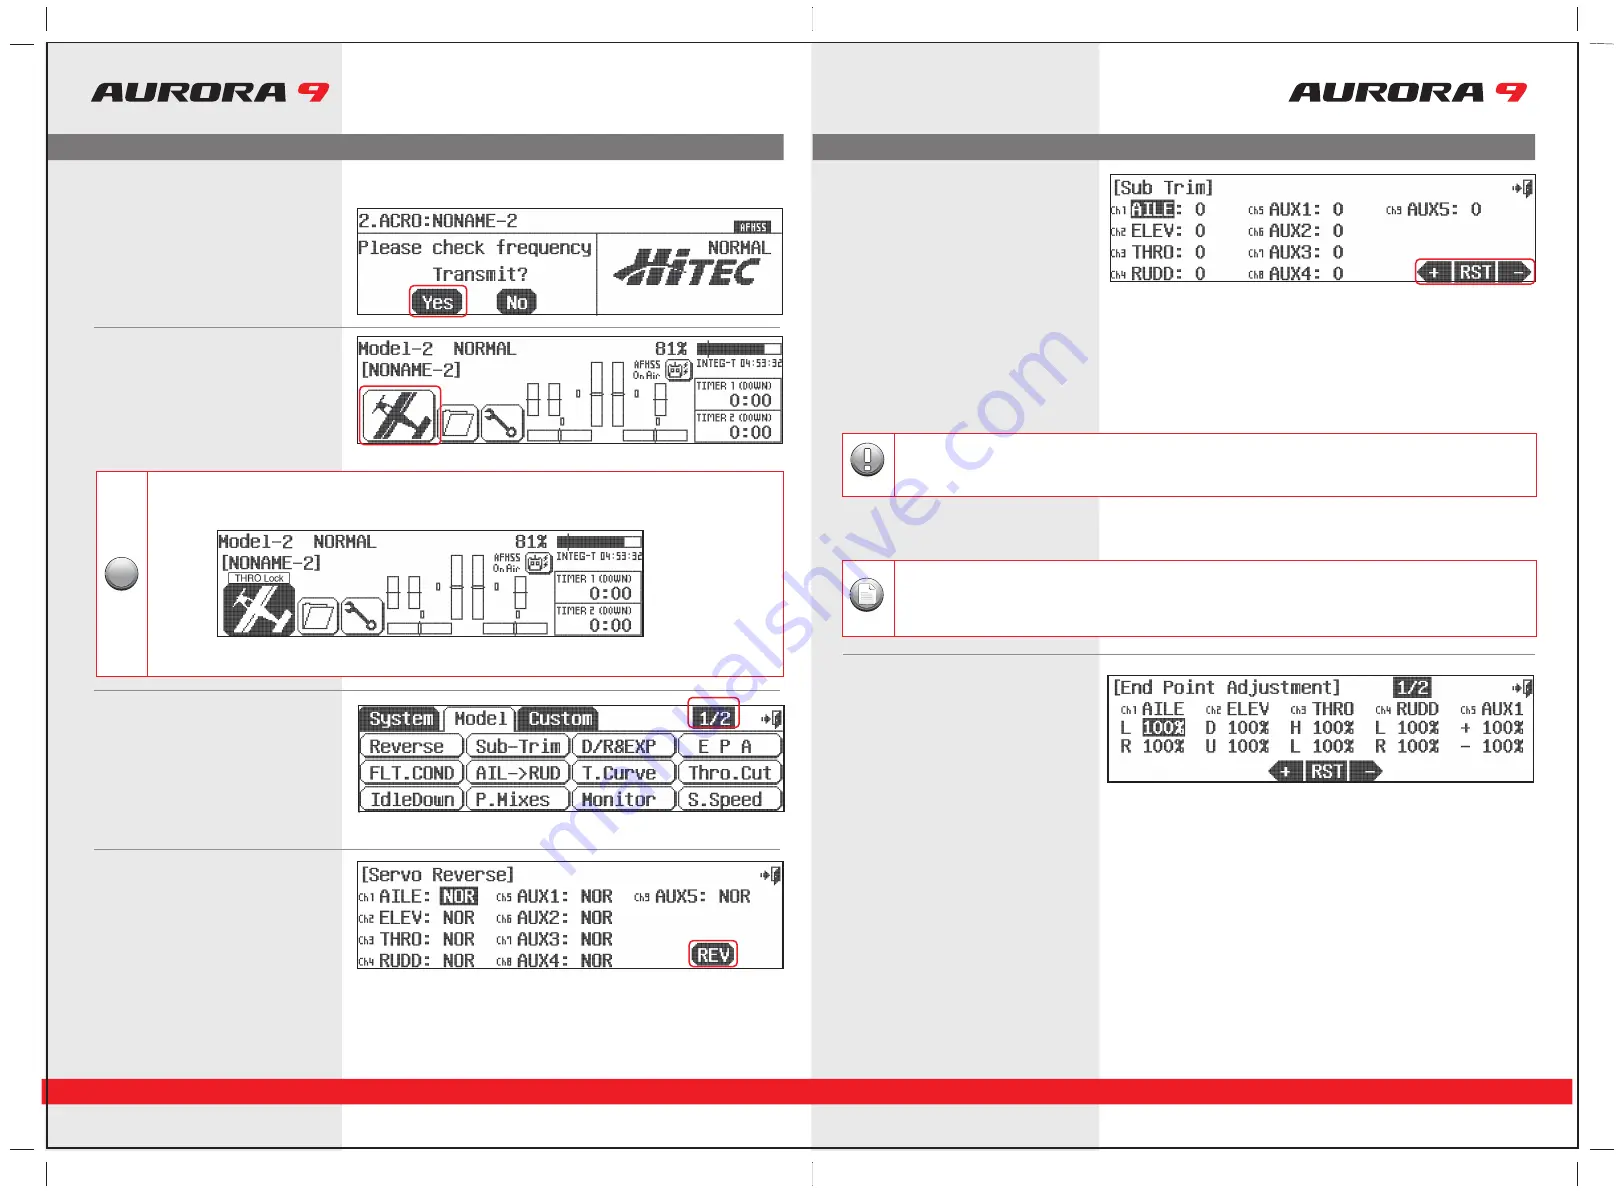
23. Turn on the transmitter,
select
Yes
to transmit.
24. At the home page, let’s select some model
functions by pressing the
plane
icon
at the lower left of the screen.
28. Select
EPA
from the model menu
a. Move the aileron control stick all the way to the left.
The
R 100%
should be highlighted.
b. Using the
+ LST –
icon set an appropriate value, more than 100% to increase the
travel, or less than 100% to decrease the servo arm travel.
c. Now move the aileron stick all the way to the right and set the travel value for
the right side.
d. Press the 100% value icon for any other channel you wish to set an EPA value for
and follow steps a-c.
e. When done, back up to the model menu by selecting the
Exit
icon.
EPA stands for “end point adjustment”. With the EPA function you can set the servo arm travel distance by lengthening or limiting how
far the arm moves. This function can help avoid binding or damaging the aircraft control surfaces, if set-up properly.
In our example we will adjust the channel 1 aileron servo.
c. Follow this procedure for any channels requiring sub-trim.
d. When done, back up to the Model menu by selecting the
Exit
icon.
Sub trim is not the place to do a major adjustment. Any servo needing more than 40 points of movement should be
adjusted by moving the control horn or adjusting the linkage.
Caution
Using the following functions are not mandatory. For the purpose of our quick set-up guide tutorial they will explain most of
the fundamental programming techniques available in the Aurora. We highly suggest you follow along with programming
the EPA, dual and exponential rate functions. Doing so will teach you valuable lessons and the basics you need to get the
most out of your Aurora.
Note
25. The model menu is one of those “two page”
screens, note the
1/2
icon. Here are all the
functions the Aurora can apply to our rather
simple selected model.
26. Select
Reverse
from the model menu
Now turn on power to your model. Within a moment, you should have control over your model with the transmitter.
a. Move your controls, are all the servos going in the correct direction?
If not, select the channel to reverse, then press the
REV
icon.
b. Press
Yes
when asked “Sure?”
c. Do this until all servo throw directions are correct.
d. Back up to the model menu by selecting the
Exit
icon.
27. Select
Sub-Trim
from the model menu
Your servo control arms should be as close to 90 degrees as possible, and the control surfaces as close to level as you can make them
by adjusting the control linkages. Sometimes small adjustment must be made to “center” the control surface using the sub-trim function.
a. Select the control/channel to adjust by pressing its icon.
b. Using the
+ RST –
icon at the screens lower left corner, adjust a value as necessary
by selecting the plus or minus icon. Select
RST
to bring the value back to zero if
you wish. You should see the control surface moving as changes are made with
the
+
or
–
icon.
Throttle Lock
The Aurora features a "throttle lock" function that can be activated when the transmitter is transmitting a signal.
We encourage you to apply the throttle lock as a safety precaution against "accidental throttle application".
Tip
Tip
Tip
Tip
a. Turn the throttle lock on and off from the home page by pressing the
Model
icon for two seconds.
Throttle lock is confirmed when the “THRO Lock” icon is displayed.


