background image

24

25

9 CHANNEL 2.4GHz AIRCRAFT COMPUTER RADIO SYSTEM

9 CHANNEL 2.4GHz AIRCRAFT COMPUTER RADIO SYSTEM

Aurora Transmitter Controls

Aurora Transmitter Controls

LT, CT, RT Switches

These switches can be used as a channel control and 
are used as adjustment controls for fine tuning many 
of the Aurora features.

Digital Trims

The Aurora features digital trims on the face of the transmitter for throttle and the three main control functions of pitch, roll and yaw.
• A gentle pull to one side of the switch will cause the control surface to move one trim step and the radio to “beep” once. 
• Hold the switch over to one side to rapidly trim a control surface.
• The size of the trim step can be adjusted in the System – TrimStep function menu. 
• The graph on the screen will indicate how much movement is applied to the control surface by the trim function. 
• Last trim position will be saved in memory should you switch to another model.  

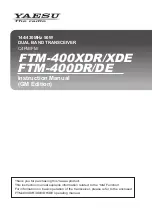
Stick Length Adjustment

Hands come in all sizes so to accommodate everyone we use a two piece stick “top” that can be adjusted to fit a wide variety of users.


Stick Tension Adjustment

Control Mode Changes

The Aurora offers unlimited options when customizing the gimble control functions for Mode 1, 2, 3 and 4 users. In addition the Aurora also 
features two manual mode set-up menus. These are all located in the System – Mode function menu. Refer to page 63 for a detailed 
explanation on how to select the mode you wish to fly.
• Easy ratchet adjustment for the throttle on each gimble.
• The radio is factory set-up for Mode 2 users in America.

• Remove the rubber pads by gently pulling up a corner and slowly pulling them off.
• Use a small Phillips head screwdriver to turn the adjustment screw clockwise to increase the spring tension, and counterclockwise to 
decrease the tension of the spring.
• Fit the rubber grip pads back into place when finished.

• Separate the top from the bottom piece and adjust the top piece to the length required.
• Screw the bottom up against the top piece to “jam” lock everything into position.

M1/3

J1

J2

J3

J4

M2/4

Summary of Contents for Aurora 9

Page 1: ...tock 40101 Battery Charger To charge the supplied NiMH transmitter battery Use the CG S45 battery charger Part 44450 for 110V Use the CG S35 battery charger Part 44350 for 220V Servo Installation Wiri...

Page 2: ...ck Length Adjustment Hands come in all sizes so to accommodate everyone we use a two piece stick top that can be adjusted to t a wide variety of users Stick Tension Adjustment Control Mode Changes The...

Page 3: ...ress the frequency number icon to enter the Frequency menu See page 57 for detailed instructions on changing the frequency 4 You are prompted to Please check frequency and asked to Transmit by selecti...

Page 4: ...el PPM QPCM or AFHSS 11 Active or Inactive Transmit Icon Displays the transmitters transmit status If the icon is dark the Aurora is not transmitting If the icon is clear with lighting bolts and the o...

Page 5: ...irplane 3 This is the home screen select the wrench icon for the System menu 4 Note the system menu function choices select MDL Sel 6 Select Yes to con rm the selection of a new model 7 At the Model n...

Page 6: ...u must select how many servos your wing has and what they control Select 1AILE if you have one aileron servo controlling both ailerons OR 2AILE if your plane has 2 aileron servos in the wing b Then pr...

Page 7: ...undamental programming techniques available in the Aurora We highly suggest you follow along with programming the EPA dual and exponential rate functions Doing so will teach you valuable lessons and t...

Page 8: ...back out 31 This is a map of the Aurora switch layout You can put the aileron dual rate function on any of the switches shown 30 At the intermediary switch screen press the SEL icon Now we can apply...

Page 9: ...w model 7 At the model naming menu name your new model using the keyboard 8 Here at transmit option screen press No We do not wish to transmit yet a Press Shift to see the other characters b When done...

Page 10: ...Touch the1 2 icon and note the second screen has even more swash type selections Many function menus will have more than one screen of options Check for the 1 2 icon as you program your heli into the...

Reviews: