-27-
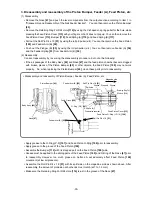
Concave portion of the
Magazine
[137]
Convex portion of the Holder Shaft
[149]
Spring
[150]
Nail Holder
[145]
Pin
[140]
Boss of the Holder Shaft
[149]
Tapping Screw D3 x 14
[148]
Tow Washer M4
[147]
Convex portion of the
Nail Holder
[145]
Ratchet Spring
[146]
•
Disassembly and reassembly of the Nail Holder , the Holder Shaft , etc
2. Disassembly and reassembly of the Nail Holder , the Holder Shaft , etc
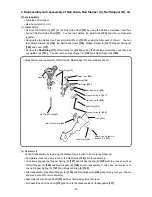
(1) Disassembly
•
Pull out the two Pins
[140]
by using the roll pin puller (
φ
4). The Magazine
[137]
and Magazine Cover
[142]
can then be removed.
•
Remove Holder Cap (A)
[144]
and loosen the Tapping Screw D3 x 14
[148]
by using the Phillips
screwdriver. You can then detach the two Trigger Arm Ass'ys
[153]
, Nail Holder
[145]
, Holder Shaft
[149]
and Spring
[150]
.
(2) Reassembly
Conduct reassembly by reversing the disassembly procedure, but note the following:
•
When mounting the Tapping Screw D3 x 14
[148]
on the Holder Shaft
[149]
, firmly fit the Washer M4
[147]
to the tapping screw and mount it with the screw head on the boss side of the Holder Shaft
[149]
.
•
When mounting the Ratchet Spring
[146]
on the Nail Holder
[145]
, mount the Ratchet Spring
[146]
from the side opposite the protrusion of the Nail Holder
[145]
, as shown below. After reassembly,
make sure the ratchet spring is oriented as shown below.
•
When mounting the Holder Shaft
[149]
on the Magazine
[137]
, make sure the Spring
[150]
is just
between the depression of the Magazine
[137]
and the protrusion of the Holder Shaft
[149]
before
inserting the Pin
[140]
.
•
Confirm the following after reassembly:
○
The Nail Holder
[145]
tilts when the Magazine Cover
[142]
is opened.
○
The Nail Holder
[145]
smoothly retracts into the Magazine
[137]
when the Magazine Cover
[142]
is
closed.


