Hisense LTDN50K360HK User Manual Download Page 11

7


|


Getting Started

       USER MANUAL

Input Source button

Still button

Special function buttons

Mute button

Sleep button

Weibo button

Picture button

Sound button

NOTE

If you want to enjoy programs from external devices, 
select the connections corresponding to the device, and 
then select correct Input source with remote control. (For 
more information, see "Connections")

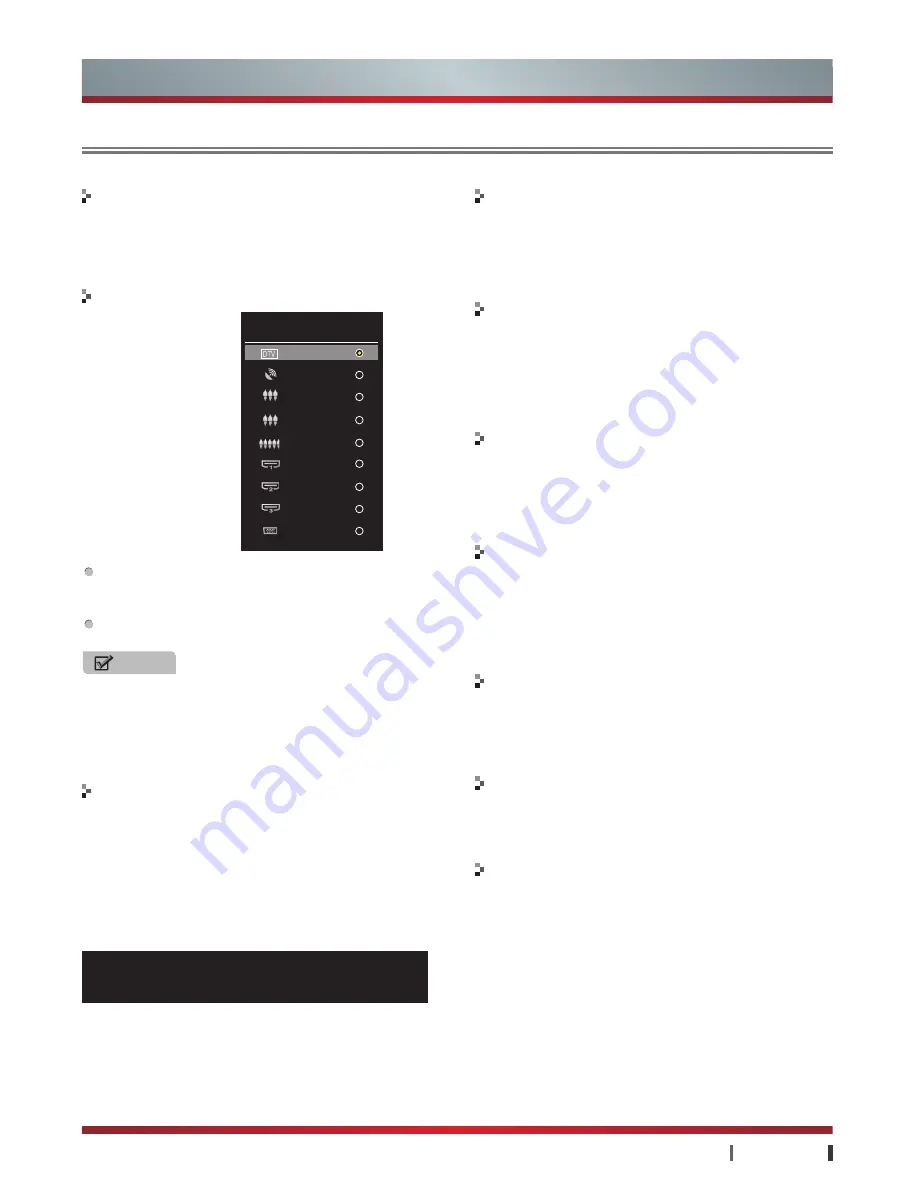
Press to display the Input Source menu, including DTV, 
ATV, AV1, AV2, Component, HDMI1, HDMI2, HDMI3 and 
VGA.
Press 

/


button to select input mode. then press 

OK

 to 

confirm operation.

Press the button to keep the image still in DTV, ATV, AV1, 
AV2 source.

Please operate as the OSD prompts.

Press to mute the sound and again to restore the sound. 
The function is used to temporarily turn off the sound.

You can set the TV to enter the standby mode automatically. 
Press the button repeatedly to set the time when the 
TV enters standby made among Off-10min-20min-...-
240min.

Press the button to open application of Micro Blog in any 
source (For more information, see "Applications" -> "Micro 
Blog")

Set the picture mode among Standard, Stadium, Game, 
Cinema, Concert, Studio and User. The User achieve the 
certain image effect by setting brightness, contrast, color 
and so on.

Set the sound mode among Standard, Live1, Live2, 
Theater, Music, Speech and User. The User achieves the 
specific sound effect by setting EQ.

In DTV, press the button to display the program 
information including the channel number, the channel 
name, the current system time, the current/next program 
information, sound track and so on. Press 

Display/Return 

button

 to exit. 

In other source, press 

Display button

 to display the 

information about the current source. When OSD is on the 
screen, you can press 

Display button

 close the OSD.

Display button

Subtitle button

This unit only supports the add-on subtitle of .srt. In DTV, 
Press the button repeatedly to switch among different 
subtitles if the TV program has multi subtitles.

Getting Started

Remote Control

Input Source

DTV

ATV

AV1

AV2

COMPONENT

HDMI1

HDMI2

HDMI3

VGA

1         001                                                             13:48    2012/03/16  Fri
Current Play:13:59-16:00           News                                    576i   HD
Next Program:14:04-16:00         TV program guide

Summary of Contents for LTDN50K360HK

Page 1: ...ying static images on the LCD TV screen may not exceed 2 hours otherwise it will result in residual image on the screen To avoid this you need to lower the screen brightness and contrast when displayi...

Page 2: ...real and more shocking Multi Mode Widescreen Display Provide with multiple aspect ratio choice full screen normal zoom in one zoom in two intelligence panorama point to point Power Saving Mode The de...

Page 3: ...udio power 10W 10W Standard Q 0202RSR 591 2011 Receiving systems RF PAL I DTMB AV PAL NTSC Channel range C1 C57 Z1 Z35 Environmental conditions Temperature 5 35 Humidity 20 80 RH Atmospheric pressure...

Page 4: ...the unit try to avoid any crash when carrying the unit and protect the LCD screen in particular If you touch the LCD screen when turning on or off the TV you can feel the slight electric shock which i...

Page 5: ...Connecting a PC 13 Connecting an Ex Speake 13 Connecting a TV Monitor or VCR 14 Selecting the Input Source 14 Basic Features 14 Using the TV for the First Time 15 Turning the TV On or Off Changing th...

Page 6: ...e sure the following items are included with your TV If any item is missing contact your dealer Getting Started Accessories List Manual Book 1 Warranty card 1 Remote Control 1 AV Adapter 2 HD Adapter...

Page 7: ...h can hold enough weight of the whole TV in case of causing damage to TV or person 2 Put the TV on the cushion with its back upwards and the LCD downwards 3 To install the base stand slide in the base...

Page 8: ...space around the TV as shown below Never install the TV set as follows Inadequate air circulation can lead to overheating of the TV and may cause damage to your TV or cause fire Leave enough space ar...

Page 9: ...t Standby indicator Light up in standby mode Remote receiver Receive remote signals from the remote control MENU Open close or return to the previous menu VOL Adjust the volume VOL button has the conf...

Page 10: ...ctions Display program diagram in DTV and in ATV Mute button Sound button Sound Track button Remote sensor Still button Picture button VOL Increase Volume VOL Decrease Volume CH Select next program CH...

Page 11: ...o Blog in any source For more information see Applications Micro Blog Set the picture mode among Standard Stadium Game Cinema Concert Studio and User The User achieve the certain image effect by setti...

Page 12: ...rent sound track if the movie has multi sound tracks Sound Track button Getting Started Functions Your favorite channels are stored in this list you can use this list of favorite channels for quick sw...

Page 13: ...and transmit the video signals being played to these devices COAXIAL Connect to external speakers It can provide digital audio signal transmission HEADPHONE Connect to headphone SD Insert the SD card...

Page 14: ...nna terminal outlet It is recommended that coaxial cable 75 be used to eliminate the interference caused by the mismatched impedance The antenna cable should not be bound together with the power cord...

Page 15: ...Camcorder Connect the TV s AUDIO IN jack to audio output jacks Audio Left Right of the external A V devices Component output jacks in VCD DVD may be marked with Y B Y R Y or Y CB CR With the AV Cable...

Page 16: ...it is proposed to use the latest version HDMI 1 3 high quality cables If the external devices lack of HDCP or HDCP poorly designed it may disturb the high defination image presented HDMI is compatible...

Page 17: ...OUT jack to the Audio Amplifier s coaxial jack then connect the Audio Amplifier to the external speaker COAXIAL output digital signal AV OUT output analog signal When connect an external speaker the...

Page 18: ...h VGA Component Connections Selecting the Input Source Making Connections A V IN Video Audio L Audio R Connect the TV s AV OUT jack to video input jack of the external A V devices VCR or TV Monitor Co...

Page 19: ...emote control to adjust the volume 3 Press 0 9 buttons on the remote control directly to select the channel NOTES In order to save power consumption set the TV in Standby mode if you do not watch TV f...

Page 20: ...a channel into favorite list skip a channel in DTV mode 2 Operations Press Menu to enter channel setting then select program edit Fav Set the selected channel as one of the favorite programmes Skip S...

Page 21: ...ve the image stability Auto Adjust Adjust the position and size of picture automatically Sound Mode EQ Balance Auto Volume SRS Effect Sound Setting H Size V Size V Position H Position Screen Functions...

Page 22: ...ing company Because the broadcasting information is provided on the specified channel the program entries are possibly displayed as null or the date fails to be displayed The display will automaticall...

Page 23: ...cted icon Using the Home Menu Media 1 3 2 NOTE Recommend you to download applications from the Hi Market as any problem with applications at stores not designated by Hisense is not in the scope of war...

Page 24: ...8 9 1 2 3 4 5 6 7 Functions You can enjoy the video in external devices or Cloud by this tool Operations Enter the Video You can click the video files in the media Menu Instructions Press Menu to disp...

Page 25: ...player spends to read the information is different from the devices and the storage capacity It is normal that there may be a temporary slow speed to read the information 4 Do not plug in or pull out...

Page 26: ...items SoftAp and Wi Fi Direct Select Off icon will close this function Select SoftAp will open this function If the set has already connected to the network wired wireless other devices supporting Wi...

Page 27: ...ongly recommended that you should turn off the external speakers NOTE Product information is only for reference actual product may vary in appearance NOTES When the TV is in abnormal status or restore...

Page 28: ...s the phenomenon is normal when audio video contents in the web page is unable to play due to upgrade to higher versions If you use wireless transceiver when browser is not used recommend taking off t...

Page 29: ...the Hi Market About You can view the relevant service information e g version information and contact method Exit Exit the Hi Market NOTES The first time downloading application from Hi Market requir...

Page 30: ...unction requires the opening of PC to TV application on the computer end and then opening the player software If such phenomenon as no sound from TV but with sound from computer is found during use of...

Page 31: ...the application all ground Exit Press Return to quit interface Accomplish the combination of Micro Blog and TV You can start Micro Blog sharing function while watching program or viewing other applica...

Page 32: ...ase select the object file and press OK then select from the pop up menu Downloading needs external storage device such as U disk mobile disk and etc Copy Move Rename Delete file Select the object fil...

Page 33: ...account and password according to prompts and then click the confirm registration icon My micro blog Show all information you shared on Hisense social platform including videos pictures web pages and...

Page 34: ...ucts cannot leave without contents intelligent app is the core of intelligent products you can see what others say Functions CNTV CNTV app provides TV program movie TV series and other videos Enter th...

Page 35: ...ection of your antenna Adjust the direction of your antenna or reset or fine tune the channel The remote control does not work Change the batteries in the remote control Remove the batteries press any...

Reviews: