background image

22

3.1  Voltage Measurement

Quick Start Manual

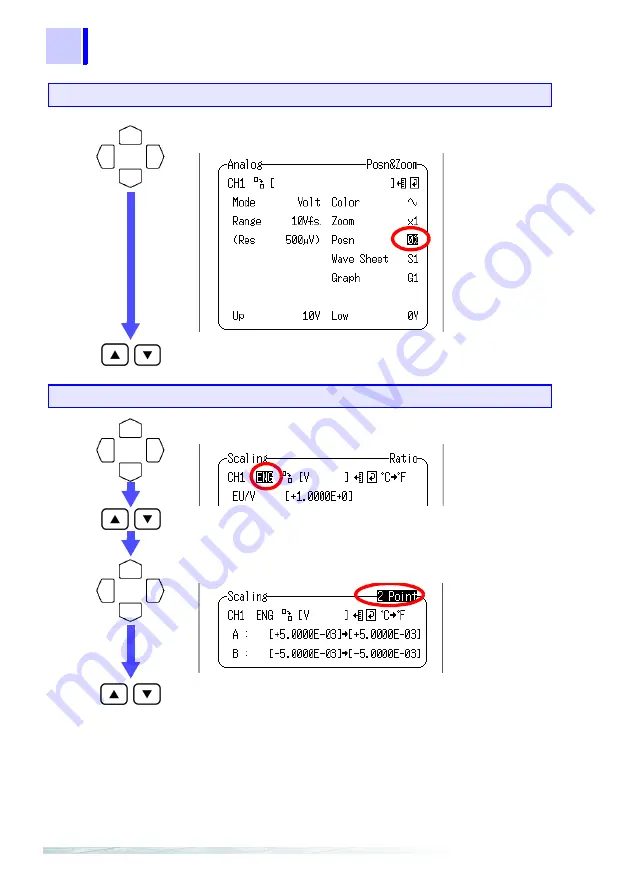
Set the display position to "0%."

Move the blinking cursor to the position shown.

Select "

0%

."

Set the scaling.

Move the blinking cursor to the position shown.

Set the scaling method to "

2 Point

."

Set the display format to "

ENG

."

Move the blinking cursor to the position shown.

Summary of Contents for 8420-51

Page 1: ...MEMORY HiLOGGER QUICK START MANUAL 8420 51 8421 51 8422 51 ...

Page 2: ......

Page 3: ...icators 3 1 1 Identification of Controls and Indicators 4 2 Display Screen and Setting Items 9 2 1 Status Screen 9 2 2 Channel Screen 10 2 3 Waveform Screen 11 3 Measurement Examples 13 3 1 Voltage Measurement 13 3 2 Temperature Measurement Using a Thermocouple K 25 3 3 Integrating the Pulse Output from a Power Meter 34 ...

Page 4: ...ii Quick Start Manual Contents ...

Page 5: ...or more detailed description of operations refer to the Instruc tion Manual In particular before operating the instrument be sure to read carefully and understand the Safety Notes and Chapter 2 Measurement Preparations page 21 in the Instruc tion Manual Refer to the Instruction Manual and the Communications Wave Viewer Instruction Manual provided with this instrument ...

Page 6: ... result in serious injury or death to the user Indicates that incorrect operation presents an extreme hazard that could result in serious injury or death to the user Indicates that incorrect operation presents a possi bility of injury to the user or damage to the instru ment Indicates advisory items related to performance or correct operation of the instrument Indicates the prohibited action Indic...

Page 7: ...3 1 2 3 4 5 6 7 8 9 10 11 Identification of Controls and Indicators 1 ...

Page 8: ...4 1 1 Identification of Controls and Indicators Quick Start Manual 1 1 Identification of Controls and Indicators Front Panel This is the 8420 51 ...

Page 9: ...s the File Screen for loading and saving mea surement data Select and accept settings Move the blinking cursor up down left and right Scroll waveforms move A B cursors and search for event markers Switches between scrolling waveforms moving A B cursors and searching for event markers Displays the Channel Setup Window on the Waveform Screen for entering settings Changes the setting channel to the p...

Page 10: ...CABLE can be connected here RS 232C Connector The 9612 RS 232C CABLE or 9721 RS 232C CABLE can be connected here Upper Panel Lower Panel AC Adapter Connector The AC adapter can be connected here Power Switch POWER Turns the power on and off Contrast Adjustment Knob CONTRAST Adjusts display contrast External Trigger Terminal EXT TRIG External trigger source input Trigger Output Terminal TRIG OUT Tr...

Page 11: ...6 7 8 9 10 11 Right Panel Analog Input Terminal Block These are the analog input terminals The 8420 51 has 8 input channels the 8421 51 has 16 input channels and the 8422 51 has 32 input channels Bottom Panel Battery Compartment Contains the 9447 BATTERY PACK ...

Page 12: ...8 1 1 Identification of Controls and Indicators Quick Start Manual ...

Page 13: ...urement chan nel settings See Section 4 4 Set the measurement channels on or off input settings Only those channels enabled here can be set in the chan nel screen See Section 4 5 Make the digital filter setting See Section 4 7 Enter the title comment See Section 4 1 Set the time axis time per division See Section 4 3 Set auto saving Data can be saved to a PC card in real time See Section 4 6 Switc...

Page 14: ... 5 1 Set the waveform dis play area range See Section 5 1 5 Set the waveform screen color See Section 5 1 6 Set the waveform magnifi cation factor See Section 5 1 7 Set the input type See Section 5 1 See Section 5 2 Shows the waveform display range Set the waveform display position See Section 5 1 8 Set the waveform sheet It is possible to divide into wave sheets S1 to S4 for display and recording...

Page 15: ...pply See Section 2 3 This indicates whether the speaker is on or off for the alarm function See Section 12 2 Shows the data record ing interval See Section 4 2 This indicates scroll mode See Section 6 4 See Section 6 5 See Section 6 6 This is the channel set ting window The button turns the display on and off The input channels can be set in the waveform display screen See Section 6 1 Shows the ti...

Page 16: ...12 2 3 Waveform Screen Quick Start Manual ...

Page 17: ...VAC as an example Moni tor voltage fluctuations for a one week period by measuring the output voltage every minute Settings Voltage is input to Channel 1 Recording interval 1 min Time axis 1 hour Recording period 7 days Data will be saved onto a PC card in real time Transducer Memory HiLogger AC Adapter Input Cables Instrument and Accessories Required for Measurement Memory HiLogger AC adapter PC ...

Page 18: ...V 1h DIV Record Time 7 d Store CH CH1 Auto Save Binary Real File Name AUTO default Save Mode Normal Full Digital Filter 60 Hz Analog Channel Screen Display Area Posn Zoom Mode Voltage Range 10Vf s Posn 0 Scaling 2 point Display Format ENG Unit V A 0 0000E 00 0 0000E 00 B 1 0000E 01 1 5000 02 ...

Page 19: ...21 of Instruction Manual 4 Insert the PC card See Section 7 Saving Measurement Data page 113 of Instruction Manual 5 Remove the terminal board cover To avoid the danger of electric shock never connect the power line to which the measurement cable is connected to this unit while the power line is live Never apply more than 30 Vrms AC or 60 VDC between ana log inputs or between analog inputs and cha...

Page 20: ...ire When connecting the input cable to a transducer refer to the instruction manual of the transducer and be sure to connect the cable correctly 7 Replace the terminal board cover to protect the terminal board and for safety 8 Turns on the power switch See Section 2 3 Powering On Off page 31 of Instruction Manual 9 Set the parameters of this instrument GND 8420 51 8422 51 8421 51 GND Channel Numbe...

Page 21: ...us Screen Set the recording interval to 1minute Move the blinking cursor to the position shown Select 1min The setting becomes effective immediately after being selected Close the list of settings Set the time axis Time DIV to 1h DIV Move the blinking cursor to the position shown Select 1h DIV ...

Page 22: ...tore CH setting is on it is not possible to make input settings in the channel screen Set the recording period Record Time to 7 days Move the blinking cursor to the position shown Select 7 d Turn on the channel 1 CH1 of the Store CH Move the blinking cursor to the position shown Turn on the channel 1 by putting a check mark in the CH1 box of Store CH ...

Page 23: ... is used AUTO AUTO0001 etc See Section 7 5 Automatic Data Saving page 133 of Instruction Manual Set the automatic saving to Binary Real time Move the blinking cursor to the position shown Select Binary Real Set the Save Mode to Normal and Full One file is created for each measurement session When the PC card is full saving ends See Section 7 5 Automatic Data Saving page 133 of Instruction Manual M...

Page 24: ...gnals The longer the recording interval is the larger the noise reduc tion effect becomes this ensures highly accurate measurement with little scatter Set the filter to 50Hz in areas where the supply frequency is 50Hz Move the blinking cursor to the position shown Select 60 Hz Display the Analog Channel Screen Display the Analog Channel Screen for channel 1 ...

Page 25: ...lay area to Posn Zoom Move the blinking cursor to the position shown Select Posn Zoom Set the input type Mode to Voltage Move the blinking cursor to the position shown Select Volt Set the range to 10Vf s Move the blinking cursor to the position shown Select 10Vf s ...

Page 26: ...e display position to 0 Move the blinking cursor to the position shown Select 0 Set the scaling Move the blinking cursor to the position shown Set the scaling method to 2 Point Set the display format to ENG Move the blinking cursor to the position shown ...

Page 27: ...Enter the following A 0 0000E 00 0 0000E 00 B 1 0000E 01 1 5000E 02 See Section 5 4 Setting Scaling page 86 of Instruction Manual Upper limit value 150 V Lower limit value 0 V Setting the scaling to correspond to the transducer conversion ratio allows the measurement values to be read off directly With the origin Posn setting at 0 the range from 0 to 150 V is displayed ...

Page 28: ...Measurement Quick Start Manual 10 Press the key to start measurement The Waveform Screen is displayed Press the key twice to abandon measurement while it is in progress 11 Measurement ends when seven days has elapsed ...

Page 29: ...rature changes by mea suring the temperature every second Settings Temperature is input to Channel 1 Recording interval 1 sec Time axis 1 min Recording period Continuous Data is viewed on the screen of the Memory HiLogger after measurement is complete Thermocouple K AC Adapter Memory HiLogger Because data is saved to the internal memory a PC card is not used When the measurement extends over a lon...

Page 30: ...hermocouple K Quick Start Manual Settings Status Screen Interval 1s Time DIV 1min DIV Record Time Continuous Store CH CH1 Auto Save OFF Digital Filter 60 Hz Analog Channel Screen Display Area Posn Zoom Mode Thermocouple Range 100 Cf s Posn 0 ...

Page 31: ... the AC adapter to the instrument 3 Plug the AC adapter into the power outlet See Section 2 1 Connecting Power page 21 of Instruction Manual 4 Remove the terminal board cover To avoid the danger of electric shock never connect the power line to which the thermocouple is connected to this unit while the power line is live ...

Page 32: ... Wire 6 Replace the terminal board cover to protect the terminal board and for safety If the input terminals are exposed to a strong wind this can upset the thermal balance of the input unit and cause incorrect readings 7 Attach the thermocouple K to the object whose temperature is to be measured 8 Turns on the power switch See Section 2 3 Powering On Off page 31 of Instruction Manual 9 Set the pa...

Page 33: ...isplay the Status Screen Set the recording interval to 1s Move the blinking cursor to the position shown Select 1s The setting becomes effective immediately after being selected Close the list of settings Set the time axis Time DIV to 1min DIV Move the blinking cursor to the position shown Select 1min DIV ...

Page 34: ...educ tion effect becomes this ensures highly accurate measurement with little scatter Set the filter to 50Hz in areas where the supply frequency is 50Hz Set the recording period Record Time to Cont ON Move the blinking cursor to the position shown Select Cont ON Turn on the channel 1 CH1 of the Store CH Move the blinking cursor to the position shown Turn on the channel 1 by putting a check mark in...

Page 35: ...Display the Analog Channel Screen Display the Analog Channel Screen for channel 1 Set the display area to Posn Zoom Move the blinking cursor to the position shown Select Posn Zoom Set the input type Mode to TC Thermocouple Move the blinking cursor to the position shown Select TC ...

Page 36: ...Cf s Set the thermocouple type Sensor to K Move the blinking cursor to the position shown Select K Set the appropriate compensation RJC to Int Internal Reference junction compensation is performed within the Mem ory HiLogger When a thermocouple is connected directly to the Memory HiLogger choose Int Move the blinking cursor to the position shown Select Int ...

Page 37: ...rement 12 Monitor changes in temperature on the Waveform Screen See Section 6 Waveform Screen page 99 of Instruction Manual Set the burn out detection Burn Out to OFF Move the blinking cursor to the position shown Select OFF Set the display position to 0 Move the blinking cursor to the position shown Select 0 Upper limit value 100 C Lower limit value 0 C ...

Page 38: ... a one month 30 day period Observe the integrated watt hours for a one month period by measuring the output pulses of the watt hour meter every 30 minutes Settings Pulse is input to Pulse Channel 1 P1 Recording interval 30 min Time axis 1 day Recording period 30 days Power Meter Memory HiLogger AC Adapter 9641 CONNECTION CABLE Instrument and Accessories Required for Measurement Memory HiLogger AC ...

Page 39: ...s Screen Interval 30min Time DIV 1d DIV Record Time 30 d Store CH P1 Auto Save Binary Real File Name AUTO default Save Mode Normal Full Digital Filter OFF Pulse Channel Screen Display Area Posn Zoom Mode Count Range 2500Mcf s Posn 0 Scaling Type2 Display Format ENG Unit kWh 1kWh 50 00 k pulse ...

Page 40: ...dapter into the power outlet See Section 2 1 Connecting Power page 21 of Instruction Manual 4 Insert the PC card See Section 7 Saving Measurement Data page 113 of Instruction Manual 5 Remove the terminal board cover To avoid the danger of electric shock never connect the power line to which the measurement cable is connected to this unit while the power line is live ...

Page 41: ...to the pulse output terminals of the power meter For details of connections refer to the instructions supplied with the power meter and take great care that the connections are correct For P1 the white lead is high and the red lead is low 8 Turns on the power switch See Section 2 3 Powering On Off page 31 of Instruction Manual 9 Set the parameters of this instrument Shield connect to instrument gr...

Page 42: ...lay the Status Screen Set the recording interval to 30min Move the blinking cursor to the position shown Select 30min The setting becomes effective immediately after being selected Close the list of settings Set the time axis Time DIV to 1d DIV Move the blinking cursor to the position shown Select 1d DIV ...

Page 43: ... d Turn on the pulse channel 1 P1 of the Store CH Unless the Store CH setting is on it is not possible to make input settings in the channel screen Move the blinking cursor to the position shown Turn on the pulse channel 1 by putting a check mark in the P1 box of Store CH Set the automatic saving to Binary Real time Move the blinking cursor to the position shown Select Binary Real ...

Page 44: ...er Quick Start Manual Set the saving mode to Normal and Full Move the blinking cursor to the position shown Select Normal Move the blinking cursor to the position shown Select Full Display the Pulse Channel Screen Display the Pulse Channel Screen for P1 ...

Page 45: ...ursor to the position shown Select Posn Zoom Set the input type Mode to Count Move the blinking cursor to the position shown Select Count Set the range to 2500Mcf s As 1 kWh is 50 000 pulses the Memory HiLogger can measure up to a monthly total power level of 50 000 kW Move the blinking cursor to the position shown Select 2500Mcf s ...

Page 46: ...the Pulse Output from a Power Meter Quick Start Manual Set the count mode to Add Move the blinking cursor to the position shown Select Add Set the slope type to Up Move the blinking cursor to the position shown Select Up ...

Page 47: ...8 9 10 5 Set the filter to ON Move the blinking cursor to the position shown Select ON When a mechanical contact output device is connected to the Memory HiLogger turn the filter to ON Set the display position to 0 Move the blinking cursor to the position shown Select 0 ...

Page 48: ...osition shown Set the scaling method to TYPE 2 Move the blinking cursor to the position shown Set the scaling unit to kWh Move the blinking cursor to the position shown Enter the following 1 kWh 50000 00 pulse See Section 5 4 Setting Scaling page 86 of Instruction Manual Upper limit value 50 000 kWh Lower limit value 0 Set the display format to ENG Move the blinking cursor to the position shown ...

Page 49: ...ng the Pulse Output from a Power Meter 45 1 2 3 4 5 6 7 8 9 10 5 10 Press the key to start measurement Press the key twice to abandon measurement while it is in progress 11 Measurement ends when a month has elapsed ...

Page 50: ...46 3 3 Integrating the Pulse Output from a Power Meter Quick Start Manual ...

Page 51: ...81 268 28 0568 E mail os com hioki co jp URL http www hioki co jp Printed in Japan 8420E983 00 All reasonable care has been taken in the production of this manual but if you find any points which are unclear or in error please contact your supplier or the International Sales and Marketing Department at HIOKI headquarters In the interests of product development the contents of this manual are subje...

Page 52: ...92 Japan TEL 81 268 28 0562 FAX 81 268 28 0568 E mail os com hioki co jp URL http www hioki co jp HIOKI USA CORPORATION 6 Corporate Drive Cranbury NJ 08512 USA TEL 1 609 409 9109 FAX 1 609 409 9108 8420E983 00 04 02H Printed on recycled paper ...

Reviews: