background image

User Manual of iVMS-5200 Control Client 

25 


display only the event recording. 


Date 

The day that has record files will be marked with 


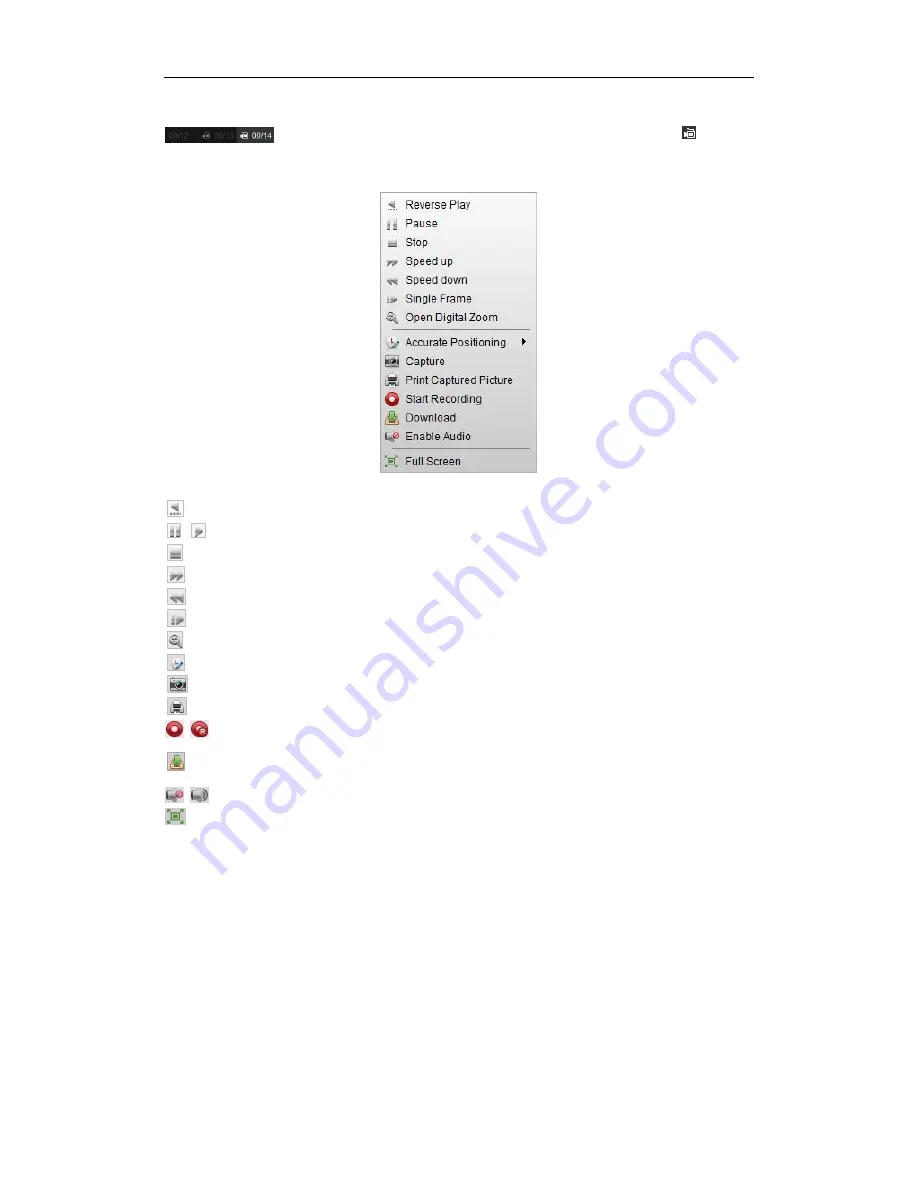
Right-click on the display window in playback to open the Playback Management Menu: 


The following items are available on the right-click Playback Management Menu: 


Reverse Playback 

Play back the record file reversely. 


Pause/Start 

Pause/Start the playback. 


Stop 

Stop the playback. 


Speed Up 

Play back the record file at a faster speed. 


Speed Down 

Play back the record file at a slower speed. 


Single Frame 

Play back the record file frame by frame. 


Open Digital Zoom 

Enable the digital zoom function. Click again to disable the function. 


Accurate Positioning 

Set the accurate time point to play back the record file. 


Capture 

Capture the picture in the playback process. 


Print Captured Picture 

Capture a picture and print it. 


Start/Stop Recording 

Start/Stop the manual recording. The record file is stored in the PC. 


Download 

Download  the  record  files  of  the  camera  and  the  record  files  are 

stored in the PC. You can select to download by file or by date. 


Enable/Disable Audio 

Click to enable/disable the audio in playback. 


Full Screen 

Display the playback in full-screen mode. Click the icon again to exit. 


3.2


Event Playback 

Purpose: 

The recordings triggered by event, such as motion detection or video loss, can be searched for Event 

Playback and this function requires the support of the connected device. 

Searching Record Files for Event Playback 

Steps: 

1.


Open the Remote Playback page. 

Summary of Contents for iVMS-5200 Pro

Page 1: ...iVMS 5200 Control Client User Manual UD 6L0202D1650A01...

Page 2: ...ITATION THE IMPLIED WARRANTIES OF MERCHANTABILITY AND FITNESS FOR A PARTICULAR PURPOSE REGARDING THE HIKVISION SOFTWARE HIKVISION DOES NOT WARRANT GUARANTEE OR MAKE ANY REPRESENTATIONS REGARDING THE U...

Page 3: ...nous Playback 27 3 5 VCA Playback 27 Chapter 4 E map Management 29 4 1 Adding an E map 29 4 2 Hot Spot Function 31 4 2 1 Adding Hot Spots 32 4 2 2 Modifying Hot Spots 34 4 2 3 Previewing Hot Spots 35...

Page 4: ...eyboard and Joystick Shortcuts Settings 54 10 4 Alarm Sound Settings 54 Chapter 11 Status Detection 56 11 1 Physical View 56 11 2 Logical View 57 Chapter 12 Web Client 59 12 1 Login 59 12 2 Live View...

Page 5: ...iVMS 5200 Control Client To ensure the proper usage and stability of the client please refer to the contents below and read the manual carefully before operation Note Two control clients are available...

Page 6: ...iary Screen Preview window Tool Log Search Open the Log Search page Local Configuration Open the Local Configuration page Status Detection Open the Status Detection page Broadcast Select the camera s...

Page 7: ...es the query of log files and the log files can be filtered by different types The Local Configuration module provides the configuration of general parameters file saving paths alarm sounds and other...

Page 8: ...nual of iVMS 5200 Professional Web Manager for the operation of changing password 3 Optionally check the checkbox Remember Password to keep the password 4 Check the checkbox Enable Auto login to log i...

Page 9: ...ese fields Server Address Enter the address of the CMS that you want to connect to Port No Enter the port No of the CMS By default it s 80 5 Click Login to enter the Control Client 2 2 Basic Operation...

Page 10: ...or the current view Save View As Save the current view as another new view Stop Live View Stop the live view of all cameras Mute Audio On Turn off on the audio in live view Resume Pause Auto switch Cl...

Page 11: ...en the Main View page 2 Optionally click and select the screen layout mode for live view 3 Click and drag the camera to the display window or double click the camera name after selecting the display w...

Page 12: ...ng icons are available Edit View Name Edit the name of the custom view Delete View Delete the custom view Instant Playback Start the instant playback of the cameras related to the view Up to 16 camera...

Page 13: ...a selected display window in all cameras auto switch Steps 1 Open the Main View page 2 Select a display window for all cameras auto switch 3 Click the icon in the toolbar and select the switching int...

Page 14: ...eps to add a preset 1 Click the Preset tab to enter the PTZ preset configuration panel 2 Click the direction buttons on the PTZ control panel to move the camera to the desired view 3 Select a PTZ pres...

Page 15: ...lick the icon to call the pattern To stop calling the pattern click Note Only one pattern can be configured and the newly defined pattern will overwrite the previous one Configuring the Patrol A patro...

Page 16: ...live view Start Stop Recording Start Stop manual recording The record file is stored in the PC Switch to Instant Playback Switch to the instant playback mode You can select the playback time Manual R...

Page 17: ...e video file and click Upload You can upload the video file to the configured FTP server You can also click Upload Queue to check the uploading status Select the video file and click Burn You can burn...

Page 18: ...ack video Capturing Picture in Live View Steps 1 Move the mouse pointer to the display window in live view to show the toolbar 2 Click the icon in the toolbar of the display window or on the right cli...

Page 19: ...pictures to FTP server the FTP settings need to be configured before proceeding For details see Section 10 2 File Saving Path Settings 2 2 5 Instant Playback Purpose The record files can be played bac...

Page 20: ...instant playback completed The following buttons are available on the playback control bar Reverse Playback Play back the record file reversely Pause Start Playback Pause Start the playback of the re...

Page 21: ...op Recording Start Stop clipping the record files Enable Disable Audio Click to turn on off the audio in instant playback Switch to Live View Switch to live view mode Full Screen Display the instant p...

Page 22: ...dow and select Camera Status The camera status such as recording status signal status connection number etc can be detected and displayed for check The status information refreshes every 3 minutes Arm...

Page 23: ...r the camera via the Web Manager For details please refer to the User Manual of iVMS 5200 Web Manager Click the icon on the control panel or click View Remote Playback to open the Remote Playback page...

Page 24: ...ched and displayed Note Up to 16 cameras can be searched simultaneously Playing Back Record Files After searching the record files for the normal playback you can play back the record files in the fol...

Page 25: ...ayback Search the recordings triggered by event such as motion detection video loss or video tampering POS Playback Search the recordings which contain POS information VCA Playback Set the VCA rule to...

Page 26: ...function Accurate Positioning Set the accurate time point to play back the record file Capture Capture the picture in the playback process Print Captured Picture Capture a picture and print it Start S...

Page 27: ...e icon in the toolbar or click the icon on the record file or double click the record file to play the video on the corresponding display window of playback Playback by Timeline The timeline indicates...

Page 28: ...ime duration for the record file Click on the timeline to play back the video of the specific time You can click or to zoom in or zoom out the timeline bar You can drag the timeline bar to go to the p...

Page 29: ...rawn region click to remove it 5 Click Search and the VCA events occurred in the defined area will be red marked on the timeline Or you can click to go back to the normal playback 6 Optional Click the...

Page 30: ...e E map Page 1 E map List 2 Map Display Area 3 E map Toolbar 4 1 Adding an E map Purpose An E map needs to be added as the parent map for the hot spots and hot regions Note The added e map you created...

Page 31: ...in the Map Display Area Use the mouse wheel to zoom in or zoom out on the map You can click and drag the yellow window in the lower right corner or use the direction buttons and zoom bar to adjust the...

Page 32: ...or hot region Delete Delete the selected hot spot or hot region Clear Alarm Info Clear the alarm information displayed on the map Refresh Refresh all the e map information Preset Display the added pre...

Page 33: ...ots to the desired locations Click to select the hot spot and you can see and edit the settings on the Property panel Adding Alarm Inputs as Hot Spots Steps 1 Click the Edit Map button in the E map to...

Page 34: ...Management to upload the local picture file to set it as the customized icon Note The picture format of the icon can only be png jpg or bmp and the picture size should be 32 32 pixels 5 Click OK to sa...

Page 35: ...Hot Spots Purpose You can modify the information of the added hot spots on the map including the name the color the icon etc Steps 1 Click the Edit Map button in the E map toolbar to enter the map edi...

Page 36: ...g control view and save the log information of the history alarm clear all the alarm information of the camera For alarm output hot spot You can enable or disable the linked alarm output For access co...

Page 37: ...related to the alarm and save them to the local PC as desired Steps 1 On the pop up window or right click menu of the hot spot click or select History Alarm to activate the History Alarm window 2 Sele...

Page 38: ...the Edit Map button in the E map toolbar to enter the map editing mode 2 Select an added map as the parent map 3 Click the icon in the toolbar to open the Add Hot Region dialog box 4 Check the checkb...

Page 39: ...p editing mode 2 Click the hot region icon on the parent map and the settings of the hot region display on the Property panel 3 You can edit the hot region name in the text field and select the color...

Page 40: ...t the commonly used location of the map as a preset to make the preview of the locations more easily and conveniently Steps 1 Click the Map Preview button in the E map toolbar to enter the map preview...

Page 41: ...er Manual of iVMS 5200 Professional Web Manager For configuring license plate recognition rules please refer to the User Manual of the device Click the icon on the control panel or click View License...

Page 42: ...reen layout mode for live view Full Screen Display the live view in full screen mode Press ESC key to exit Right click on the display window in live view to open the Live View Management Menu The foll...

Page 43: ...ckboxes to select the cameras or areas for query 3 Select the query type and set the corresponding conditions If you select Search by License Plate Number you can input the license plate number as nee...

Page 44: ...User Manual of iVMS 5200 Professional Web Manager Click the icon on the control panel or click View Alarm Center to open the Alarm Center page Alarm Center Page 1 Alarm List 2 Alarm Toolbar 3 Switch A...

Page 45: ...he level including low medium and high which indicates the urgent degree of the alarm Handle Alarm You can check the device information and the alarm type You can also view the live view of the alarm...

Page 46: ...ion during the operation of the iVMS 5200P such as connecting device failure searching record files error etc Steps 1 Open the Alarm Center page and click the Information tab 2 You can check the detai...

Page 47: ...he iVMS 5200P please refer to the User Manual of iVMS 5200 Web Manager For configuring people counting rule please refer to the User Manual of People Counting Server Click Tool People Counting to open...

Page 48: ...User Manual of iVMS 5200 Control Client 47...

Page 49: ...igured with heat map rule Note For adding heat map network camera to the iVMS 5200P please refer to the User Manual of iVMS 5200 Professional Web Manager For configuring heat map rule please refer to...

Page 50: ...les Steps 1 Open the Log Search page 2 Select the radio button of CMS Logs 3 Select the Log Type and the corresponding search condition There are 3 log types available including Alarm Log Operation Lo...

Page 51: ...ching the log files 4 Select the Major Type and the corresponding Minor Type 5 Click the icon to specify the start time and end time 6 Click Search The matched log files will display on the list You c...

Page 52: ...les including the CMS logs and remote logs can be exported to local PC Steps 1 Search the needed log files 2 Click Backup Log to open the Backup Log dialog box 3 Click the icon and select a local savi...

Page 53: ...pen the Local Configuration page Note You can click Default Value to restore the defaults of all the local configurations 10 1 General Settings Purpose The frequently used parameters including the vie...

Page 54: ...ly Prioritize the Playback of Record Files on Storage Server Play back the video files recorded on the storage server preferentially Otherwise play back the video files recorded on the local device Au...

Page 55: ...rop down list if DS 1003KI or DS 1004KI keyboard is connected to the PC installed with the Control Client 2 For PC keyboard and USB joystick 1 Select a certain function from the list 2 Double click th...

Page 56: ...o Files Notes For Video Engine the function should be support by the operating system of your PC If you select Video Engine the PC will play the voice text configured on the Web Manager when the alarm...

Page 57: ...b You can check the working status of the servers the online status of the devices and the servers and the recording schedule of the cameras 3 Optionally you can click Refresh to get the latest status...

Page 58: ...est status of the device Address Domain Name The IP address or domain name of the device that the camera belongs to Device Serial No The serial No of the device that the camera belongs to Connection C...

Page 59: ...User Manual of iVMS 5200 Control Client 58...

Page 60: ...Server and press the Enter key A login window displays Example If the IP address of CMS is 172 6 21 96 and you should enter http 172 6 21 96 in the address bar 2 Input the user name and password of CM...

Page 61: ...including picture capturing recording PTZ control etc Before you start An area with cameras assigned to is required to be defined for live view Click the Live View tab to open the Live View page Star...

Page 62: ...e the digital zoom function Full Screen Display the live view in full screen mode Press ESC to exit Move the mouse over the display window during live view the following icons show Capture Capture the...

Page 63: ...ter the PTZ preset configuration panel 2 Click the direction buttons to move the camera to the desired view 3 Click to select a PTZ preset No from the preset list and click the icon 4 In the pop up di...

Page 64: ...ts for one camera need to be added Perform the following steps to add and call a patrol 1 Click the Patrol button to enter the PTZ patrol configuration panel 2 Select a track number from the drop down...

Page 65: ...playback process Start Stop Clipping Start Stop clipping the record files Download Open the download window Select the record file s and click Download to save the file s to the local PC Audio on Mute...

Page 66: ...he record file from the search result list and then click the icon to play the video on the display window of playback Playback by Timeline The timeline indicates the time duration for the record file...

Page 67: ...playback Pause Start Playback Pause Start the playback of the record files Stop Playback Stop the playback of the camera Slow Forward Play back the record file at a slower speed Fast Forward Play back...

Page 68: ...r Self adaptive according to the hardware performance of the PC Picture Format Set the file format for the captured pictures during live view or playback Prioritize Playback of Record Files on Storage...

Page 69: ...User Manual of iVMS 5200 Control Client 68...

Reviews: