HIKVISION iDS-7200AHQHI-M Series User Manual Download Page 75

Before You Start

You must register the DynDNS, PeanutHull, or NO-IP services with your ISP before configuring

DDNS settings.
Steps

1. Go to System → Network → TCP/IP → DDNS

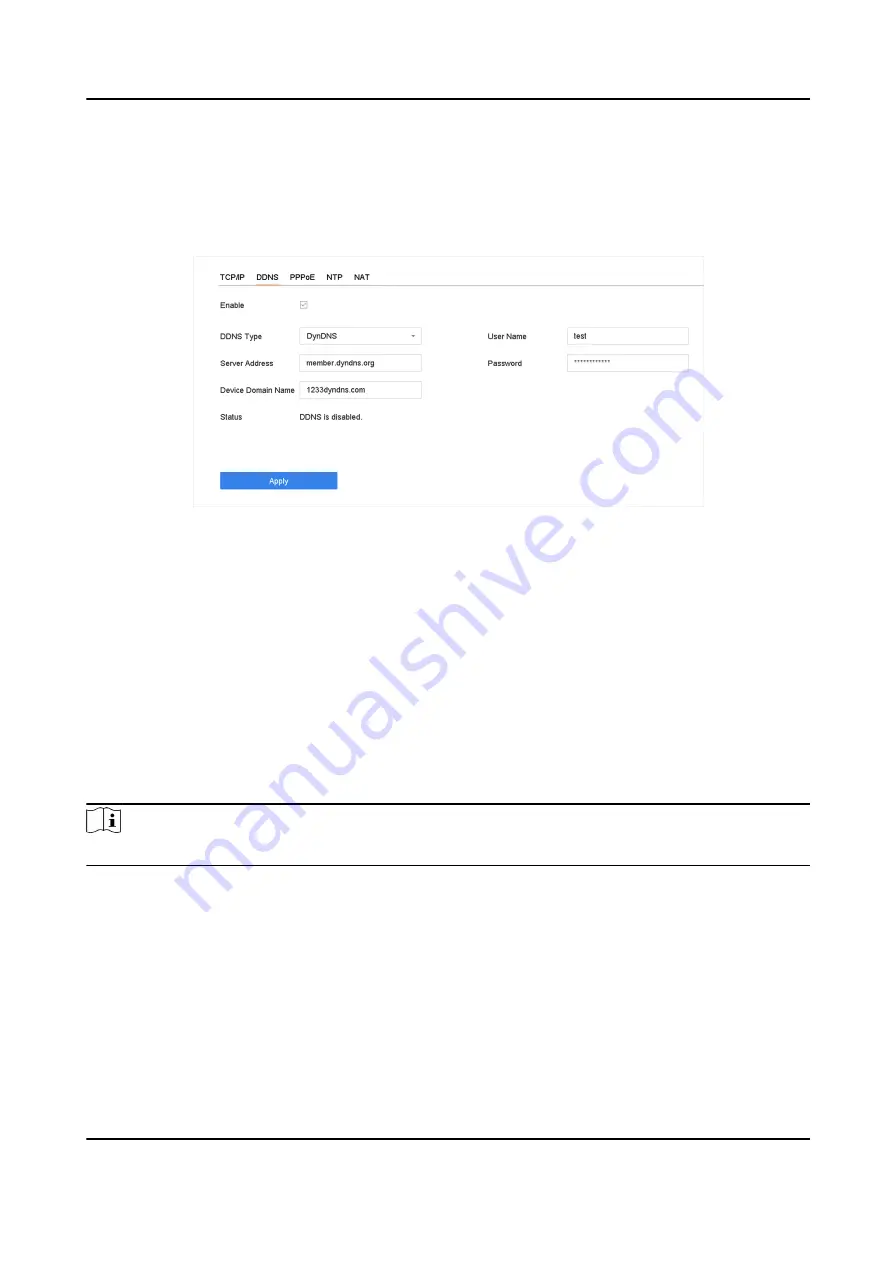
Figure 7-2 DDNS Settings

2. Check Enable.

3. Select DDNS Type as DynDNS.

4. Enter Server Address for DynDNS (i.e., members.dyndns.org).

5. Under Device Domain Name, enter the domain name obtained from the DynDNS Website.

6. Enter User Name and Password registered in the DynDNS Website.

7. Click Apply.

7.3 Configure PPPoE

If the device is connected to the Internet through PPPoE, you need to configure the user name and

password accordingly under System → Network → TCP/IP → PPPoE .

Note

Contact your Internet service provider for details about PPPoE service.

7.4 Configure NTP

Connection to a network time protocol (NTP) server can be configured on your device to ensure

the system's date and time accuracy.
Steps

1. Go to System → Network → TCP/IP → NTP .

ATM Digital Video Recorder User Manual

60

Summary of Contents for iDS-7200AHQHI-M Series

Page 1: ...ATM Digital Video Recorder User Manual...

Page 2: ...OR ANY SPECIAL CONSEQUENTIAL INCIDENTAL OR INDIRECT DAMAGES INCLUDING AMONG OTHERS DAMAGES FOR LOSS OF BUSINESS PROFITS BUSINESS INTERRUPTION OR LOSS OF DATA CORRUPTION OF SYSTEMS OR LOSS OF DOCUMENTA...

Page 3: ...AR EXPLOSIVE OR UNSAFE NUCLEAR FUEL CYCLE OR IN SUPPORT OF HUMAN RIGHTS ABUSES IN THE EVENT OF ANY CONFLICTS BETWEEN THIS MANUAL AND THE APPLICABLE LAW THE LATER PREVAILS ATM Digital Video Recorder Us...

Page 4: ...use harmful interference 2 This device must accept any interference received including interference that may cause undesired operation EU Conformity Statement This product and if applicable the suppli...

Page 5: ...Industry Canada ICES 003 Compliance This device meets the CAN ICES 3 A NMB 3 A standards requirements ATM Digital Video Recorder User Manual iv...

Page 6: ...Applicable Model This manual is applicable to the following model Series Model iDS 7200AHQHI M iDS 7204AHQHI M1 ATM Digital Video Recorder User Manual v...

Page 7: ...avoided will or could result in death or serious injury Caution Indicates a potentially hazardous situation which if not avoided could result in equipment damage data loss performance degradation or...

Page 8: ...LV Safety Extra Low Voltage and the Limited Power Source with 100 VAC to 240 VAC or 12 VDC according to the IEC60950 1 standard Please refer to technical specifications for detailed information Do not...

Page 9: ...r shocks or jolts to the recorder as a result of dropping it may cause damage to the sensitive electronics within the recorder Use the device in conjunction with an UPS if possible Power down the reco...

Page 10: ...l Input 7 1 3 2 Add Automatically Searched Online Network Camera 8 1 3 3 Add Network Camera Manually 8 1 4 Platform Access 10 1 4 1 Configure Guarding Vision 10 Chapter 2 Live View 11 2 1 Start Live V...

Page 11: ...2 Playback 24 3 2 1 Instant Playback 24 3 2 2 Play Normal Video 25 3 2 3 Play Custom Searched Files 26 3 2 4 Play Tag Files 26 3 2 5 Play by Sub periods 28 3 2 6 Play External Files 28 3 3 Playback O...

Page 12: ...udden Scene Change Detection 46 4 3 11 Unattended Baggage Detection 47 4 3 12 PIR Alarm 48 4 3 13 Target Detection 48 4 4 Configure Arming Schedule 49 4 5 Configure Linkage Actions 50 4 5 1 Configure...

Page 13: ...63 7 7 Configure ONVIF 64 Chapter 8 ATM Settings 66 8 1 Network Interception 66 8 2 Serial Port Interception 66 8 3 Network Protocol 66 8 4 Serial Port Protocol 67 8 5 Custom Protocol Settings 67 8 5...

Page 14: ...10 4 1 Reset Password by GUID 82 10 4 2 Reset Password by Security Questions 83 10 4 3 Reset Password by Reserved Email 83 Chapter 11 System Management 85 11 1 Configure Device 85 11 2 Configure Time...

Page 15: ...s 92 11 5 3 Upgrade IP Cameras 92 11 6 Import Export Device Configuration Files 93 11 7 Search Export Log Files 93 11 8 Restore Default Settings 94 11 9 Security Management 95 11 9 1 HTTP Authenticati...

Page 16: ...d before activation You can also activate the device via Web Browser SADP or Client Software Steps 1 Enter the admin password twice Figure 1 1 Activate via Local Menu Warning We highly recommend you t...

Page 17: ...ture password resetting When you have enabled Security Question Configuration continue to set the security questions for the future password resetting When you have enabled Reserved E mail Settings co...

Page 18: ...r product And we recommend you reset your password regularly especially in the high security system resetting the password monthly or weekly can better protect your product 5 Click Activate 1 1 4 Acti...

Page 19: ...w Figure 1 4 Device Management Interface 3 Check the recorder status from the device list and select an inactive recorder 4 Click Activate to pop up the Activation interface 5 Create a password and in...

Page 20: ...egularly especially in the high security system resetting the password monthly or weekly can better protect your product Figure 1 5 Activation 6 Click OK to start activation 7 Click Modify Netinfo to...

Page 21: ...d you to create a strong password of your own choosing using a minimum of 8 characters including at least three kinds of following categories upper case letters lower case letters numbers and special...

Page 22: ...a DHCP server is available on the network Valid MTU value range is 500 to 9676 3 Click Apply 1 3 Add Network Camera 1 3 1 Configure Signal Input You can configure the analog and IP signal input types...

Page 23: ...rk Camera Steps 1 Click on the main menu 2 Click Number of Unadded Online Device at the bottom 3 Select the automatically searched online network cameras 4 Click Add to add the camera which has the sa...

Page 24: ...port to add the camera For SDK service the default port value is 8000 For enhanced SDK service the default value is 8443 Note The function is only available when you use HIKVISION protocol 6 Optional...

Page 25: ...net access Please read Service Terms and Privacy Statement before enabling the service if you agree the service terms and privacy statement 4 Click OK Note Guarding Vision is disabled by default The v...

Page 26: ...figure Live View Settings Live View settings can be customized You can configure the output interface dwell time for screen to be shown mute or turning on the audio the screen number for each channel...

Page 27: ...a in the list to link the camera to the window Note You can also click and drag the camera to the desired window on the Live View interface to set the camera order You can enter the number in the text...

Page 28: ...TZ parameters The PTZ parameters configuration must be done before you can control the PTZ camera Steps 1 Click on the quick settings toolbar of the PTZ camera s Live View 2 Click PTZ Parameters Setti...

Page 29: ...the preset No 1 to 255 from the drop down list 6 Enter the preset name 7 Click Apply to save the preset 8 Optional Click Cancel cancel the location information of the preset 9 Optional Click in the l...

Page 30: ...tay there for a set duration before moving on to the next key point The key points are correspond to the presets Steps 1 Click on the quick settings toolbar of the PTZ camera s live view 2 Click Patro...

Page 31: ...Determines the order the PTZ will follow while cycling through the patrol Speed Defines the speed the PTZ will move from one key point to the next Duration Refers to the duration to stay at the corre...

Page 32: ...tings toolbar of the PTZ camera s live view 2 Click Patrol on the PTZ control panel Figure 2 11 Patrol Configuration 3 Select a patrol 4 Click Call to start the patrol 5 Optional Click Stop to stop th...

Page 33: ...cording to the predefined patterns Steps 1 Click on the quick settings toolbar of the PTZ camera s live view 2 Click Pattern to configure pattern Figure 2 13 Pattern Configuration 3 Select a pattern 4...

Page 34: ...time Before You Start Before operating this function make sure the connected camera supports linear scan and is in HIKVISION protocol Steps 1 Click on the quick settings toolbar of the PTZ camera s l...

Page 35: ...by the number of pixel rows height e g 1024 768 Bitrate The bit rate in kbit s or Mbit s is often referred to as speed but actually defines the number of bits time unit and not distance time unit Ena...

Page 36: ...e the H 265 Stream Access The device can automatically switch to the H 265 stream of IP camera which supports H 265 video format for the initial access Go to Camera More Settings H 265 Auto Switch Con...

Page 37: ...all event triggered alarm Motion Recording triggered by motion detection Alarm Recording triggered by alarm M A Recording triggered by either motion detection or alarm M A Recording triggered by moti...

Page 38: ...Click Copy to 2 Select camera s to duplicate with the same schedule settings 3 Click OK 7 Click Apply 3 1 5 Configure Holiday Recording You may want to have different plan for recording on holiday th...

Page 39: ...not up to 1080P non real time is supported Go to Storage Advanced to enable or disable 1080P Lite Mode 3 2 Playback 3 2 1 Instant Playback Instant playback enables the device to play the recorded vide...

Page 40: ...ct date and camera s and use the toolbar at the bottom to perform playback operations Refer to Playback Operations You can click camera s to execute simultaneous playback of multiple camera s Figure 3...

Page 41: ...ile Status Event Type etc Figure 3 5 Custom Search 5 Click Search Figure 3 6 Custom Searched Video Files 6 Select a file and start playing the video on search results interface 3 2 4 Play Tag Files Vi...

Page 42: ...dit the tag information 5 Click OK Note Max 64 tags can be added to a single video file Play Tag Files Steps 1 Go to Playback 2 Click Custom Search at the left bottom 3 Enter search conditions includi...

Page 43: ...ote According to the defined number of split screens the video files on the selected date can be divided into average segments for playback E g if there are video files existing between 16 00 and 22 0...

Page 44: ...o clips during playback Steps 1 Go to Playback 2 Click at the bottom toolbar 3 Set the start time and end time You can click to set the time period or set a time segment on time bar 4 Click to save th...

Page 45: ...alarm A higher value results in the more readily to triggers motion detection 6 Set the arming schedule Refer to Configure Arming Schedule 7 Set linkage actions Refer to Configure Linkage Actions 4 1...

Page 46: ...alarm Steps 1 Go to System Event Normal Event Alarm Input 2 Select an alarm input item from the list and click 3 Select the alarm input type 4 Edit the alarm name 5 Check Input 6 Set the arming sched...

Page 47: ...e for the same analog camera Enable smart ATM event alarm will cost 2 ch IP camera connection resources 4 2 1 Panel Mode Panel mode supports the following smart ATM protection rule types human entranc...

Page 48: ...nding Region Contained in Scene Whether the scene contains the human standing region 6 Set Smart ATM Capture parameters for captured image 7 Set Target Overlay Target frames or rules can be overlaid o...

Page 49: ...ted rule to set alarm response actions Refer to Configure Linkage Actions and Configure Arming Schedule for details 11 Optional Set the shield region The shield region is used to shield environment in...

Page 50: ...to click Full Screen to the draw detection region as full screen 8 Optional Click Draw Max Size Draw Min Size to draw the maximum minimum filtering size of the human face Note It is recommended to us...

Page 51: ...r details 11 Click Apply 4 3 VCA Event Alarm The device supports receiving VCA detections sent by connected IP cameras Enable and configure VCA detection on the IP camera settings interface first Note...

Page 52: ...Configure Arming Schedule 8 Set linkage actions Refer to Configure Linkage Actions 9 Click Apply 4 3 2 Vehicle Detection Vehicle detection is available for road traffic monitoring In Vehicle Detection...

Page 53: ...ngs Up to 4 lanes are selectable Blacklist and Whitelist You can export the file first to see its format and edit it and import it to the device 9 Click Apply Note Refer to the Network Camera User Man...

Page 54: ...de to the B side can be detected B A Only the object crossing the configured line from the B side to the A side can be detected 3 Set the detection sensitivity The higher the value is the more easily...

Page 55: ...ls are selectable 2 Set Time Threshold and Sensitivity Time Threshold The time an object loiter in the region When the duration of the object in the defined detection area exceeds the threshold the de...

Page 56: ...a 4 Check Enable Region Entrance Detection 5 Optional Check Save VCA Picture to save the captured pictures of region entrance detection pictures 6 Set detection rules and detection areas 1 Select Armi...

Page 57: ...set the detection rules and detection areas 1 Select Arming Region Up to 4 regions are selectable 2 Set Sensitivity The higher the value is the more easily the detection alarm will be triggered Its r...

Page 58: ...efocus image will be detected 7 Set the arming schedule Refer to Configure Arming Schedule 8 Set the linkage actions Refer to Configure Linkage Actions 9 Click Apply 4 3 8 Object Removal Detection The...

Page 59: ...from the region for 10s Its range is 5s 20s Sensitivity The similarity degree of the background image If the sensitivity is high a very small object taken from the region will trigger the alarm 3 Clic...

Page 60: ...nd rise by configuring its Sensitivity and Sound Intensity Threshold Sensitivity The smaller the value the more severe the change must be to trigger the detection Range 1 100 Sound Intensity Threshold...

Page 61: ...Select a camera to configure 4 Check Enable 5 Optional Check Save VCA Picture to save the captured sudden scene change detection pictures 6 Drag the Sensitivity slider to set the detection sensitivit...

Page 62: ...he detection rules and detection areas 1 Select Arming Region Up to 4 regions are selectable 2 Drag the sliders to set Time Threshold and Sensitivity Time Threshold The time of the objects are left in...

Page 63: ...Optional Check Save VCA Picture to save the captured of PIR alarm pictures 6 Set the arming schedule Refer to Configure Arming Schedule 7 Set the linkage actions Refer to Configure Linkage Actions 8 C...

Page 64: ...t Click a result in list to play the related video 4 4 Configure Arming Schedule Steps 1 Click Arming Schedule 2 Click Edit 3 Select a day of the week and set the time period Up to eight time periods...

Page 65: ...tput Select the output to show the event video Full Screen Monitoring Dwell Time Set the time in seconds to show the alarm event screen If alarms are triggered simultaneously in several channels their...

Page 66: ...et the email parameters 3 Click Apply 4 Go to the Linkage Action interface of the alarm detection e g motion detection video tampering face detection etc 5 Select Send Email alarm linkage action 4 5 5...

Page 67: ...t mode with high quality black and white image Backlight Set the camera s wide dynamic range 0 to 100 When the surrounding illumination and the object have large differences in brightness you can set...

Page 68: ...ivacy Mask The privacy mask protects personal privacy by concealing parts of the image from kive view or recording with a masked area Steps 1 Go to Camera Privacy Mask 2 Select a camera to set privacy...

Page 69: ...figured and the size of each area can be adjusted You can clear the configured privacy mask zones on the window by clicking the corresponding clear zone 1 to 4 icons on the right of the window or clic...

Page 70: ...specified channels can be recorded onto a particular HDD group through HDD settings Steps 1 Go to Storage Storage Mode 2 Select Mode as Group 3 Click Apply 4 Go to Storage Storage Device 5 Select a HD...

Page 71: ...the list 11 Select related camera s to save videos and pictures on the HDD group 12 Click Apply 6 1 2 Configure the HDD Property HDD property can be set as R W Read only or Redundant Before You Start...

Page 72: ...e Mode 2 Select Mode as Quota 3 Select a camera to set quota 4 Enter the storage capacity in the text fields of Max Record Capacity GB and Max Picture Capacity GB 5 Click Copy to to copy the quota set...

Page 73: ...er NetHDD IP address and click Search to search the available NetHDD 5 Select the desired NetHDD 6 Click OK 7 The added NetHDD will be displayed in the HDD list Select the newly added NetHDD and click...

Page 74: ...7 1 TCP IP Settings 2 Configure network parameters as needed Note Check Enable DHCP to obtain IP settings automatically if a DHCP server is available on the network Valid MTU value range is 500 to 96...

Page 75: ...Website 6 Enter User Name and Password registered in the DynDNS Website 7 Click Apply 7 3 Configure PPPoE If the device is connected to the Internet through PPPoE you need to configure the user name...

Page 76: ...o time synchronization with NTP server NTP Server IP address of the NTP server NTP Port Port of the NTP server 4 Click Apply 7 5 Configure Port You can configure different types of ports to enable rel...

Page 77: ...configured in the software Server Port Server port 8000 by default should be configured for remote client software access and its valid range is 2000 to 65535 HTTP Port HTTP port 80 by default should...

Page 78: ...s multi address the Default Route of the device should be in the same network segment as that of the LAN IP address of the router Universal Plug and Play UPnP can permit the device seamlessly discover...

Page 79: ...ith the external port value and other required contents Note Each item should be corresponding with the device port including server port http port RTSP port and https port The virtual server setting...

Page 80: ...e letters lower case letters numbers and special characters in order to increase the security of your product And we recommend you reset your password regularly especially in the high security system...

Page 81: ...nsaction behaviour etc can be captured by monitoring the data package of the serial port communication Before You Start Connect the device and the ATM Automatic Teller Machine via the serial port prop...

Page 82: ...the ATM to the device Before You Start Connect the device and the ATM Automatic Teller Machine via the serial port properly Steps 1 Go to System ATM Settings 2 Check Enable ATM 3 Select Input as Seri...

Page 83: ...nal Filter specified content 1 Check Enable Filter 2 Select a format in Data format 3 Enter the content in Content 4 Set Content Position 7 Click OK 8 5 2 Configure Transaction Information The device...

Page 84: ...Behaviour Set Length Type as Variable and set the minimum length and maximum length for the transaction information and then select data format and set the end character Set Length Type as Fixed and s...

Page 85: ...et Delay Time for menu display if there is no Card In or Card Out in the transaction information The default value is 60 the range is from 0 to 65535 5 Click OK 8 5 4 Configure Overlay Position You ca...

Page 86: ...on the image None It will not overlay transaction information on the image Custom It will overlay transaction information on the image You can drag the yellow rectangle to a desirable position 3 Clic...

Page 87: ...ay related pictures only Target Picture Display the search results of vehicle close ups Source Picture Display the search results of original pictures captured by camera 9 2 Search History Operation Y...

Page 88: ...ptional Check Backup License Plate Statistics Info to export license plate statistics information later Note Only for vehicle files 4 Select the file to export as Video and log and click OK 5 Click OK...

Page 89: ...increase the security of your product We also recommend that you reset your password regularly Especially in the high security systems resetting the password monthly or weekly can better protect your...

Page 90: ...ck Enable Unlock Pattern to enable the use of an unlock pattern when logging in to the device 2 Use the mouse to draw a pattern among the 9 dots on the screen and release the mouse when the pattern is...

Page 91: ...Operator Guest 3 Edit the user information as desired including the new password strong password is required and MAC address 4 Click OK 10 2 Manage User Permissions 10 2 1 Set User Permissions For an...

Page 92: ...Parameters Settings Configuring parameters restoring factory default parameters and importing exporting configuration files Local Camera Management Adding deleting and editing of IP cameras Local Adv...

Page 93: ...motely operating HDD management initializing HDD setting HDD property upgrading system firmware clearing I O alarm output Remote Shutdown Reboot Remotely shutting down or rebooting the device 3 Set Ca...

Page 94: ...en lock status of device The admin user can set this permission for user accounts When the normal user Operator or Guest has no local live view permission for specific camera s the live view permissio...

Page 95: ...ser account 2 Insert a USB flash drive to your device and export the GUID file to the USB flash drive Figure 10 5 Export GUID File 3 Select a Device 4 Select a directory on the device 5 Click Export 1...

Page 96: ...il The reserved email will help you to reset password when you forget your password Steps 1 Check Reserved E mail when you are activating the device or click Modify when you are editing the admin user...

Page 97: ...Start The GUID file must be exported and saved in the local U flash disk after you have activated the device or edited the admin user account Steps 1 On the user login interface click Forgot Password...

Page 98: ...3 2 Configure Security Questions Steps 1 On the user login interface click Forgot Password 2 Select the password resetting type as Verify by Security Question 3 Input the correct answers of the three...

Page 99: ...to USB flash drive c Email the QR code to pw_recovery device service com as attachment 6 Check your reserved email and you will receive a verification code within 5 minutes 7 Enter the verification co...

Page 100: ...ange of 1 to 255 and the default No is 255 The number is used for the remote and keyboard control Auto Logout Set the timeout time for menu inactivity E g when the timeout time is set to 5 minutes the...

Page 101: ...NTP Port Port of the NTP server 4 Click Apply 11 2 3 DST Synchronization DST daylight saving time refers to the period of the year when clocks are moved one period ahead In some areas worldwide this h...

Page 102: ...1 Go to Maintenance Network Traffic 2 You can view the real time network traffic status including MTU Maximum Transmission Unit and network throughput Figure 11 1 Network Traffic 11 3 2 Test Network D...

Page 103: ...ection 3 Select network card in Select NIC 4 Select the USB flash drive in Device Name You can click Refresh if the connected local backup device cannot be displayed Figure 11 3 Export Network Packet...

Page 104: ...nter a short description of your concept here optional This is the start of your concept 11 4 1 Bad Sector Detection Steps 1 Go to Maintenance HDD Operation Bad Sector Detection 2 Select the HDD No yo...

Page 105: ...l not be affected but local search and playback functions will not be available during the process you can still achieve search and playback functions remotely via web browser client software etc Do n...

Page 106: ...rade by FTP Before You Start Ensure the network connection of the PC running FTP server and the device are valid and correct Run the FTP server on the PC and copy the firmware into the corresponding d...

Page 107: ...ts available upgrade firmware the device will notify you when you log in 3 Optional You can switch on Download Latest Package Automatically to automatically download the latest firmware package 4 Clic...

Page 108: ...contain the file Steps 1 Go to Maintenance Import Export Figure 11 9 Import Export Config File 2 Export or import the device configuration files Click Export to export configuration files to the sele...

Page 109: ...ults Note Up to 2 000 log files can be displayed each time 5 Related Operation Click or double click it to view detailed information Click it to view the related video file Export Export ALL Click it...

Page 110: ...9 Security Management Enter a short description of your concept here optional This is the start of your concept 11 9 1 HTTP Authentication If you need to enable the HTTP service you can set HTTP auth...

Page 111: ...11 9 3 RTSP Authentication You can specifically secure the stream data of live view by setting the RTSP authentication Steps 1 Go to System System Service System Service Figure 11 14 RTSP Authenticat...

Page 112: ...UD16604N...

Reviews: