


Storage Enclosure Quick Start Guide
14
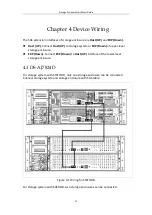
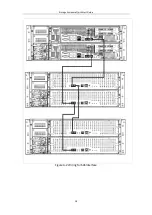
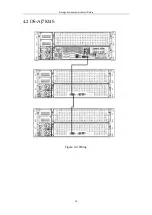
Please check the following hardware connection
Power cord connection: connect the power cord to 110V~220VAC power supply.
Connect the SAS cable to storage system. The default interface is UP1.
before installing device, please wear a wrist strap and ensure it is correctly grounded.
3.2.2 Install HDD
Select HDD Model
It is recommended to adopt the certificated professional HDD models so as to ensure
the stable running of the system and the reliable data storage. It is highly
recommended to purchase the enterprise-class hard disks, e.g., Seagate
Constellation™ ES, Western Digital WD RE3 and WD RE4 series hard disk.
The use of non-enterprise hard disks for establishing RAID may cause instability of
the system running and thus lead to data damage. In case of hard disk failure, please
replace it with the functioning one immediately so as to prevent the data loss or
performance effect. Please refer to the List of Compatible HDD Models of our
company for the recommended HDD models.
In order to avoid damages during transportation, it is recommended to package and
transport the hard disks separately with the chassis of network storage system.
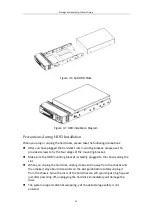
Install HDD
Follow the steps below to install HDDs. We use 24 slots device as an example to
describe the following operations.
Step 1
Use the panel key to unlock the front panel and then pull out the front panel.
Step 2
Press the spring lock of the HDD on the left, draw the handle and then pull out
the HDD bracket from the chassis along the guide apparatus.
Step 3
Use four screws to secure the HDD (with the PCB side downward) to the
bracket. In order to ensure the HDD pin holds the line with the rear of the plate,
mount screws to the specific screw hole as shown.
Step 4
Insert the HDD bracket (with the PCB side towards the left of the chassis) to
the chassis and push it along the guide apparatus to the bottom. Then, press
the securing handle to ensure the bracket has been seated into position and
lock it.
Step 5
Repeat the operating steps above till all HDDs have been installed.