


User Manual of DS-7304HFI-SE DVR
42
7.1 Configuring Network Settings
7.1.1 Network configuration
Network settings must be configured before you’re able to use your DVR over the network.
To configure network settings:
1.
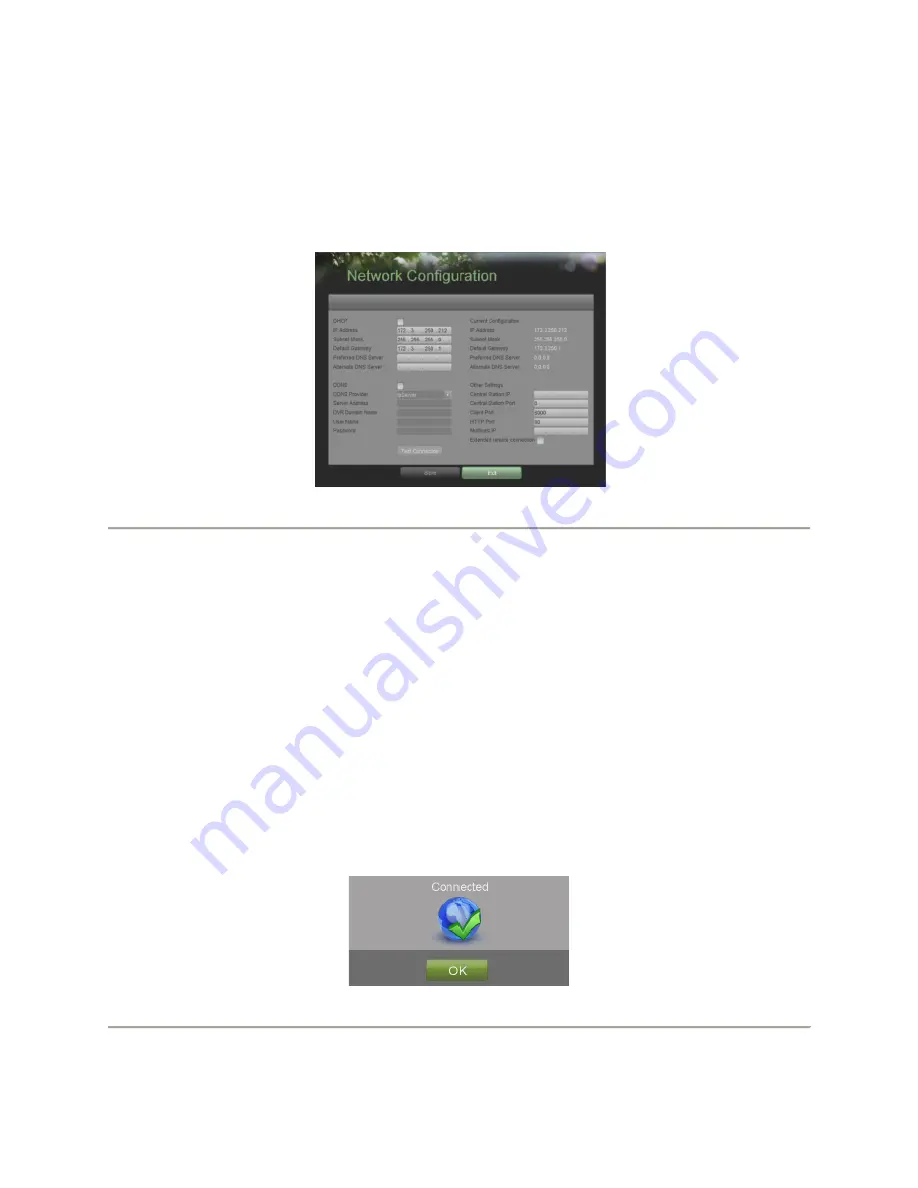
Enter the Network Configuration menu, shown in Figure 33 by going to Main Menu > System Configuration >
Network Configuration.
Figure 33. Network Settings Menu
2.
The current network settings are displayed on the right side of the menu.
3.
If you have a DHCP server running and would like your DVR to automatically obtain an IP address and other
network settings from that server, check the
DHCP
checkbox.
4.
If you would like to configure your own settings, enter the settings for:
•
IP Address:
IP address you would like to use for your DVR.
•
Subnet Mask:
Subnet Mask of network.
•
Default Gateway:
IP address of your Gateway. Typically the IP address of your router.
•
DNS Server:
The preferred and alternate Domain Name System (DNS) Server to be used with your DVR.
5.
To enable Dynamic DNS (DDNS), check the
DDNS
checkbox. Dynamic DNS allows you to create a hostname and
associate it to your IP address, making access to your DVR over the internet easier. To configure DDNS:
1.
Enable DDNS by checking the
DDNS
checkbox.
2.
Select a DDNS provider from the
DDNS Provider
selection box.
3.
Enter settings for
Server Address
,
DVR Domain Name
,
User Name
, and
Password
.
6.
If a central monitoring station that is compatible with your DVR is available, you may enter its settings under
Central Station IP
and
Central Station Port
.
7.
Enter the
Client Port
and
HTTP Port
to be use with your DVR. The client port designates the port to be use with
the client software while the HTTP port refers to the one to be use with the built-in Web Server.
8.
After all settings have been configured; you may test the connection by clicking the Test Connection button. A
confirmation message, similar to the one shown in Figure 34 will pop up if the network is working properly.
Figure 34. Test Connection Confirmation
9.
Select the Save button to save the network settings and select Exit to return to the previous menu. Selecting the
Exit button without clicking Save will quit out of the menu without saving settings.
Summary of Contents for DS-7304HFI-SE
Page 1: ...DS 7304HFI SE DVR USER S MANUAL Version 1 2 ...
Page 7: ...User Manual of DS 7304HFI SE DVR 7 C H A P T E R 1 Introduction ...
Page 15: ...User Manual of DS 7304HFI SE DVR 15 C H A P T E R 2 Getting Started ...
Page 20: ...User Manual of DS 7304HFI SE DVR 20 C H A P T E R 3 Live Feed ...
Page 28: ...User Manual of DS 7304HFI SE DVR 28 C H A P T E R 4 Record Settings ...
Page 33: ...User Manual of DS 7304HFI SE DVR 33 C H A P T E R 5 Playback ...
Page 37: ...User Manual of DS 7304HFI SE DVR 37 C H A P T E R 6 Backup ...
Page 41: ...User Manual of DS 7304HFI SE DVR 41 C H A P T E R 7 System Configuration ...
Page 51: ...User Manual of DS 7304HFI SE DVR 51 C H A P T E R 8 Camera Management ...
Page 55: ...User Manual of DS 7304HFI SE DVR 55 C H A P T E R 9 Disk Management ...
Page 59: ...User Manual of DS 7304HFI SE DVR 59 C H A P T E R 1 0 DVR Management ...


