background image

User Manual of DS-7304HFI-SE DVR 

12 


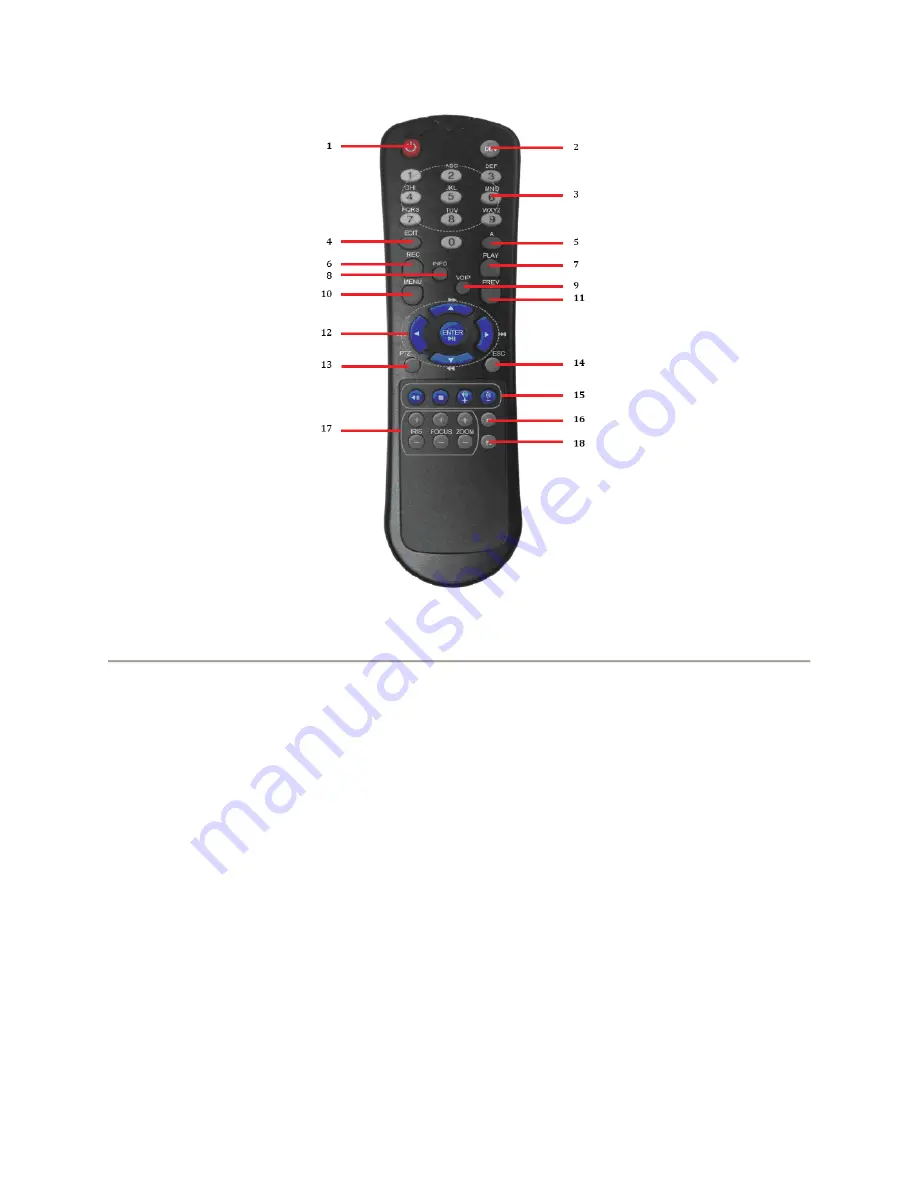
Figure 4. IR Remote Control 


The keys on the remote control closely resemble the ones found on the front panel. Referring to Figure 4, they include:


1. POWER Button: 

Same as POWER button on front panel . 

2. DEV Button: 

Enables/Disables Remote Control. 

3. Alphanumeric Buttons: 

Same as Alphanumeric buttons on front panel . 

4. EDIT Button: 

Same as EDIT/IRIS+ button on front panel . 

5. A Button: 

Same as A/FOCUS+ button on front panel. 

6. REC Button: 

Same as REC/SHOT button on front panel . 

7. PLAY Button: 

Same as PLAY/AUTO button on front panel . 

8. INFO Button: 

Same as ZOOM+ button on front panel . 

9. VOIP Button: 

Same as MAIN/SPOT/ZOOM- button on front panel . 

10. MENU Button: 

Same as MENU/WIPER button on front panel . 

11. PREV Button: 

Same as PREV/FOCUS- button on front panel . 

12. DIRECTION/ENTER Buttons: 

Same as DIRECTION/ENTER buttons on front panel . 

13. PTZ Button: 

Same as PTZ/IRIS- button on front panel . 

14. ESC Button: 

Same as ESC button on front panel . 

15. RESERVED: 

Reserved. 

16. F1 Button: 

Same as F1/LIGHT button on front panel . 

17. PTZ CONTROL Buttons: 

Buttons to adjust the iris, focus and zoom of a PTZ camera. 

18. F2 Button: 

Same as F2/AUX button on front panel . 

 
Aim the remote control at the IR receiver located at the front of the unit to test operation. If there is no response: 

1. 

Using the front control panel or the mouse, go into Main Menu > System Configuration>Display Configuration 

2. 

Check and remember DVR device No. The default ID# is 255. This ID# is valid for all IR controls. 

3. 

Press the DEV button on the remote. 

Summary of Contents for DS-7304HFI-SE

Page 1: ...DS 7304HFI SE DVR USER S MANUAL Version 1 2 ...

Page 2: ...n part or otherwise reproduced without prior written consent from Hikvision except where specifically permitted under US and international copyright law The information in this document is subject to change without notice Hikvision assumes no responsibility or liability for any errors or inaccuracies that may appear in this book This manual is written for DVR firmware version 1 2 ...

Page 3: ...s properly secured to a rack or shelf Major shocks or jolts to the unit as a result of dropping it may cause damage to the sensitive electronics within the unit Use the DVR in conjunction with an UPS if possible Power down the unit before connecting and disconnecting accessories and peripherals A factory recommended HDD should be used for this device Improper use or replacement of the battery may ...

Page 4: ...6 2 2 Rebooting and Locking Your DVR 17 2 3 Setting Date Time 17 2 4 Checking the Status of Your DVR 19 C H A P T E R 3 Live Feed 20 3 1 Watching a Live Feed 21 3 1 1 Understanding Live Feed Icons 21 3 1 2 Operating the Live Feed 21 3 2 Using the Display Menu 24 3 3 Configuring Live Feed Displays 26 3 4 Setting Camera Order 26 C H A P T E R 4 Record Settings 28 4 1 Configuring Settings for Recordi...

Page 5: ...ccounts 43 7 2 1 Adding a New Remote Local User 43 7 2 2 Deleting a User 44 7 2 3 Editing a User 44 7 2 4 Switch User 44 7 3 Configuring PTZ Cameras 45 7 3 1 Configuring Basic PTZ Settings 45 7 3 2 Customizing PTZ Presets Patterns and Patrols 46 7 4 Configuring Alarms and Exceptions 47 7 4 1 Setting up Motion Detection 47 7 4 2 Configuring Alarm Inputs 48 7 4 3 Configuring Exceptions 49 7 4 4 Conf...

Page 6: ...les 57 9 3 1 Searching for Recorded Files 57 9 4 Locking and Unlocking Recorded Files 58 C H A P T E R 1 0 DVR Management 59 10 1 Managing System 60 10 1 1 Upgrading the System Firmware 60 10 1 2 Restoring Default Settings 60 10 2 Exporting Importing Configuration 61 10 3 Viewing System Logs 62 10 4 Locking and Unlocking System Menus 63 ...

Page 7: ...User Manual of DS 7304HFI SE DVR 7 C H A P T E R 1 Introduction ...

Page 8: ...g for both audio video composite stream and video stream audio and video synchronization during composite stream encoding Compression storage and network transmission of 4CIF or CIF video image in JPEG format Local Monitoring Up to 1024 768 resolution for VGA output display Simultaneous VGA and CVBS output 1 4 camera video live view with the camera order adjustable Group switch manual switch and a...

Page 9: ...ont panel keys mouse IR control and special keyboard Three level user management each user with individual operating permission for DVR and camera Powerful record and search for log of operation alarm and exceptions Import export of device configuration files Network 10 100M adaptive network interface TCP IP protocol suites PPPoE DHCP DNS DDNS NTP SADP protocols etc Unicast and multicast supported...

Page 10: ...nd the Soft Keyboard 1 3 1 Using the Front Panel Controls Your DVR comes with built in front panel controls as shown in Figure 3 Figure 3 DVR Front Panel Controls The controls on the front panel include 1 Status Indicators Status indicators for different features of the DVR Power Power indicator turns green when DVR is powered on Status The indicator lights when the compound key switches to numeri...

Page 11: ...ethods upper and lowercase alphabet symbols and numeric input 4 SHIFT Switch of compound keys between the numeric letter input and functional control 5 DIRECTION ENTER Buttons DIRECTION Buttons The DIRECTION buttons are used to navigate between different fields and items in menus In Playback mode the Up and Down button is used to fast forward and rewind recorded video The Left and Right button wil...

Page 12: ...nt panel 10 MENU Button Same as MENU WIPER button on front panel 11 PREV Button Same as PREV FOCUS button on front panel 12 DIRECTION ENTER Buttons Same as DIRECTION ENTER buttons on front panel 13 PTZ Button Same as PTZ IRIS button on front panel 14 ESC Button Same as ESC button on front panel 15 RESERVED Reserved 16 F1 Button Same as F1 LIGHT button on front panel 17 PTZ CONTROL Buttons Buttons ...

Page 13: ...ons on the mouse corresponds to 1 Left Button Single Click Select a component of a menu such as a button or an input field This is similar to pressing the ENTER button on the remote front panel controls Double Click Switch between single screen and multi screen mode in Preview Playback mode Click and Drag Clicking and dragging the Left mouse button can be used to control the pan tilt of a PTZ came...

Page 14: ...User Manual of DS 7304HFI SE DVR 14 Symbols Switch to symbols input Backspace Delete the character in front of the cursor Enter Confirm selection ESC Exit out of Soft Keyboard ...

Page 15: ...User Manual of DS 7304HFI SE DVR 15 C H A P T E R 2 Getting Started ...

Page 16: ...ction with the unit 2 Connect the DVR to a VGA monitor You will only see the DVR menu system when it s connected to a VGA monitor 3 Press the POWER switch on the back rear panel The Power indicator LED should turn green The unit will begin to start 4 After startup the Power indicator LED will remain green Figure 6 Figure 6 Startup Splash Screen To shut down the DVR 1 Enter the Shutdown menu shown ...

Page 17: ...tton to reboot the DVR 2 3 Setting Date Time It is extremely important to setup the system date and time to accurately timestamp recordings and events To setup date and time 1 Enter the System Configuration menu by going to Main Menu System Configuration as shown in Figure 8 Figure 8 System Configuration Menu 2 Click the Time Date button to enter the Time Date menu Figure 9 Figure 9 Time Date Menu...

Page 18: ...er checkbox You may enter your own NTP server or select from one of the default locations from the list of servers as shown in Figure 10 Figure 10 Time Date Menu 6 Click the Save button to save settings and click the Exit button to exit out of the menu Clicking the Exit button without clicking the Save button will exit the menu without saving ...

Page 19: ...sk space of the DVR Free Disk Space Total free disk space of the DVR Uptime The amount of time the DVR has been up and running Messages Displays the overall system status IP Address IP address that is set for the DVR Subnet Mask Subnet mask that is used for the DVR Default Gateway The default gateway that is set on the DVR DNS Server The DNS server that s currently being used on the DVR DVR Domain...

Page 20: ...User Manual of DS 7304HFI SE DVR 20 C H A P T E R 3 Live Feed ...

Page 21: ... manually from a schedule and or triggered from motion or alarm Picture Settings Icon Adjust picture settings for selected display PTZ Control Icon Enter PTZ control mode for the selected display Preset Icon Recall PTZ preset Patrol Icon Recall PTZ patrol Tour Icon Recall PTZ tour Zoom In Zoom Out Zoom in out with PTZ Full Screen Exit Full Screen Icon Enter into exit out of full screen mode for se...

Page 22: ...ttings menu as shown in Figure 13 Figure 13 Picture Settings Menu 3 Increase decrease amount for brightness contrast saturation and hue The affect will be displayed immediately on the screen 4 Click the Close icon to save the settings and return to the Live Feed mode PTZ Control If the selected camera is a PTZ camera you may control it directly from the display To control a PTZ camera 1 Select dis...

Page 23: ...e or disable audio 1 Select display to enable disable audio 2 Enable audio by clicking the Enable Audio icon and disable audio by clicking the Disable Audio icon An error message similar to the one shown in Figure 15 will pop up if the Enable Audio option is not selected in the Display Configuration menu for the specified channel Figure 15 Enable Audio Error Window Digital Zoom Mode Enable digital...

Page 24: ...Feed mode The Display menu shown in Figure 16 allows you to quickly change into different display modes and to start stop auto switching of the display modes Figure 16 Live Feed Display Menu 2x2 Mode Click to switch to four channel display mode 3x3 Mode Click to switch to nine channel display mode 4x4 Mode Click to switch to sixteen channel display mode ...

Page 25: ...ameras based Next Set of Display Click to view the next set of display In a 2x2 mode this will show the next four display In a 3x3 mode this will show the next nine display Note In order to use auto switching of channels the dwell time must be configured in the Display Configuration menu Note After 20 seconds of inactivity the DVR will automatically exit out of the Display menu and go back into th...

Page 26: ...ch video output You may select between a 1x1 2x2 or 4x4 configuration Sequencing Dwell Time The time in seconds to dwell between switching of channels when Start Sequence is selected in Live Feed Selecting Disable Switching will disable switching in Live Feed Enable Audio Enables disables audio output for the selected video output Output Format Designates the video output standard Device Name No D...

Page 27: ...fferent cameras that are available on the DVR 1 Pressing the up and down button of each selection box select the camera you would like to show in the particular display Selecting X will disable the display 5 Click the Previous and Next button to go to the next set of displays for the selected screen configuration For example in 2x2 screen configuration mode pressing the Next button will bring up t...

Page 28: ...User Manual of DS 7304HFI SE DVR 28 C H A P T E R 4 Record Settings ...

Page 29: ...2 Select the camera to configure in the camera drop down menu on the upper left of the menu If all cameras are to be configured with the same settings select All Cameras from the list 3 Select the Encoding Parameters mode to configure Either Continuous or On Event can be selected 4 Select the camera resolution in the Resolution drop down menu The options for the camera resolution includes 4CIF CIF...

Page 30: ...ent for 24 hours a day 7 days a week If you wish to schedule different time frames for Monday through Sunday leave the 24 7 checkbox unchecked and skip to step 6 5 Select Recording Type for 24 7 recording and move on to step 8 Recording type includes Continuous for continuous recording or On Event for recording when an event is triggered i e from detected motion 6 Select the start and stop time fo...

Page 31: ...e day To setup multiple time periods uncheck 24HR and enter the Start and Stop Time for the selected day The start and stop time are listed using a 24 hr cycle i e 18 00 is equivalent to 6 00pm 6 Select recording type under Type for selected day of the week Recording type includes Continuous for continuous recording or On Event for recording when an event is triggered i e from detected motion for ...

Page 32: ... save the schedule settings and select Exit to return to the previous menu Selecting the Exit button without clicking Save will quit out of the menu without saving settings Note Creating a schedule in the Quick Schedule Configuration menu will also create a schedule in Advanced Schedule Configuration The quick schedule will show up as a time period in the Advanced Schedule Configuration ...

Page 33: ...User Manual of DS 7304HFI SE DVR 33 C H A P T E R 5 Playback ...

Page 34: ...s Controls for playback of the selected recording Clip Backup Tools Tools to backup clips from a recording Clip Playback Controls Controls for playback of marked clip 5 2 Searching for Recorded Files The Playback Interface allows for easy searching of recorded files To search for recorded files using the Playback Interface 1 Enter the Playback menu shown in Figure 26 by going to Main Menu Playback...

Page 35: ...layback See Searching for Recorded Files on page 34 you may use the Playback Controls to navigate through the recording The controls found under Playback Controls include Play Button Button to playback recording Decrease Speed Button Button to decrease play speed Increase Speed Button Button to increase play speed Enter Exit Full Screen Mode Button to enter into and exit out of full screen mode En...

Page 36: ...rectangle in the regular recorded feed window 8 Click the Exit button to return to the previous menu 5 4 Playing Back Multiple Channels You may also playback recordings from multiple channels simultaneously To playback recordings from multiple channels 1 Search and select recording to playback in the Playback Interface 2 Enter into Full Screen mode shown in Figure 27 by clicking the Full Screen bu...

Page 37: ...User Manual of DS 7304HFI SE DVR 37 C H A P T E R 6 Backup ...

Page 38: ...lected video clip Save Clip Button Save the selected video clip to the HDD Clear Clip Button Clear the selected video clip To select video clips in the Playback Interface 1 Enter the Playback Interface shown in Figure 29 by going to Main Menu Playback Figure 29 Playback Menu 2 Search for the recorded files that you would like to select video clips from See Searching for Recorded Files on page 34 V...

Page 39: ...he Backup menu To backup video clips 1 Enter the Clips Backup menu shown in Figure 31 by first going to Main Menu Playback In the Playback menu click the Clips Backup button Figure 31 Clips Backup Menu 2 If video clips were successfully saved to the HDD using the Playback Interface they will be listed under the Backup Clips heading on the left hand side of the menu The camera number as well as the...

Page 40: ...would like to backup by checking the box next to the file You may also check the All File box to backup all files The total required space will be shown next to Total Size 3 Click the Files Backup button this will take you to the Files Backup menu as shown in Figure 32 Figure 32 Files Backup Menu 4 In the Files Backup menu connect a USB storage device and click the Refresh button If the device is ...

Page 41: ...User Manual of DS 7304HFI SE DVR 41 C H A P T E R 7 System Configuration ...

Page 42: ...DDNS check the DDNS checkbox Dynamic DNS allows you to create a hostname and associate it to your IP address making access to your DVR over the internet easier To configure DDNS 1 Enable DDNS by checking the DDNS checkbox 2 Select a DDNS provider from the DDNS Provider selection box 3 Enter settings for Server Address DVR Domain Name User Name and Password 6 If a central monitoring station that is...

Page 43: ...functions include Log Search View logs that are saved on the DVR Serial Port Control Configure settings for RS232 and RS485 ports Two Way Audio Ability to use two way radio between the remote client and the DVR Advanced Control Manage hard disk drives initializing and setting properties for HDDs Ability to remote update system firmware and stopping of the relay output Live View Access the Live Fee...

Page 44: ...er Settings 2 Select a user to edit in the Users List panel 3 Edit user information in the Users and Remote Permissions panel Remote permissions are defined above in Adding a New Remote User on page 43 4 Click Save button to save settings and Done button to exit menu Note Password of Administrator can be modified in User setting menu If password of administrator is changed a dialog box to enter in...

Page 45: ... in the camera drop down menu on the upper left of the menu If all cameras are to be configured with the same settings select All Cameras from the list 4 Configure PTZ settings including those of Baud Rate Data Bit Stop Bit Parity Flow Ctrl Protocol and Address according to the parameters of the PTZ camera s 5 Click the Save button to save current settings To test and verify PTZ settings 1 Enter t...

Page 46: ... menu Note Only the first 23 presets are shown in the table To save or recall more presets click on the button Clicking the button will bring up a selection list for presets up to 200 To customize PTZ patterns 1 Enter the PTZ Configuration menu shown in Figure 38 by going to Main Menu System Configuration PTZ Configuration 2 Select the On Camera Settings tab 3 Select a Pattern Number to set from t...

Page 47: ...t the selected area is part of the motion detection region Dragging or left clicking on areas that overlap the current selected motion detection area will include them into the region You may also click the Full Screen button to include the whole area into the motion detection region Left clicking on any part of the grid will remove that section from the motion detection region 6 If you re not sat...

Page 48: ...revious menu Selecting the Exit button without clicking Save will quit out of the menu without saving settings Certain actions can also be performed if an alarm input is triggered To setup trigger actions 1 Enter the Trigger Settings menu shown in Figure 42 by going to Main Menu Recording Configuration Trigger Settings 2 Select the Trigger Actions tab this will take you to the Trigger Actions subm...

Page 49: ... trigger action when a network failure is detected IP Conflict If selected trigger action if an IP conflict is detected Illegal Login If selected trigger action when illegal logins are detected Video Exception If selected trigger action when an exception such as distorted video is detected Video Output Standard Mismatch If selected trigger action when video output standard does not match 3 Select ...

Page 50: ...use when an e mail is sent out from the DVR Attach JPEG Enabling will attach a small JPEG segment duration can be set next to the Attach JPEG checkbox to the out going e mail SSL Enable Secure Sockets Layer SSL for out going e mail 3 Enter To E mail Address and click the Add button The e mail address will be added to the Recipients List 4 You may now test the e mail settings by clicking the Test b...

Page 51: ...User Manual of DS 7304HFI SE DVR 51 C H A P T E R 8 Camera Management ...

Page 52: ...sponding Clear Zone button or Clear All button to clear all zones 6 Select the Save button to save the privacy zones settings and select Exit to return to the previous menu Selecting the Exit button without clicking Save will quit out of the menu without saving settings 8 2 Configuring Video Tampering Detection Video tampering detection can be used to recognize if an area of a camera is purposely ...

Page 53: ...ls on your DVR to detect the loss of video To configure video loss detection 1 Enter the Video Loss Detection menu shown in Figure 47 by going to Main Menu Camera Setup Video Loss Detection Figure 47 Video Loss Detection Menu 2 Select the camera to setup video loss detection in using the camera drop down menu on the upper left of the menu If all cameras are to be configured with the same settings ...

Page 54: ...nu If all cameras are to be configured with the same settings select All Cameras from the list 3 Configure OSD settings including Camera Name Name of selected camera Display Camera Name Enable to display camera name in OSD Display Date Enable to display date in OSD Display Week Enable to display week in OSD Date Format Format of date Time Format Format of time OSD Display Display style for OSD 4 U...

Page 55: ...User Manual of DS 7304HFI SE DVR 55 C H A P T E R 9 Disk Management ...

Page 56: ...he available disk space of all disks combined 3 Click the Done button to exit out of Disk Management 9 2 Formatting Disk A newly installed hard disk drive HDD must be first formatted before it can be used with your DVR Formatting the disk will erase all data on it To format a new disk 1 Enter the Disk Management menu shown in Figure 49 by going to Main Menu System Configuration Disk Management 2 S...

Page 57: ...Configuration Disk Management 2 Check the Overwrite checkbox 3 Click the Save button 4 Click the Done button to exit out of Disk Management 9 3 Managing Files 9 3 1 Searching for Recorded Files Previously recorded files can be searched by criteria in the File Management menu To search for all recorded files 1 Enter the File Management menu shown in Figure 52 by going to Main Menu File Management F...

Page 58: ...ttom of the menu Figure 53 Figure 53 File Search Results 9 You may now play the selected file by clicking the Play button that is next to the file 10 Click the Done button to exit out of the File Management menu 9 4 Locking and Unlocking Recorded Files To lock and unlock recorded files 1 Search for recorded files using the File Management menu See Searching for Recorded Files on page 34 2 Select t...

Page 59: ...User Manual of DS 7304HFI SE DVR 59 C H A P T E R 1 0 DVR Management ...

Page 60: ...wn on the screen 4 Select the firmware file The firmware file is named digicap 5 Click the Upgrade button to upgrade the DVR The DVR will automatically reboot after the upgrade is completed If you do not wish to upgrade at this point click the Cancel button 10 1 2 Restoring Default Settings To restore factory default settings to your DVR 1 Enter the Factory Default menu shown in Figure 55 by going...

Page 61: ...n to create a new folder or the Delete button to delete a file folder 5 Select the location where you would like the configuration to be stored on the USB storage device 6 Click Export to export a configuration file to USB storage device The configuration file will be named devCfg bin 7 Click the Exit button to exit out of the Export Import Configuration menu To import DVR configuration 1 Enter th...

Page 62: ...pes are available Alarm Exception Operation Information 4 Click the Search button The search results will be displayed in a list on the right side of the menu Figure 58 If there are more than 2000 entries click the Prev Page or Next Page button to display more entries Figure 58 System Log Search Results 5 Select an entry to view more detail information about the entry 6 If applicable you may also ...

Page 63: ...Figure 60 select the menus you would like to lock unlock by selecting the Lock icon beside the menu s name in the list on the right You may also choose to lock and unlock all settings or just recording settings by clicking on the corresponding buttons Unlock All Settings Lock All Settings Lock All Recording Settings 4 Once a system menu is locked access to that menu will only be granted after the ...

Reviews: