


User Manual of DS-7304HFI-SE DVR
39
Figure 30. Video Clip Time Range
8.
You may play the video clip using the Play Clip button or use the arrow keys shown next to the clip time range to
progress through the video one second, minute or hour at a time.
9.
Click the Save Clip button to save clip to the DVR. Clip must be first saved to the DVR before it can be backed up
to an external USB storage device or to a DVD writer. Clicking the Clear Clip button will remove the video clip.
10.
Repeat steps 2-7 to select additional clips. If you would like to backup video clips at this point, click the Backup
button.
Note:
The Play Clip, Save Clip and Clear Clip buttons are not available unless a completed video clip is selected. A
completed video clip has a start and end point marked by using the Start Clip and End Clip button.
Note:
The Start Clip button is not available when there is still a video clip that has not been saved or cleared.
6.1.2 Backing up Video Clips
After video clips have been selected in the Playback Interface (See
Selecting Video Clips
on page 38), you may back them
up to an external USB storage device or DVD writer by
going to the Backup menu.
To backup video clips:
1.
Enter the Clips Backup menu, shown in Figure 31 by first going to Main Menu > Playback. In the Playback menu,
click the Clips Backup button.
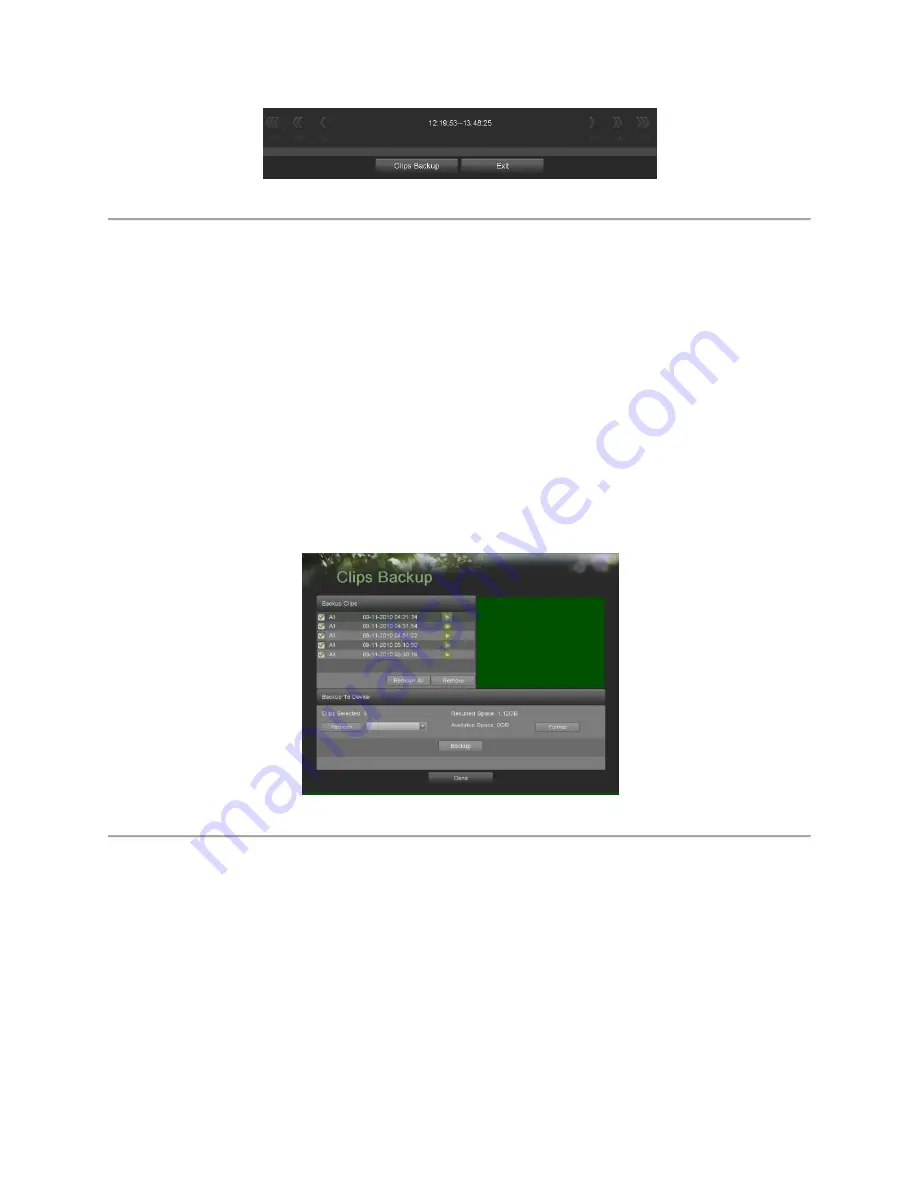
Figure 31. Clips Backup Menu
2.
If video clips were successfully saved to the HDD using the Playback Interface, they will be listed under the
Backup Clips
heading on the left hand side of the menu. The camera number as well as the time range would be
listed.
3.
Select the video clips you would like to backup by checking the checkbox next to the desired clips. You may also
click the Play icon to play and review the clip. Video clips can be deleted by selecting it and clicking the Remove
button or by clicking the Remove All button to delete all clips.
4.
Connect at least one USB storage device to the DVR. If the device is compatible with the DVR, it will
automatically be detected. Select the backup device from the
Backup Device
drop down menu.
5.
The
Clips Selected
,
Required Space
and
Available Space
will be displayed on the Clips Backup menu. If the USB
storage device has not been properly initialized and formatted, you may click on the Format button to do so. It is
important to note that formatting will delete ALL data from the storage device.
6.
If the available space on the storage device is adequate, select the Backup button to begin backup of the selected
clips.
Summary of Contents for DS-7304HFI-SE
Page 1: ...DS 7304HFI SE DVR USER S MANUAL Version 1 2 ...
Page 7: ...User Manual of DS 7304HFI SE DVR 7 C H A P T E R 1 Introduction ...
Page 15: ...User Manual of DS 7304HFI SE DVR 15 C H A P T E R 2 Getting Started ...
Page 20: ...User Manual of DS 7304HFI SE DVR 20 C H A P T E R 3 Live Feed ...
Page 28: ...User Manual of DS 7304HFI SE DVR 28 C H A P T E R 4 Record Settings ...
Page 33: ...User Manual of DS 7304HFI SE DVR 33 C H A P T E R 5 Playback ...
Page 37: ...User Manual of DS 7304HFI SE DVR 37 C H A P T E R 6 Backup ...
Page 41: ...User Manual of DS 7304HFI SE DVR 41 C H A P T E R 7 System Configuration ...
Page 51: ...User Manual of DS 7304HFI SE DVR 51 C H A P T E R 8 Camera Management ...
Page 55: ...User Manual of DS 7304HFI SE DVR 55 C H A P T E R 9 Disk Management ...
Page 59: ...User Manual of DS 7304HFI SE DVR 59 C H A P T E R 1 0 DVR Management ...


