background image


Page 32/34 


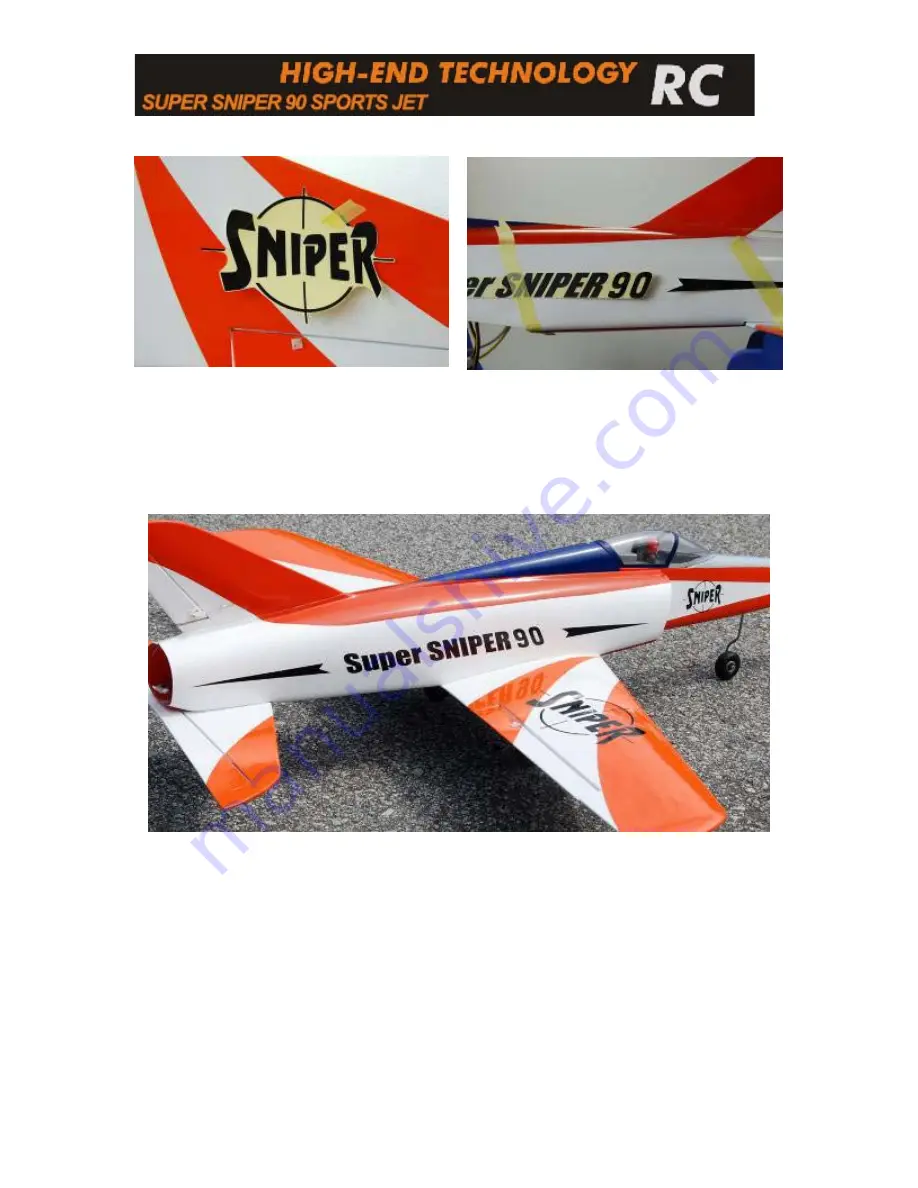
Step 12: Decals 


Cut the decal from the decal sheet. Leave 
the protective back on the decal. Cut the 
decal as close to the edge as possible. The 
clear film might otherwise be visible.  
Clean the surface area with cleaning 
alcohol. 
 

Adjust the decals on the model and secure 
them with masking tape. Create a guide 
with masking tape as a reference. 
Trim 10mm of the protective back at one 
end and line up the decal. Press the 
adhesive part to the model. 


Slowly remove the protective back and rub the decal in place at the same time.  

Ensure that no air gets trapped under the decal. 

Do not rub too hard on the wooden surfaces as you might otherwise dent it. 


Summary of Contents for Super Sniper 90

Page 1: ...ilding the Sniper 90 please go through the instructions on the following pages and study the pictures and building guidelines carefully Due to the high speed that this jet is capable of extra care needs to be taken during the building process to ensure that the model can perform flawlessly when in the air later You will find that this model is quick and easy to assemble ...

Page 2: ...am for Retract Valve optional 90mm Fan unit e g HET RC 9305 600 Brushless Motor e g HET RC Typhoon 600 42 Brushless Speed Controller e g HET 90A ESC LiPo Battery to match Motor and ESC e g 3700mAh 7S 30C Building equipment required 30 min epoxy 5 min epoxy Milled fiberglass Micro Balloons Drill e g Dremel tool with 1 1 5 and 2mm drill X acto Knife CA Glue with accelerator Sandpaper 220 180 A rotar...

Page 3: ...berglass Fuselage 2x Sniper 90 Wing panels 1x Sniper 90 Elevator 1x Sniper 90 Fiberglass Rudder 1x Clear Canopy with Plywood canopy frame 1x Nose Gear Retract Mount 3x Wheels 1x Nose wheel strut 2x Main wheel strut 1x Bungee Hook Various Push Rods Mounting screws Clevises Control Horns ...

Page 4: ...the glue surface Ensure that you do not cut into the wood as this might weaken the root rib Next dry fit the main spar and slot the wing halves together Ensure that both halves align fully at the wing root without a gap If required sand the wing root to achieve the desired fit In order to strengthen the glue joint we recommend that you roughen the wing root surface A needle can be used to create n...

Page 5: ...both wing halves at the wing root Use masking tape to press both wings panels together and to secure the alignment until the epoxy has fully cured Let the epoxy cure fully before moving the wing Turn the wing around and locate the servo cut outs When choosing your servo measure both servo and servo cut out depth to ensure that the servo is flush with the wing surface once installed Place your serv...

Page 6: ...ough to allow a pushrod to be connected and to move freely Push the servo wire through the servo channel ensure the cable is long enough Next glue the servo in place with 5 minute epoxy You can either glue on the servo directly with its casing or wrap the servo in tape or shrink tube before gluing it Roughen the servo surface with sandpaper before applying glue Tape the servo cable ends to the top...

Page 7: ...ld run parallel to the servo centerline and touch the servo horn as shown A Z Bend will later be used to secure the rod to the servo Move the rudder horn so that it lines up with the clevis The holes in the rudder horn should be directly above the pivot line between aileron and wing Mark the rudder horn position and drill the holes for the mounting screws Fix the horn in place Enlarge the hole of ...

Page 8: ...the wing the retract mount is installed directly behind the main spar If there is a need to enlarge the wheel well you can only do so in the direction of the trailing edge Enlarging the wheel well 2 wheel cutout shown above Mark the new wheel well size only enlarge towards the trailing edged and cut out the well with a sharp knife Ensure that you do not damage the top skin of the wing The foam cor...

Page 9: ...rton or fiberglass sheet into the wheel well as shown The carton sheet will later form the wall of the wheel well to protect the foam from damage Trace the outline long the wing skin This step only needs to be performed if the wheel well was enlarged in the previous step Remove the carton fiberglass sheet and cut along the line drawn in the previous step Test fit the carton lining again and if req...

Page 10: ...essary Some builders might find a small gap between wing and fuselage which can easily be closed to enhance the planes looks Tape the servo wires securely to the wing and cover the top surface with glad wrap plastic foil This will create a non stick surface for the filler Use tape inside the fuselage to create a boundary line as shown This will prevent the filler from running inside the fuselage M...

Page 11: ...on paste should have been pushed out between the wing and the fuselage Use a cloth and lots of cleaning alcohol to clear all excess epoxy before it cures Make sure you get a smooth transition between fuselage and wing In case you still have a gap or cleaned away to much epoxy push some of the paste into the gap with a scrap piece of balsa or a medical syringe Once cured remove the wing The wing sh...

Page 12: ...nd installed the motor first Insert the Fan into the fuselage and carefully slide it into the intake duct Rotate the fan so that the 2 mounting lugs are horizontal Once in place use making tape to secure it in place View the plane from the rear and shift the fan until you have a straight thrust line Tape the fan in place so that it can t move The kit includes 2 fan mounting brackets which should b...

Page 13: ...ure the fan in place The exhaust duct is fabricated out of the supplied clear PVC sheet Place the sheet on the template and trace the outline Mark the last line of the template on the PVC sheet This will be the glue line for later Cut the sheet and roll it together Depending on the fan you choose for your Sniper adjust the exhaust nozzle diameter HET 9305 Fans should use an exhaust diameter of 78m...

Page 14: ...he intake end over the fan unit Mark the excess ducting sticking out of the rear Remove the duct and trim the end to shape Prepare the elevator Locate the CA hinge slots in the elevator fin Trial fit the elevator rudder If necessary carefully lengthen the slots to reach a perfect fit between fin and rudder Remove the rudder and glue the CA hinges into the fin with thin CA Glue Once cured slot in t...

Page 15: ...describe the installation of the hidden linkage For the hidden installation of the elevator linkage a cutout needs to be made in the fuselage to allow the rudder horn to go inside Remove the elevator mark a 2cm slot as shown above and cut it out Please note the slot should be made as close as possible to side wall of the fuselage to allow the rudder horn to clear the exhaust duct Attach the elevat...

Page 16: ...alled in the fuselage as shown above Before it can be glued roughen the bottom surface of the fuselage with sandpaper Assemble the elevator linkage from the supplied threaded rod with one clevis at each end Trial fit the pushrod and servo in the fuselage Adjust the length of the pushrod as required Use masking tape to secure the elevator in neutral position Once everything is adjusted glue the ser...

Page 17: ...n Cut the rudder out Use a small saw or cutting disk Wear a face mask when cutting the polyester Prepare two 6x6x160 mm and two 6x3x50mm balsa spruces to close the rudder and create a surface for the hinges Taper the spruce at one end to allow it to fully slide in the fin and rudder Trial fit the spruce Glue the 4 parts into the fin and rudder with 30min epoxy The balsa blocks should form a flush ...

Page 18: ...as cured hold the rudder against the fin and mark the hinge position Cut the slots and glue the rudder in place with thin CA Check the movement The rudder pushrod position will heavily depend on the later servo position As the clearance between duct and fuselage top is not very big we have decided to install the servo further forward in the fuselage If you are using a very slim servo which can fit...

Page 19: ...to pass through The rough position of the slot is shown above Trial fit the rudder to ensure that the slot is long enough Trial fit the rudder If required sand the bottom edge of the rudder until it fits Roughen the inside of the rudder fin with sandpaper Lightly sand the glue area on the fuselage Apply 30min epoxy mixed with milled fiberglass to the inside of the fin and press it in place Use mas...

Page 20: ...fan mount Use balsa scraps on both sides of the sleeve to improve the bond You can use scrap wood dowels to push the sleeve against the fuselage wall as shown Once the epoxy has cured these braces are removed The end of the sleeve will be glued against the bottom of the fan mount Again use a piece of balsa scrap to wedge it in place Once the glue is dried shorten the sleeve inside the fuselage dir...

Page 21: ...nstall the clevis on the pushrod inside the fuselage Attached the clevis to the servo horn Ensure that the rudder is in neutral position Roughen the fuselage surface and glue the servo with 5min epoxy against the fuselage side Once the glue is dry remove the masking tape from the rudder and test the movement with your radio ...

Page 22: ... pen and carefully cut the canopy to size Cut in small steps and keep on measuring The Canopy should later form a continuous surface with the fuselage If you intend to install a pilot sheet the plywood with 1mm balsa and measure your pilot position A basic cockpit can be designed very quickly with balsa scraps The cockpit is kept in place with a plywood latch in front and a canopy lock in the back...

Page 23: ...piece over the lock as shown above Apply 5min epoxy to the ply wood block pull the lock back open position and slide the cockpit in place Tape the cockpit floor to the fuselage and release the lock The plywood primed 5 min epoxy should now be pushed against the cockpit frame at the right position to ensure a perfect fit later Once the epoxy has cured check the fit and lock operation It might be re...

Page 24: ...y glue dry for 24 hours Remove the canopy and remove excess glue Mask the cockpit Paint the canopy frame in the desired color We used the following airbrush color for the frame Blue Aqueous 5 and Gray FS26440 Gunze Sangyo 325 ...

Page 25: ... 235mm in front of the line between both intakes Tape the cut out template to the bottom of the fuselage Align the beginning of the template with the 235mm line measured before Trace the outline Cut the retract slot out of the fuselage Slide the nose gear former into the fuselage F front first Adjust formers if necessary to reach a perfect fit with the fuselage The front of the former shall line u...

Page 26: ...a servo horn as shown The wooden former should be installed directly at the end of the retract cutout Ensure that the retract cycle is not obstructed by the former wheel Cut the vac formed part to size to cover the gap between the two formers Glue the parts with 5min Epoxy Glue the servo to the bulkhead with 5min epoxy as shown Drill holes through the retract former to route the cables If needed c...

Page 27: ...ounting surface with sandpaper Apply 30 minute epoxy mixed with milled fiberglass to the surface Place the elevator on top and screw it in place Clean excess epoxy with cleaning alcohol Skip this step if you have retracts installed Measure 70mm from the intake to the nose of the plane Mark the position Drill a 2 mm hole in the centerline Turn the model around and roughen the inside of the fuselage...

Page 28: ... ESC and other components The Super Sniper 90 build for this manual will use a 3700 7S LiPo Pack and a 90A ESC Due to the weight and size of the batteries in the nose section we have decided to install the ESC air tank retract servo and receiver towards the rear of the plane to balance it out better Please note The installation described in the next pictures is an example only Choose your own inst...

Page 29: ... ESC at the desired location and extend the cables to the battery position Depending on the ESC you use it might be a good idea to install an anti flash resistor at the ESC Battery connector Solder a 100k 150k resistor to the connector of the ESC Cable as shown above Isolate the resistor from the connector casing with a heat shrink tube Make a loop of the remaining resistor wire just past the end ...

Page 30: ...in position Cut slits into the duct to allow the fins to pass through Also cut the opening for the Motor wires Trial fit the ESC Reinstall the duct route the motor cables out of the duct and connect them to your ESC To get enough distance between ESC Motor and receiver we installed the ESC directly behind the fan on top of the thrust tube Slide it into the fuselage slightly This will keep the ESC ...

Page 31: ...interference problems find a suitable position for your receiver as far away from ESC Motor Battery Wires as possible and install it We installed the receiver directly beside the elevator servo at the end of the fuselage The antenna is routed between thrust tube and fuselage Take note of the air tank installed behind the fan opposite to the retract valve As the ESC is located close to the tank iso...

Page 32: ...g alcohol Adjust the decals on the model and secure them with masking tape Create a guide with masking tape as a reference Trim 10mm of the protective back at one end and line up the decal Press the adhesive part to the model Slowly remove the protective back and rub the decal in place at the same time Ensure that no air gets trapped under the decal Do not rub too hard on the wooden surfaces as yo...

Page 33: ...ring servo is slaved to the rudder Step 14 Final check Ensure that all control surfaces work without binding Check your ESC programming and motor operation Throttle up slowly to check if the rotor is running freely stop immediately if you feel that the fan is not running smoothly or the rotor is not running freely ensure that the duct fan mount does not compress the fan and causes binding We recom...

Page 34: ... nose gear steering to allow the plane to run straight After take off do not attempt to turn the plane immediately Instead climb and trim the model Once you have sufficient height and airspeed turn and finalize the trimming We wish you many successful flights with your model Happy Flying WARNING Although the Sniper 90 is a stable airplane it might cause serious personal injury and property damage ...

Reviews: