background image

3-12  The Printer Driver 


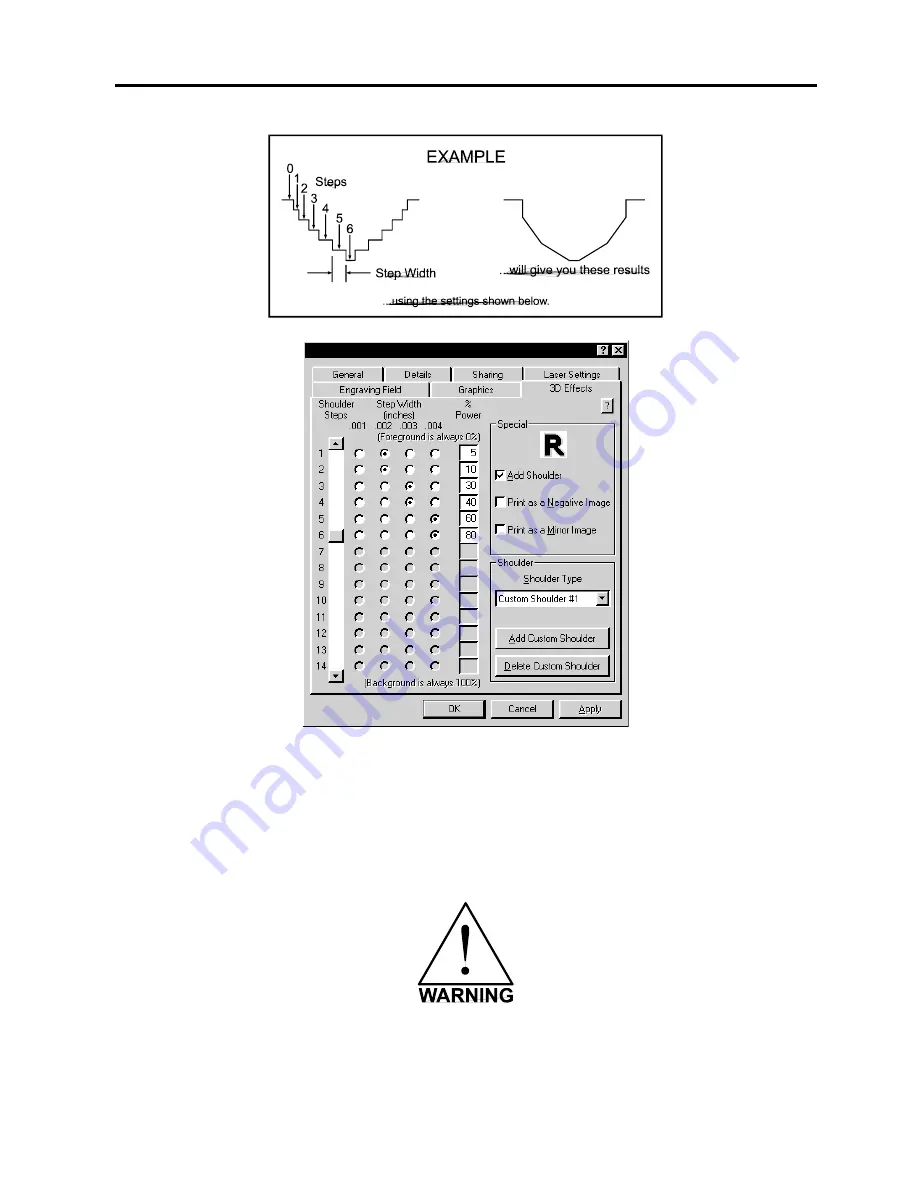
The  above  settings  are  just  an  example  to  show  you  how  to  use  the  controls.    This  example 
might not achieve the exact stated results on your particular material.  This is why the driver has 
custom settings available for you to control. 


Delete Custom Shoulder 

Click  on  the  custom  shoulder  that  you  want  to  delete  and  then  click  on  this  button  to 
permanently delete it. 


Deleted custom shoulder profiles cannot be restored so make sure that you absolutely want to 
delete it before clicking on this button. 

Summary of Contents for VANGUARD OPTIMA

Page 1: ...VANGUARD OPTIMA USER S MANUAL ...

Page 2: ......

Page 3: ...VANGUARD OPTIMA Laser Engraving and Cutting System User s Guide Manufactured by Universal Laser Systems Inc 16008 North 81st Street Scottsdale AZ 85260 Phone 480 483 1214 Fax 480 483 5620 August 1998 ...

Page 4: ...r for any other purpose without the prior written permission of ULS ULS provides no warranties whatsoever on any software used in connection with a ULS Laser Engraving System express or implied Neither does it guarantee software compatibility with any off the shelf software package or any software program that has not been written by ULS Intended use of this system must be followed within the guid...

Page 5: ... is necessary to call for technical assistance please call our Technical Support Department at 602 483 1214 Please be prepared to answer our questions by following the procedures below as this will allow us to provide assistance in a prompt and efficient manner Take a moment to write down all of the pertinent information about the computer being used with the laser cutting and engraving system suc...

Page 6: ......

Page 7: ...Electrical Requirements 2 2 Exhaust Requirements 2 3 Unpacking and Assembling the System 2 4 Computer Requirements 2 5 Software Suggestions 2 5 Font Requirements 2 6 Making the Connections 2 7 SECTION 3 The Printer Driver 3 1 How the Computer Controls the Laser System 3 1 Installing the Windows 95 Printer Driver 3 2 Driver Controls 3 3 SECTION 4 Graphics Software 4 1 Software Setup 4 1 Speed Optim...

Page 8: ...the System Step by Step 6 1 Powering Up 6 1 Loading and Positioning the Material 6 1 Focusing Methods 6 2 Creating the Graphic 6 3 Setting the Drivers Properties 6 3 Downloading the File 6 5 Starting the Engraving Process 6 5 Material Removing and Reloading 6 6 SECTION 7 Accessories 7 1 Rotary Fixture 7 1 Rubber Stamps 7 1 SECTION 8 Sample Materials 8 1 Safety 8 1 Acrylic Cast and Extruded 8 3 Acr...

Page 9: ...8 18 Rubber Stamps Pre Inked Stamps 8 19 Sign Vinyl 8 20 Wood Wood Inlay 8 21 SECTION 9 Maintenance 9 1 Suggested Cleaning and Maintenance Supplies 9 1 System Cleaning 9 3 Optics Cleaning 9 3 Adjustments and Lubrication 9 6 Electronic Upgrading 9 6 Maintenance Schedule 9 6 SECTION 10 Appendices Warranty A Specifications B Using DOS Based Programs C Using Macintosh Computers D Serial Cable Requirem...

Page 10: ...extracted from the laser system and exhausted outside Some materials when engraved or cut with a laser can produce toxic and caustic fumes We suggest that you obtain the Material Safety Data Sheet MSDS from the materials manufacturer The MSDS discloses all of the hazards when handling or processing that material The law requires all manufacturers to provide this information to anyone who requests ...

Page 11: ...e laser radiation at a wavelength of 10 6 microns in the infrared spectrum This laser system contains a C02 laser in a Class I enclosure However due to the presence of a visible red laser diode the entire laser system is classified as Class 3a The entire system is completely enclosed with a protective housing This will completely contain the invisible C02 laser beam under normal use However the re...

Page 12: ...d CE Do not stare into the beam or view directly with any optical instrument Laser Safety Labels CDRH and CE regulations require all laser manufacturers to affix warning labels in specific locations throughout the equipment The following warning labels are placed on the laser system for your safety DO NOT remove them for any reason If the labels become damaged or have been removed for any reason D...

Page 13: ...tube assembly that is not visible under normal operating conditions The third is located on the outside of the laser tube assembly The second and third locations are only visible if the laser tube assembly is removed for service and is not visible under normal operating conditions Locations 1 Affixed to the back of the laser tube assembly Not visible under normal operating conditions Only visible ...

Page 14: ...of the top door Visible from the outside under normal operating conditions with the door closed WARNING THIS LASER SYSTEM CONTAINS A CO LASER IN A CLASS I ENCLOSURE THE LASER SYSTEM HAS BEEN CLASSIFIED AS CLASS 3a DUE TO THE PRESENCE OF A VISIBLE LASER DIODE 2 Locations 1 On the outside of the top door Visible from the outside under normal operating conditions with the door closed Other Safety Lab...

Page 15: ... system next to the ON OFF switch and plug receptacle Visible from the outside under normal operating conditions Locations 1 Inside of the laser systems cooling fan cover next to the chassis ground green wire Not visible under normal operating conditions Visible only when cover is removed for servicing only Locations 1 On the outside motor cover of the optional Rotary Fixture Visible under normal ...

Page 16: ...ules These limits are designed to provide reasonable protection against harmful interference when the equipment is operated in a commercial environment This equipment generates uses and can radiate radio frequency energy and if not installed and used in accordance with manufacturer s instructions may cause harmful interference to radio communications Operation of this equipment in a residential ar...

Page 17: ...e Directive 89 392 EEC Machinery Directive based on the standards listed Standards Used Safety EN 60950 1995 EN 60825 1994 Class IIIa EMC EN 55022 1995 Class A EN 50082 1 1992 EN 60801 2 1993 6kV CD 8kV AD EN 61000 3 2 1996 class A EN 61000 3 3 1995 EN 61000 4 3 1997 3 V m EN 61000 4 4 1995 2 kV power line 0 5 kV signal line EN 61000 4 5 1996 class 2 Manufacturer s Contact Chris Risser Compliance ...

Page 18: ... Some materials after laser engraving or cutting continue emitting fumes for several minutes after processing Having these materials present in a confined unventilated room can contaminate the room Choose a place which provides the shortest and most direct path to the exhaust ductwork not provided Refer to exhaust requirements later on in this section Have a work table or storage area next to or n...

Page 19: ... lead to the electrical cord and plug the system into a non grounded outlet This is very dangerous and can lead to a severe if not fatal electrical shock Always plug the system into a 3 prong grounded outlet If electrical power fluctuations brown outs or constant power outages are a problem in your area an electrical line stabilizer UPS Uninterruptible Power Supply or backup generator might be req...

Page 20: ...ial grade wire reinforced rubber tubing to connect the end of the gate or rigid tubing to the laser system This will provide mobility and will dampen blower vibrations Use only a few feet because it s spiral construction reduces air flow Install a hose clamp on both ends of the hose to prevent leaks and to prevent the hose from slipping off Have the blower wired to a wall switch in the same room T...

Page 21: ...2 4 Installation ...

Page 22: ...nch color VGA monitor 3 5 floppy disk drive CD ROM Drive Mouse or other pointing device Microsoft Windows 95 600 DPI Optical Resolution Scanner Remember the laser system is an output device just like a printer is The faster you can create graphics and manipulate your software the faster you can download to the laser system to keep it producing Software Suggestions The following is a list of recomm...

Page 23: ...ostScript fonts The laser system is not a PostScript printer and therefore has no capability of printing PostScript fonts Sometimes a PostScript font will print if you are running Adobe Type Manager ATM Adobe Type Manager converts PostScript fonts to bitmapped fonts before sending the information to our printer driver Using ATM does not guarantee that the PostScript font will print properly theref...

Page 24: ...ided it will violate the laser systems FCC and CE rating and may also cause harmful interference when downloading files to the laser system Please make the following connections in the exact order described otherwise static electricity can damage the computer and or the laser system s electronics Connect the laser system s power cord and the computer s power cord to a high quality surge suppressor...

Page 25: ...his creates electrical noise which can cause an engraving problem or can damage the laser system and or the computer s electronics Never use any device that is installed between the computers parallel port and the parallel port of the laser system such as a ZIP drive or parallel port CD ROM drive This can not only damage the laser systems electronics but it usually will not work Again install an a...

Page 26: ...ctor motions The laser systems printer driver works directly with your software program to send the correct image to the laser system We will explain later on in this section about how this works but for right know we want you to understand this simple concept behind how the computer controls the laser system The laser system is an output device just like a printer or plotter is After the graphic ...

Page 27: ...ext 6 Select Local Printer and click Next 7 When the Manufacturer and Printers menu list appears click Have Disk Do not look for the printer in the menu 8 Insert the driver disk 9 Make sure the dialog box matches the floppy drive you are using A or B 10 Click on OK 11 When the list of Printers appears choose Vanguard Optima 12 DO NOT click on Have Disk again click on Next 13 Choose the port your l...

Page 28: ...t hand corner of all of tabs bring you into the drivers online help screens Laser Settings Tab The settings in this tab are primarily used to adjust the Power Speed and PPI of the different driver colors as well as setting the overall printing resolution NOTE When the following sections refer to turning a switch ON this means clicking in the box next to the driver selection desired and a check mar...

Page 29: ...will fire Again since the laser system is proportionally pulsed all pulses will fire equally spaced from one to the next regardless of changes in Speed Power acceleration deceleration or the cutting of curves For example when setting the PPI to 500 and using a standard lens that has a laser spot size of five thousandths of an inch 005 significant pulse overlap will occur The laser system fires a l...

Page 30: ...tput very similar to laser printer output The entire drawing will be engraved including all outlines and only one power level will be used which is black The color change ability of the driver is essentially turned off and all colors are engraved as different shades of gray The laser system represents different shades of gray by producing a halftone pattern when engraving The halftone pattern is b...

Page 31: ...art button on the control panel of the laser system Use extreme caution when using this function because there will be very little time to react and get over to the laser system once you click on OK in the driver The Manual Start selection is the normal mode of operation of the laser system The laser system will not start until the entire file enters into the laser system and the operator pushes t...

Page 32: ...lained in Section 7 of this manual Rotary Fixture It is only necessary to use this selection if the optional Rotary Fixture has been purchased For full details on how to use this option please refer to Section 7 Do not skip over to that section until the rest of this manual up to that section has been read There is important information about the operation of the laser system that must be read bef...

Page 33: ...els to be scattered in a random pattern to represent shading This randomized dither pattern is unlike the fixed pattern of a Halftone screen and can be adjusted Error Diffusion Controls When you select Error Diffusion this section becomes enabled allowing you to adjust 3 settings Brightness Contrast and Diffusion Brightness is similar to the brightness control in most photo editing software Adjust...

Page 34: ...r software program does not support this type of printing then the image will look like a solid black and white image without any dot pattern at all If this happens use the Error Diffusion selection to print the image There is much more to laser engraving photographs and clipart images than stated above Please refer to the section on Bitmapped Images for a more thorough description of how to use m...

Page 35: ...have an outline If the 3D Effects option is activated and the T is printed to the laser system the driver turns the T into a three dimensional object that has defined steps of laser power The final image looks as if it is chiseled into the material Special Choose Add Shoulder to activate the 3D Effects feature This adds a shoulder to all raster graphic objects within the engraving area but does no...

Page 36: ...t side of the dialog box will enable There are three adjustments the number of steps the distance between steps and the power setting for each step Before you set the parameters you must first understand how each parameter works In the normal engraving mode the laser beam engraves virtually straight down into the material In the 3D Effects mode the laser beam is controlled in such a manner that it...

Page 37: ...our particular material This is why the driver has custom settings available for you to control Delete Custom Shoulder Click on the custom shoulder that you want to delete and then click on this button to permanently delete it Deleted custom shoulder profiles cannot be restored so make sure that you absolutely want to delete it before clicking on this button ...

Page 38: ...y not print correctly When setting page orientation and driver orientation to Landscape mode the laser system will operate in the horizontal direction left to right If page orientation and driver orientation is set to Portrait mode the laser system will operate in the vertical direction front to back The laser system is designed to operate best in the Landscape mode and this orientation is highly ...

Page 39: ...ted above the driver will attempt to match it to a color in the driver that it most closely resembles The driver will then use that colors power setting and apply a halftone pattern to represent the original colors shade For example if using a color like pink to fill a rectangle the driver takes a reading of the percentage of different colors used to create that color and will use the power settin...

Page 40: ...t then proceed to cutting Engraving will proceed in the exact order of the colors listed in the driver For example all black filled objects will engrave first then all red filled objects then all green filled objects and so on When all engraved objects have been completed the laser system will proceed to cut any outlines present in the artwork Unlike engraving cutting will proceed in the order fro...

Page 41: ...his case it may be necessary to use bitmap image processing software to first rotate the bitmap before importing the bitmap into the graphics program If the artwork contains engraved objects of the same color with a great deal of space between them in the engraving direction processing time can be longer since the laser must make long strokes to engrave both objects at the same time To reduce engr...

Page 42: ...images must be converted into a black and white images To do this either the driver will do it automatically or you can convert the grayscale image to a black and white image in your bitmap image processing program The two primary grayscale image conversion techniques are Halftone or Error Diffusion The printer driver can print either one and it is selected in the driver under the Graphics tab Ple...

Page 43: ...ything else desired just as long as your graphics software can edit EPS images Be careful when using EPS files in layout software as opposed to true graphics software Layout software may allow the placement of EPS files in the artwork but may not actually import and convert the EPS file to a useful format for the printer driver and therefore may not print correctly Please refer to your graphics so...

Page 44: ...wer Supply The DC power supply converts the incoming AC electricity to 48 volts DC This is used to power both the laser tube assembly and the motherboard Motherboard The motherboard is the brains of the system and controls everything Located on the motherboard are standard computer memory SIMMS This is where incoming files from the computer are stored while the power is on The motherboard gets inp...

Page 45: ...m exits the laser tube through its output optics bounces off the 1 mirror passes through the beam window bounces off the 2 and 3 mirror and finally passes through the focus lens The 2 and 3 mirror and the focusing lens are all mounted to the motion system The width of the laser beam as it exits the tube called the Beam Diameter is about 4 mm The focus lens focuses the beam into a very small spot w...

Page 46: ...tion System The motion system consists of the mechanically moving parts of the laser system It is made up of rails motors bearings belts mirrors a lens and other parts There are two directions of motion left and right is called the X direction and front to back is called the Y direction The motherboard controls the movement of the motors which moves the mirrors and focus lens across the engraving ...

Page 47: ...m and the significance of each item in the control panel The Liquid Crystal Display LCD The LCD is a four line display that displays the menus that control the laser system It is a backlit type of display that enhances visibility even under low light environments When the laser system is powered on the laser system will perform a series of routines INITIALIZING will display until the motion system...

Page 48: ...ad to other menus and some are settings that can be adjusted The ESCAPE button depending on which menu you are in at the time either exits you back to the previous menu or it nullifies or cancels any changes that you have made to that menu item Continuously pressing the ESCAPE button will eventually bring you back to the MAIN menu The indicator lights will act differently depending on the current ...

Page 49: ...SE button is pressed It can take a few seconds or maybe even several seconds to stop the system because it needs to complete the motion commands that it is currently running Opening the top door also works similar to the PAUSE button but not exactly The first thing that the laser system will do is turn off the laser beam immediately after the door is opened The next thing that it will do is pause ...

Page 50: ...he focus lens assembly is positioned in the field by shining a bright red dot on the engraving area Further details on how to use this button will be covered later in this section This button positions the focus carriage slightly away from the upper left hand corner at the default 1 1 position in the engraving area This is where the majority of focusing will be done Once the focus carriage is posi...

Page 51: ...5 8 System Operation ...

Page 52: ...System Operation 5 9 ...

Page 53: ...utine When the system has finished initializing READY will appear in the display indicating that the laser system is ready to accept files FILE DISPLAY Menu Appears automatically after the first file is downloaded completely into the laser systems memory This is the menu that you will remain in most of the time when operating the laser system It has been designed to show all pertinent operating in...

Page 54: ...porary changes so if you pressed the START button to start the file over again it will take on the original settings that you sent down from the driver The display contains a timer to time files as they are run this is useful for job costing The timer will pause when the PAUSE button is pressed and starts up again when cutting or engraving has been RESUME d If the same file is run again the timer ...

Page 55: ... end of the last bit of that information and inserts an EOF The file then shows up on the display as NONAME and will allow either its solitary deletion without having to delete the other files in memory or it will allow the file to be run just as if it was downloaded from the Windows printer driver MAIN Menu Allows access to all other menus MEMORY CONTROL Menu The laser system is equipped with an ...

Page 56: ...l fill up with files that will need to be deleted to free up space for more files It is possible to select each individual file and delete them one at a time To accomplish this make the desired file for deletion the current file in the same manner as previously described Use the up or down arrow buttons to position the cursor on the DELETE THE FILE menu item and then press the SELECT button The di...

Page 57: ...s Remember to accept the setting that you have made press the SELECT button to bring the cursor back over to the left side of the display Pressing the ESCAPE button nullifies your change Once you have set the correct settings for all of the pen numbers that you will be using in your DOS software press the ESCAPE button to bring you back to the MAIN menu Your settings will be permanently stored jus...

Page 58: ...laser system clears out the entire memory as the new file comes in to replace the first file You can now run that second file as many times as you want If you download another file it dumps the entire memory again and the new file becomes the only file in memory and so on While in this mode the parallel port is turned off so no new files can be received until the file is finished running This is t...

Page 59: ...h the motion system arrow buttons position the X Axis arms focus lens carriage directly over the Rotary Fixtures centerline of rotation as the following diagram illustrates The left and right position X position of the focus carriage is irrelevant in this setting and is not shown in the display Now select the YES SAVE Y AXIS choice If you change your mind and do not wish to alter the ROTARY AXIS p...

Page 60: ... suggest keeping the door closed at all times when the laser system is powered on as this keeps the laser warmed up If the door is open the power to the laser tube itself is turned off and the tube will cool down The laser runs best after being warmed up for 15 to 20 minutes TICKLE is pre set at the factory and usually does not require adjustment However it is possible that it may need adjustment ...

Page 61: ...r system is running a different file This can cause data corruption to occur to the file coming in to the computer Either pause the laser system or wait until it finishes engraving the file before downloading the next one This situation is for the serial port only Disregard this warning message if you are using the parallel port for communications The fastest method of file transmission to the las...

Page 62: ...ed bring the cursor down to the YES SAVE POSITION line and press the SELECT button Press the ESCAPE button twice to exit back to the MAIN menu Your settings will automatically be retained permanently in memory To restore the focus position back to the original factory setting go back into this menu and press the up and down arrow keys simultaneously You will see the motion system move to the 1 inc...

Page 63: ...to be replaced Please contact technical support if there is a problem with the memory PRINT TEST Menu There is a built in test file in the menu system To access this file use the up and down arrow buttons to position the cursor on the PRINT TEST menu item and press the SELECT button The display will get replaced with the text 001 MEMORY EMPTY After a few seconds a test file name will pop up in the...

Page 64: ...on the origin to any other point in the engraving area To do this you must first get into this menu From either the MAIN menu or the FILE DISPLAY menu press the X Y button in the middle of the four motion system directional arrow buttons The red laser diode will appear on the engraving table Using the directional arrow buttons position the red dot at the location you would like to store as the new...

Page 65: ...d down arrow keys simultaneously while in this menu You will see the carriage move to the upper left hand corner automatically Again select SET NEW ORIGIN then select YES SET NEW ORIGIN and your settings will automatically be stored in memory permanently Focusing the Laser Beam To properly focus the laser beam onto the surface of the material you need to perform two tasks First position the focus ...

Page 66: ...age back into the home position If you find that you need to place your materials in a position other than the upper left hand corner you can change the default focus position to anywhere in the field that you like Please refer to that menu item selection earlier in this section You can also use the motion system directional arrow buttons to position the focus carriage directly over your material ...

Page 67: ...e printer port from entering the laser system during power up This common practice should be utilized for all output devices whether it is a laser printer or a laser engraver If you happen to power up the laser system first and then power up your computer afterwards there is a possibility that some garbage information gets transmitted to the laser system If you then send down a file to print that ...

Page 68: ... the control panel of the laser system You will see the focus carriage move to the 1 1 position directly over the piece of wood Using the focus tool adjust the table until the proper focal height is achieved WARNING Be careful not to position the tool underneath the focus lens as this can damage the lens if the table is driven up into it Sometimes it is desirable to be slightly out of focus when e...

Page 69: ...red fill and NO outline For example type in the word Keychain Draw an outline box around the text color the outline RED give the outline a thickness of 001 inches remove the fill color if any and round the edges if desired Now add a circle with the same RED outline 001 inches and NO fill for the key ring Place the graphic into the upper left corner of the page on screen relative to how the piece o...

Page 70: ...6 4 Running the System Step by Step Once the printer driver is visible click on the appropriate tabs and duplicate the drivers properties as the diagrams below illustrate ...

Page 71: ... assigned to the first color One this appears file download is now complete Starting the Engraving Process Before pressing the START button on the control panel Turn on your exhaust system Make sure your material is positioned correctly within the engraving area Make sure that you are properly focused Make sure that the top door is closed and the RED light on the control panel is not flashing Make...

Page 72: ...well ventilated area away from yourself and others Some materials when engraved or cut with a laser can produce toxic and caustic fumes We suggest that you obtain the Material Safety Data Sheet MSDS from the materials manufacturer The MSDS discloses all of the hazards when handling or processing that material The law requires all manufacturers to provide this information to anyone who requests it ...

Page 73: ...ixture and an inverted cone shaped disk attached to the adjustable end of the fixture These attachments are designed to hold wine glasses mugs cups etc The Rotary Fixture is placed on the engraving table as the following diagram illustrates For further details on how to operate the Rotary Fixture please refer to the operating instructions supplied with it Rubber Stamps There are two method to crea...

Page 74: ...by drawing a black box slightly larger than the size of the stamp desired Type in or add graphics within that area and color them with a fill of white It is not necessary to mirror the image Then draw a red outline box 001 inch or 1 mm line thickness for the cut There is no need to mirror the image we will let the driver do that later An example is shown below Place the stamp in the upper right ha...

Page 75: ...s and be sure to properly focus on the material Set the printer driver properties as shown below These settings came from the section on Sample Materials There is a considerable difference between rubber blends thickness and hardness between different manufacturers Experiment with different settings to obtain the desired results ...

Page 76: ...elections print the graphic to the laser system Start engraving and notice that the stamps are being engraved as a mirrored image and are in the correct position on the rubber sheet The background area since it is colored black is being engraved and the letters remain standing up When the engraving part is done the stamp gets cut out along the red cut line due to the higher power setting that was ...

Page 77: ...tings as the previous example but with only one modification In the 3D EFFECTS tab select the PRINT AS A NEGATIVE IMAGE option as the diagram below illustrates Print to the laser system Position the full sheet of rubber stamp material in the same upper left location on the engraving table and begin engraving The driver automatically adds the shoulder mirrors the entire page and creates a negative ...

Page 78: ...UT A PROPERLY INSTALLED AND OPERATING EXHAUST SYSTEM Some materials when cut or engraved can produce fumes that are hazardous in concentrated amounts Also make sure that your room is adequately ventilated as some materials will continue to produce fumes for several minutes to possibly hours after the cutting or engraving process has been completed Since many materials can produce toxic and possibl...

Page 79: ...ll samples were run with the resolution set at 500 DPI except were otherwise noted When using a lower resolution in order to achieve greater engraving speeds remember that the resolution will be reduced which in turn will reduce quality and depth In order to compensate for lower resolution settings lower the speed and or increase the power to achieve the same depth The opposite applies for higher ...

Page 80: ... 100 70 500 1 010 COMMENTS This sample engraved deeper than the first sample Engrave through original masking Engraving too deep will lose detail TYPE POWER SPEED PPI PASS DEPTH VECTOR ENGRAVING 5 4 0 500 1 2 COMMENTS Engrave with or without masking TYPE POWER SPEED PPI PASS DEPTH VECTOR CUTTING 75 8 500 1 2 COMMENTS For the best results remove the original masking on both sides Re mask with trans...

Page 81: ...ng through very thick acrylic re mask both sides with transfer tape and dampen the masking on both sides of the acrylic with water from a spray bottle Elevate the acrylic off the table at least 1 8 inch re focus then proceed to cut Elevating the acrylic will allow the beam to completely pass through the material which allows the smoke and heat to escape from underneath If cutting directly on the e...

Page 82: ...cessary because the acrylic is protected from smoke damage by the mirrored backing TYPE POWER SPEED PPI PASS DEPTH VECTOR ENGRAVING 5 4 0 500 1 005 COMMENTS Again masking is not necessary because the acrylic is protected from smoke damage by the mirrored backing TYPE POWER SPEED PPI PASS DEPTH VECTOR CUTTING 75 1 6 500 1 1 COMMENTS Make sure both sides are masked Dampen and elevate at least 1 8 ab...

Page 83: ...levate at least 1 8 inch above the table The laser beam will not reflect off of the mirrored surface because it is absorbed by the acrylic first Sometimes cutting the acrylic from the back side will cause the mirrored backing to distort and crack from the intense heat required to cut If the combination of engraving and cutting is desired our suggestion is to engrave the backing unmasked remove the...

Page 84: ...is a process called Laser Color Marking which enables the color filling of anodized aluminum First coat or spray the aluminum with a clear acrylic finish After the finish has thoroughly dried laser engrave the graphic onto the aluminum Then take a water based marker such as those found in an art supply store and swab on the ink into the engraved area You can actually see the ink get absorbed into ...

Page 85: ...aterial adjust the power so that the laser beam removes the painted coating but not the clear coating This will expose the polished clear coated brass without penetrating all the way down to the metal Since the brass is already clear coated and polished it will not require any cleanup after engraving nor will it ever oxidize If too much laser power is used the brass the clear coat will be removed ...

Page 86: ...ly when the engraved area is paint filled If paint filling it is a good idea to mask first and then engrave through the masking In this way when ready to paint fill the material is already masked Spray painting seems to be the easiest Using a paint brush is acceptable but time consuming Use the paint sparingly Excess paint can accumulate on the edges of the engraving which will make mask removal d...

Page 87: ...CTOR ENGRAVING 10 4 0 500 1 010 COMMENTS Engrave unmasked TYPE POWER SPEED PPI PASS DEPTH VECTOR CUTTING 50 1 6 100 1 060 COMMENTS Unmasked A low PPI setting is used to prevent flaming ADDITIONAL COMMENTS Cork is not very popular for engraving but it does engrave and cut nicely Cork is mainly used for making gaskets by vector cutting the gasket patterns ...

Page 88: ...die must be made as the diagram below indicates Seal Sample Create the male with a white graphic and a black background Mirror the image and invert it by making the background white and the graphic black Add a 010 inch black outline to the graphic portion of the female side This will give the greater clearance to the female side to prevent the paper from piercing through when the male side of the ...

Page 89: ...he glass wet it with water from a spray bottle and laser engrave it The transfer tape and water will act as a heat sink and pull the heat away from the glass as the laser system engraves it This helps reduce chipping or flaking of the glass Be especially careful when engraving leaded crystal The lead in crystal conduct heat which can cause much more flaking or even the cracking of the crystal Use ...

Page 90: ...VECTOR CUTTING 50 2 0 200 1 1 COMMENTS Mask top surface and use a low PPI setting when cutting ADDITIONAL COMMENTS Leather is a very simple material to engrave and most types of leather engrave very well with the laser system Simulated leather engraves well also but the results are not as nice as with the real thing Engraving lightly will turn the surface of the leather dark brown giving it a high...

Page 91: ...ed image to appear washed out The objective is to engrave deep enough to turn the marble white and provide a good contrast Too much power can also cause the material to discolor and turn brown as if it were burned Photographs look great when engraved on marble especially darker marbles where the whiteness of the engraving really stands out Avoid using marble that is very textured looking The textu...

Page 92: ...board is an excellent material to use for architectural modeling and for picture framing It cuts and engraves very neatly and cleanly It comes in a variety of shades and colors Patterns can be engraved on the surface with a power setting for light engraving which just breaks through the very thin top layer and exposes the lighter colored underlying substrate When engraving a low PPI setting is use...

Page 93: ...istent surface finish and uniform base material composition Unlike regular wood which has grain patterns and density variations melamine when laser engraved produces a flat and even engraved area This characteristic gives this material superior engraving and paint filling qualities Masking can be used if desired but it is just as easy to spray the engraved area with water and wipe down with a cham...

Page 94: ...he next step is to select a halftone pattern Usually imaging software gives the choice of using different halftone patterns including frequency of lines per inch and pattern angles Use a line frequency above 20 and below 100 The size of the dots decreases as the line frequency increases Experiment to see which pattern looks the best Big dots look good on some materials and small dots look better o...

Page 95: ...S Engravers plastic comes in many different colors thickness coatings and surface textures About 75 of the available engravers plastic including ADA signage materials will engrave and cut well with the laser system Microsurfaced plastics seem to work the best because there is less surface material to remove to uncover the substrate Since most plastics have low melting points a low PPI setting is u...

Page 96: ...very thin and flimsy and will collapse while stamping them If you do not have this option and would like to add it to your system please contact one of our engineers in the sales department for current pricing All laser systems can be upgraded to have this extraordinary feature In the above example only one pass is necessary to achieve a deeply engraved rubber stamp When cutting out the rubber sta...

Page 97: ...e a squeegee to remove trapped air bubbles The transfer tape can then be lifted off and the vinyl lettering or objects that were vector cut will stick to the transfer tape and maintain their correct spacing with respect to each other Now apply the tape to the desired surface and squeegee peel off the transfer tape and the lettering will remain adhered to the surface The other method is to apply a ...

Page 98: ...sh wrapped around it Dampen the sponge and wipe off the residue A damp chamois cloth works well also Do not use paper towels or a regular sponge because these materials will get lodged in the engraved area when wiping and are extremely difficult to remove A method to avoid cleanup is to mask the wood with transfer tape and peel off the tape after engraving If desired after engraving and before pee...

Page 99: ...oo much material removal and the fit will not be snug Some software programs allow outline offsetting to compensate for the thickness of the beam This is called contouring and is optimal if planning to do this type of work Usually a contour to the outside of the vector line of 006 inches provides a tight fit Remember if using more power to cut through the veneer compensate for the thicker width of...

Page 100: ...e is the best performing machine Always turn the laser engraving system OFF and unplug it before performing any cleaning procedures Suggested Cleaning and Maintenance Supplies Soap solution mixture of 1 tablespoon 2 cl liquid soap and 1 quart liter of water in a spray bottle Paper towels Cotton cloth Denatured alcohol NOT to be used on any painted surface plastic or the Top Window Acetone can be u...

Page 101: ...9 2 Maintenance ...

Page 102: ...m by hand to roll the bearings against the swab There are seven bearings in the system three 3 on the Focus Carriage two 2 on the left side of the X Rail and two 2 on the right side of the X Rail Clean the Top Window with a cotton cloth and the soap solution The Top Window is made out of acrylic DO NOT use paper towels because they will scratch the acrylic Also DO NOT use window cleaner alcohol or...

Page 103: ...th as this can scratch the mirror If the mirror did not come clean use a fresh cotton swab and repeat the procedure Do not worry about small pieces of lint that come off of the cotton swab They will be vaporized as soon as the laser hits it You can cause more damage to the mirror by trying to get it off than by leaving it alone The other method is to use a piece of lens tissue and the Lens Cleanin...

Page 104: ...he Focus lens are both glued to a metal bracket and the metal bracket is attached to the front plate with Phillips head screws It is not necessary to detach the bracket from either optic in order to clean them Simply tilt the front cover at enough angle so that you can apply the Lens Cleaning solution directly to the 3 Mirror and to the Focus Lens Flood the surfaces with the solution If heavy debr...

Page 105: ...anism After some time contaminants can bind to the lubricant making the Z axis adjustment knob more difficult to turn or sound squeaky If this is the case wipe off the contaminated grease with a soft cloth a apply fresh white lithium grease to the screw threads Run the table up and down to work in the grease Electronic Upgrading The laser systems onboard computer is equipped with a special Flash u...

Page 106: ...wer it must be user defined As a starting point we recommend checking and if necessary cleaning the laser system after every 8 hours of engraving or cutting Depending on your particular operation you may need to adjust this schedule If you are noticing a considerable buildup of debris on the optics and the motion system clean the system at more frequent intervals If your system has remained relati...

Page 107: ...Appendix A Warranty Please insert your warranty statement here ...

Page 108: ...peatability 0 002 inches 06 mm Interfaces Parallel Centronics Serial RS 232C PC Serial Phone Jack MAC Memory Size 4MB upgradeable to 64MB System Dimensions 29 wide x 30 deep x 17 tall System Weight 25 Watt 150 lb 68 kg Safety Classification Class I Focal Plane Z axis Adjustment 5 inches 127 mm Facility Requirements Electrical Power 25 Watt Single phase 120 VAC 50 60 Hz 10 Amp US Version 25 Watt Si...

Page 109: ...to assign an HPGL plotter pen to the different colors in which the graphic was drawn In most cases the pen numbers should match the power setting numbers in the laser systems DOS Power Settings display 4 Some DOS programs may allow the setting of pen speed for the plotter pens These speeds will be ignored by the laser The laser system only recognizes the settings in the DOS Power Settings section ...

Page 110: ... Windows 95 operating system Since there has been a high demand for Macintosh users we have created a Macintosh based printer driver If you ordered the Macintosh printer driver and the special printer cable required please refer to the installation and operation instructions included with your order ...

Page 111: ...Appendix E Serial Port Cable Requirements ...

Page 112: ... INI file usually located in the c coreldrw draw subdirectory Open this file up in a text editor such as NOTEPAD which comes with Windows Scroll down about 55 lines to find the line that reads FontRasterizer 1 and change it to read FontRasterizer 0 Save this file and restart CorelDraw for the changes to take effect COREL 4 0 Find the CORELAPP INI file usually located in the c corel40 config subdir...

Page 113: ...g subdirectory Open this file up in a text editor such as NOTEPAD which comes with Windows Scroll down about 64 lines to find the line that reads FontRasterizer 1 and change it to read FontRasterizer 0 Save this file and restart CorelDraw for the changes to take effect COREL 7 0 Find the CORELAPP INI file usually located in the c windows corel70 config subdirectory Open this file up in a text edit...

Reviews: