background image

HN5i Quick Start Guide 

69 

Transport 

NOTE 
A number of these categories contain sub-categories. 

Using your Navigator with CAMPS 6 Book 

Using Navigator with CAMPS 6 


The 

CAMPS 6

 POI data included with your 

HEMA NAVIGATOR HN5i

 is designed to 

work in conjunction with the 

Camps Australia Wide 6

 book. 

The range of CAMPS 6 Australia Wide books are available from many retailers or 

direct from HEMA. Please contact HEMA to locate your nearest CAMPS 6 retailer. 

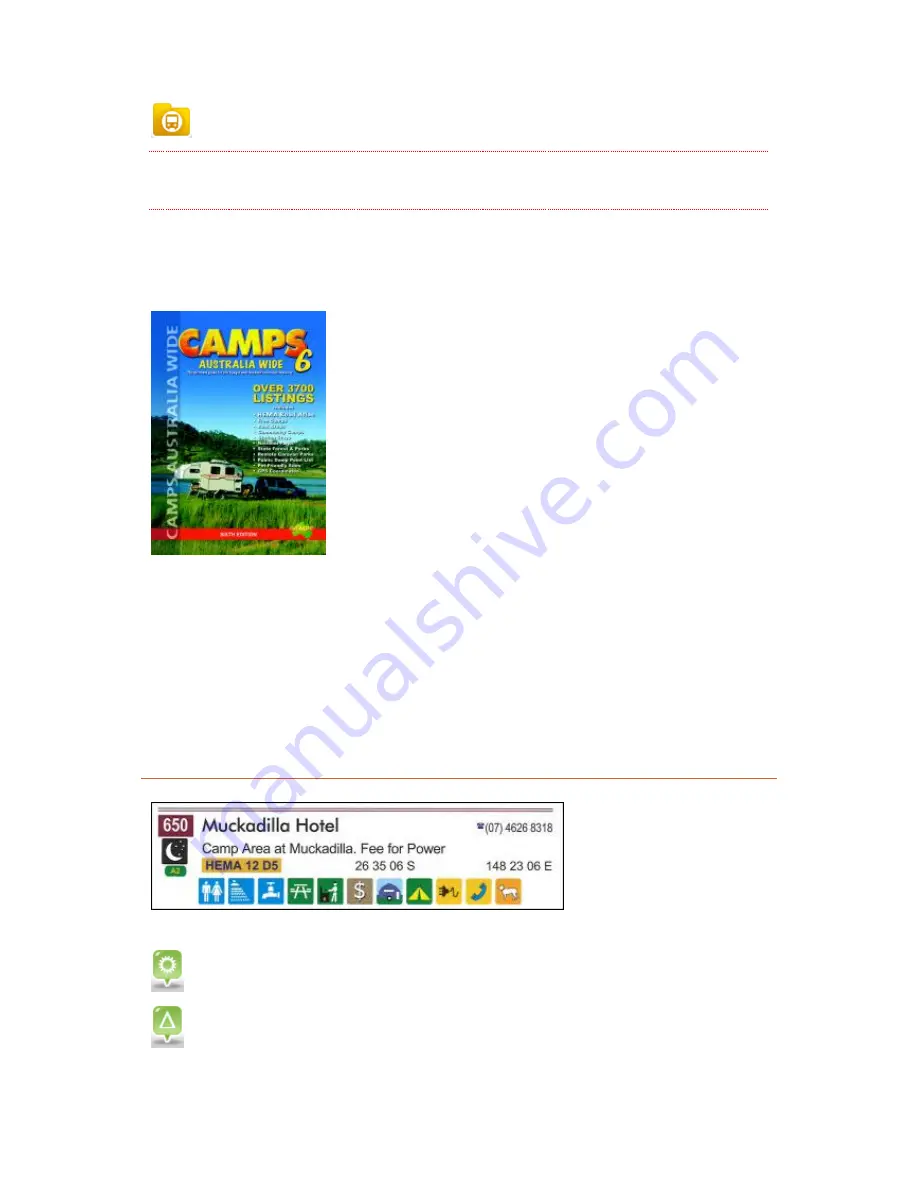
CAMPS 6 POIs are divided into the following categories: 


Caravan Park 


Day Use ONLY 


Overnight Camping 


CAMPS 6 POIs are categorised using an icon to identify the type as show below: 

Day Use Only 

Overnight Camping / Parking 

Summary of Contents for HN5i

Page 1: ...HN5i Quick Start Guide ...

Page 2: ......

Page 3: ...ry 2 Cleaning the Unit 3 Avoiding Theft 3 Getting Started 3 Getting Started 3 Box Contents 3 HN5i Features 4 Parts of the HN5i 4 Inserting Removing MicroSD cards 6 Using the MicroSD Card Adapter 7 Mounting the HN5i on the Windscreen 8 Turning the HN5i ON and OFF 10 Charging the Battery 10 Resetting the HN5i 10 Stylus Techniques 11 Additional Information 11 PC Connectivity 12 PC Connectivity 12 Mas...

Page 4: ...on Find Places Screen 64 Custom Search 65 List of POI Categories 68 Using your Navigator with CAMPS 6 Book 69 More Menu 74 Settings Menu 77 4WD Nav 80 4WD Nav 80 Getting to know OziExplorer 81 Map Overlay Information Buttons 82 Standard Toolbar 83 Acquiring a GPS Satellite Fix 84 Page Selection 85 Pages and their Functions 86 Opening a Map 87 Adding Waypoints 88 Exiting OziExplorer 89 OziExplorer ...

Page 5: ...Table of Contents v Selecting a Map 95 Memory Map Navigator DVD Installation 97 Important Product Information 104 Important Product Information 104 Technical Data Sheet 106 ...

Page 6: ......

Page 7: ...r than the stylus designed for this purpose Avoid prolonged use in high vibration and high shock environments Do not carry transport flammable liquids gases or explosives in the same compartment as the device and its accessories Wireless devices can interfere with the reception of satellite signals causing unstable signal reception GPS GPS signals are produced and monitored by the United States go...

Page 8: ...ven by any navigation device Do not install the navigation device in such a manner as to obstruct the driver s view of the road or interfere with the operation of a vehicle s controls or safety features such as air bag systems The route calculated by the navigation device is a suggested route and used for reference only It is not a substitute for alert driver behaviour and common sense Drivers mus...

Page 9: ... or microfibre cloths isopropyl alcohol or water may be applied to the cloth where required to gently wipe the touch screen Do not use harsh or abrasive cloths and avoid the use of chemical cleaners or solvents as these can damage the NAVIGATOR Avoiding Theft To avoid theft remove the NAVIGATOR and mount from sight when not in use Remove the residue left on the windscreen by the suction mount Gett...

Page 10: ...uracy and faster GPS fix 2GB on board memory 8GB microSD card Preloaded with HEMA 4WD maps Topo 250 Austalia 1 250K Bluetooth Built in hands free calling FM Transmitter Rear view camera ready iGo Street Navigation Preloaded with Australia New Zealand mapping plus 2 year free map updates OziExplorer with new easy to use HEMA customised interface Memory Map with access to a wide range of extra digit...

Page 11: ... and green when fully charged Top View Power Button Powers the NAVIGATOR ON OFF or activates sleep mode Mounting cradle slots Locate and secure the device within the mounting cradle Rear View Speaker Provides audio output System reset button Resets the NAVIGATOR system to a stable state Microphone For hands free Bluetooth functionality Stylus Use with the NAVIGATOR touch screen ...

Page 12: ...2 24V power source or Windows PC computer system Inserting Removing MicroSD cards The HEMA NAVIGATOR HN5i comes with a pre installed 8GB MicroSD card To remove the MicroSD card from your HN5i 1 Turn the NAVIGATOR so that the rear of the device is visible 2 Locate the MicroSD card slot on the side of the device 3 Using your fingernail depress the card further into the slot and slowly release 4 The ...

Page 13: ...e the MicroSD card slot on the side of the device 3 Position the card with printed side facing you and as per illustration 4 Slide the card gently into the slot until it clicks into place Using the MicroSD Card Adapter A MicroSD card adaptor has been included with the NAVIGATOR so that it can be used in conjunction with an SD card reader SD Card Adapter MicroSD card SD Card Adapter Lock Tab ...

Page 14: ...not move lock tab to LOCK This will WRITE PROTECT the card and prevent data being written to the card Mounting the HN5i on the Windscreen Attach Cradle to Windscreen Mount Attach the cradle to the windscreen mount via the 4 pin system and slide it down until it snaps locks securely in place Secure the Windscreen Mount WARNING The adhesive disc included with the mount is only used for attaching the...

Page 15: ...creen mount until the desired viewing angle is achieved using the vertical and horizontal adjustment knobs TIP The new mounting cradle has a hook on the back designed the hold the cables securely in place Connect the Power 1 Plug the USB connector of the car charger into the USB port located on the left hand side of the NAVIGATOR 2 Plug the car charger into the power outlet of the vehicle Attach t...

Page 16: ...Powering the unit back on from SLEEP MODE will restart the HN5i on the same screen from which the sleep mode was originally activated NOTE The unit is not completely shut down and will discharge the battery over the course of time Power Off To power off the device gently press and hold the power button for approximately 3 seconds then release The unit will display the POWER OFF screen briefly befo...

Page 17: ...reen once with the stylus to open items or select activate an option Double Tap Touch the screen with the stylus twice in quick succession to open or select activate an option Drag Hold the stylus on the screen and continue to hold down the stylus while dragging up down left right or across the screen Tap and Hold Tap and hold the stylus without moving until an action is complete or a result or me...

Page 18: ...hen the USB cable supplied with the NAVIGATOR is plugged into the PC and the mini USB connector inserted into the device the following three icons will be displayed Mass Storage Mode PC Sync Mode Power Charge Mode Mass Storage Mode NOTE The device will not charge using this mode This will display the contents of the Resident Flash on board memory and MicroSD card as Removable Disks in Windows Expl...

Page 19: ...form updates and allow downloading of extra content To facilitate this connection one of the following applications need to be installed on your computer ActiveSync for Windows XP Windows Mobile Device Centre for Windows Vista and Windows 7 NOTE Windows Mobile Device Centre is available in two versions for 32 bit and 64 bit versions of Windows You need to install the correct version for your Windo...

Page 20: ...GATOR device using the USB port of the PC as the charging source Main Menu Main Menu Tools button The Tools button allows access to the Tools menu where you can access system settings functions and utilities Battery Indicator The Battery Indicator displays the charge state of the internal battery as shown below Empty 20 50 80 100 Charging ...

Page 21: ...real time displayed in combination with raster maps and other useful data These programs are best suited for off road navigation System Date Time The current System Date and Time are displayed at the bottom of the Main Menu Tools Menu Tools Menu The NAVIGATOR Tools menu consists of the following elements BlueTooth BlueTooth is a wireless technology which enables the transmission of voice and data ...

Page 22: ...requency AV IN With a compatible reversing camera connected you can view the video signals produced by the camera System Used to modify volume power and backlight settings alter the date time and interface language You can also perform screen calibration and view a number of system parameters Bluetooth Menu Bluetooth Menu The HEMA NAVIGATOR HN5i allows you to pair with a compatible Bluetooth enabl...

Page 23: ...another Bluetooth device Keeping the Bluetooth facility active behind the scenes while a GPS application is running Automatic pickup of incoming calls Pair Device Displays a list of devices which have previously been paired with this NAVIGATOR The connection may be re established by selecting the device from the list and selecting the Pair button You can also delete old or redundant pairings from ...

Page 24: ...HN5i Quick Start Guide 18 When you choose to pair with the NAVIGATOR you will be prompted to enter the PIN code default 8888 ...

Page 25: ...ed successfully you will see the Pair Success message briefly on the screen of your NAVIGATOR You Will then see the Bluetooth indicator and Bluetooth Connected message appearing at the top of the Bluetooth screen Making A Call Once paired with a compatible mobile phone a call can be made from the NAVIGATOR Tap the Keypad button from the main Bluetooth screen the Keypad screen will appear ...

Page 26: ...nnection to mobile phone 1 Enter the number using the keypad buttons 2 Tap the Green Handset button to make the call Back button Return to previous screen Bluetooth indicator Showing call in progress via mobile phone While the call is in progress you can hang up by tapping the RED Handset button ...

Page 27: ...the background Turn on the option to auto answer incoming calls Back button Return to previous screen Change PIN Code button Opens the Set PIN Code window Current PIN Code Keep Bluetooth Running indicator When ON keeps Bluetooth resident in memory so it can accept calls while GPS applications are running Auto Pickup indicator When ON will cause the phone to automatically answer incoming calls Chan...

Page 28: ...indicator button will switch this feature ON When this feature is active Bluetooth will continue to run while other applications are active which means you will be able to receive calls etc even while using navigation applications When this option is on an indicator will appear at the top of the screen as shown below The indicator can be dragged around the screen to avoid obscuring details on appl...

Page 29: ... Auto Pickup Incoming Call option is switched on Back button Return to previous screen If the option is NOT set to automatically answer incoming calls simply tap the GREEN Handset button to answer the call Call Record Tap the Call Record button to view the Call Record screens These contain a log of Outgoing calls you ve made from the NAVIGATOR via Bluetooth Incoming calls you ve accepted on the NA...

Page 30: ...HN5i Quick Start Guide 24 Back button Return to previous screen Call Record List Select button Choose which of the three screens you wish to view ...

Page 31: ...an one page of entries in the current list Page Forward Moves forward one page where there are more than one page of entries in the current list Re Dial Re dials the number of the selected entry in the current list Dial Last You can re dial the last phone number accessed using the Dial Last button When tapped the keypad screen will appear allowing the opportunity to modify the number before callin...

Page 32: ...me Down Decrease volume level during call Volume Up Increase volume level during call Pair Device Tap the Pair Device button to view a record of Bluetooth devices which are either currently paired or have been previously paired with your NAVIGATOR Back button Return to previous screen Device in list which is currently connected Device in list which is NOT currently connected ...

Page 33: ...ce in list Delete ALL Entries Removes ALL entries from the current list Previous Entry Moves back one entry in the current list Next Entry Moves forward one entry in the current list Note Application The Note application can be used for entering and storing notes and reminders It is started by tapping the Note button from the Tools menu Back button Return to previous screen Note Screen buttons ...

Page 34: ...ve finished entering text TIP If the note contents become hidden by the keyboard use the Move button to re position the keyboard at the top of the screen 5 Tap the Save Note button to save your note for later viewing The note will be saved using the first five letters of the note contents as the reference and will be displayed in the Stored Notes list on the left of the Notes screen Bearing this i...

Page 35: ... desired note by tapping the note reference in the Stored Notes list on the left of the screen 2 Use the up and down arrows if necessary to scroll through the notes available 3 Tap the note reference to re display the saved note in the Text Display area of the screen 4 Tap the Delete Note button to permanently erase the selected note Calculator Application The HEMA NAVIGATOR HN5i comes with a comp...

Page 36: ...he required day month and year and tapping the OK button Back button Return to previous screen OK button Used to set the System Date to that shown by the calendar FM Transmitter Function The HEMA NAVIGATOR HN5i can be set to transmit audio on a preselected FM radio frequency NOTE The NAVIGATOR will NOT output sound through the internal speaker while the FM function is switched ON ...

Page 37: ...er function on NOTE The NAVIGATOR will NOT output sound through the internal speaker while the FM function is switched ON AV IN Reversing Camera Function With the reversing camera sold separately connected and powered on the AVIN screen shows a camera s eye view NOTE Depending on the make and type of camera fitted the view may differ slightly AV IN Screen buttons For use with a reversing camera th...

Page 38: ...rmat Photo Used to view image photo files JPG or BMP file format Flash Used to view Flash Video files SWF file format Flash 4 or lower Player File Browser Controls Each player accessible from the Player screen has its own File Browser which allows you to choose the files you wish to play The File Browser screen has the same controls regardless of the file type you are currently browsing Back butto...

Page 39: ...ic Player File Browser Back button Return to previous screen Current Folder Shows the current folder you are browsing Folder Contents Shows the contents of the current folder 1 Browse to the music file in the Music Browser 2 Select the file to play by tapping the required icon The Music Player will start playback of the selected music file Music Player Status Display ...

Page 40: ...during playback Music Player Screen buttons The controls at the bottom of the Music Player screen allow the following functions Previous Track Skip to previous track Play Pause Suspend resume playing until tapped again Stop Stop playing Next Skip to next track Cycle Repeat ALL Repeat Single Track Allows you to choose to repeat the currently playing track or ALL tracks or no tracks Toggle Shuffle P...

Page 41: ... file is selected in the Video Player File Browser NOTE Operation of the Video Player is not recommended during navigation Back button Return to previous screen Current Folder Shows the current folder you are browsing Folder Contents Shows the contents of the current folder Video Player Status Display Back button Return to previous screen ...

Page 42: ... buttons Previous Skip to previous video Play Pause Suspend resume playing until tapped again Stop Stop playing Next Track Skip to next video Return to Player Browser screen Volume Control Allows you to increase decrease the volume level during playback Text Player The Text Player will appear when the Text button is selected on the Player Menu and a compatible file is selected in the Player Browse...

Page 43: ...n Text Player Screen buttons The controls at the bottom of the Text Player screen allow the following functions Previous Page Scroll back to previous page of text file Next Page Scroll forward to next page of text file Keypad This button has no function on this page Return to Player Browser screen Photo Player The Photo Player will appear when the Photo button is selected on the Player screen and ...

Page 44: ...hows the contents of the current folder NOTE It may take a short while to generate thumbnail images of the images in the selected folder depending upon the size of the image files Photo Player Status Display Back button Return to previous screen File Name The name of the currently displaying image file Image Display Image playback window ...

Page 45: ...lideshow Slideshow will continue until screen is tapped Rotate Image Rotate current image 90 clockwise Return to Player Browser screen Flash Player The Flash Player will appear when the Flash button is selected on the Player screen and a compatible file is selected in the Flash Player File Browser NOTE Operation of the Flash Player is not recommended during navigation System Menu System Menu Tap t...

Page 46: ...battery charge level and status and allows adjustment of power saving settings Backlight Adjusts the brightness of the screen backlight and allows adjustment of power saving settings Date Time Set the date time and timezone Language Choose the interface language of the NAVIGATOR Sys Info Displays the system status and has additional functions such as Screen Calibration GPS Reset Factory Reset Volu...

Page 47: ...ing the buttons as shown below The Enable sounds for taps option when switched ON produced a sound when options are tapped in the NAVIGATOR s menu system Back button return to previous screen Decrease Volume Increase Volume Toggle menu tapping sound Power Displays the current battery charge level for the NAVIGATOR ...

Page 48: ...rom power source Sleep Mode Indicator Adjustment Set the unit to go into Sleep Mode after a set time period on battery power The options are always on off after 1 minute off after 2 minutes off after 3 minutes off after 10 minutes off after 30 minutes Backlight Allows adjustment of the system backlight allowing increase decrease of overall screen brightness ...

Page 49: ...ight level Use arrows to adjust Dim Mode Indicator Adjustment Set the unit to dim the screen after a set time period on battery power The options are always on off after 1 minute off after 2 minutes off after 3 minutes off after 5 minutes System Date Time Set Date Time and Time zone on the NAVIGATOR to suit your location ...

Page 50: ...o the appropriate time zone using the arrows Language Allows selection of language for system menu screens on the NAVIGATOR Note that it may also be possible to select language options in individual applications Back button Return to previous screen Language Selection Tap the Flag button to select the default language for system screen on the NAVIGATOR The selected icon will turn grey ...

Page 51: ...ns Back button Return to previous screen System Status Panel Shows various items of system information including signal strength of GPS satellites Screen Calibration Allows you tun the screen calibration routine See below GPS Reset This button will reset the internal GPS inside the NAVIGATOR Factory Reset Reset the system settings to factory defaults Screen Calibration ...

Page 52: ...ap the highlighted white crosshair as accurately as possible When complete you will return to the previous screen automatically Street Nav Street Nav To begin street navigation tap the STREET button from the NAVIGATOR main menu The iGo Primo navigation application is used primarily for navigating within populated areas and has the ability to perform auto routing and location searching To start iGo...

Page 53: ...HN5i Quick Start Guide 47 Once the program has started the Navigation Menu will be displayed By default iGo will automatically switch to night colour mode between sunset and sunrise Exit button ...

Page 54: ...button to select your desired destination by entering an address or selecting a place of interest POI a location on the map or one of your favourite destinations My Route button Tap the My Route button to display route parameters Here you can view a route preview on the map You can also perform route related actions such as editing or cancelling your route setting a start point for the route picki...

Page 55: ...Settings menu access additional features and functions Back button Wherever you see the Back button displayed it can be tapped to take you back to the previous screen Map Screen and Functions If your GPS does not not yet have a satellite fix iGo will let you know this via an icon and status message at the top of the main map screen ...

Page 56: ...Current Speed Shows the current speed Tap to modify the information shown Current Street Shows the name of street you are currently on Menu button Jumps back to the Main Menu The display shown by the Map screen varies depending on your current activity You will see different Map screen displays and indicators for Non navigation mode Navigation mode Simulation mode Quick Menu button The Quick Menu ...

Page 57: ...g the Exit button will exit the Quick Menu If you do not tap ANY buttons the Quick Menu will return to the previous screen after approximately 10 seconds The Quick Menu also has the following controls at the bottom The Mute button instantly tells iGo to keep quiet Tap the button again to unmute The Volume slider allows you to adjust the main volume level within iGo You can tap and drag the volume ...

Page 58: ... indicator shows you information about the next manoeuvre you need to perform along your route and the next street or the next city town The indicator shows The type of manoeuvre turn roundabout exit motorway etc Distance before the manoeuvre is required from the current position The distance indicator will count down as you approach In some cases there will be a secondary manoeuvre required a ver...

Page 59: ...hever panel you tap on will become the single panel displayed i e If Distance Time Left and Arrival Time are displayed and you tap on the Distance panel the display will change to a single panel with the Distance displayed The contents of the three panels can be customised in the Settings Visual Guidance Data Fields section Using the Find button Tap the Find button from the main menu to enter the ...

Page 60: ...lect a Point Of Interest POI as your destination Tap the Find on Map button to navigate to a location selected directly on the map Tap the Favourites button to choose from your list of saved favourite locations as your destination NOTE If you have not yet saved any favourites the Favourites button will be greyed out inactive ...

Page 61: ...on to access a list of previously used destinations Tap the More button to navigate to a coordinate or to a location saved in a photo Finding an Address Tap the Find Address button on the Find Menu The Find Address screen allows you to specify where you want to go by entering the address details of your destination ...

Page 62: ... the on screen keyboard TIP If you are not sure of the exact Town Suburb name you can leave this blank Choose the Street by tapping the Street selector and entering data with the on screen keyboard Intersecting Street button Street Number button You can choose a street which intersects your chosen destination street or a specific number on your chosen street using the appropriate button Then enter...

Page 63: ...address marked with a cursor Tap the Next button to calculate a route to your selected destination The route to your destination is now calculating The Route Planning screen shows a summary of route options while calculating the route These options can be changed on the More Menu Settings Route Settings screen ...

Page 64: ...ad Route if you have a previously saved route available Historical Traffic Please see the full manual available online for details on these additional options Once the route has been calculated tap the Go button to begin navigation The Go button has a countdown timer of 10 seconds After the countdown timer has expired iGo will automatically start navigation This is an example of the screen seen wh...

Page 65: ...he Find Places menu allows you to specify where you want to go by searching a comprehensive list of POIs NOTE The Find Places screen will appear differently depending on the mode you are currently in If you look at the example above you will notice that the buttons have Around Here as a subtext on the buttons Looking at the example below shows the Find Places screen with the button subtext showing...

Page 66: ...ed in order of the distance away from your current location POI Deviation Indicators The list will also show indicators to help you gauge how far off your route the POIs are i e small medium or large deviation from your route This can help you to decide which petrol station is easier for you to stop at during your journey for example Small Medium Large Types of Search available from the Find place...

Page 67: ...or caravan around our current location The Places Found screen displays a list of matching entries in order of distance away from your current location closest to furthest You can move up and down the list using the arrows to the right of the list Note that the text which you searched for is highlighted in the list You can tap an item in the list and select to navigate to that item ...

Page 68: ...he navigation process Quick Search Along Route The Quick Search Along Route button is displayed if you are currently navigating to a destination The Quick Search Along Route button is a way to quickly find POIs which match your search specifications which are located along the route you are currently on ...

Page 69: ...which petrol station is easier for you to stop at during your journey for example Small Medium Large Quick Search Along Route The Quick Search Along Route button is displayed if you are currently navigating to a destination The Quick Search Along Route button is a way to quickly find POIs which match your search specifications which are located along the route you are currently on Tap the Results ...

Page 70: ...en route you would need to go to get to that place Quick Shortcuts on Find Places Screen As well as the Quick Search button there are four buttons located along the right hand portion of the Find Places screen These buttons are pre selected for your convenience and follow the convention shown earlier in this chapter where each button has two different states That is they allow searching two differ...

Page 71: ...n either around your current location or at the destination of your current route Available when not navigating Available when navigating along a route Performs a quick search for Restaurants either around your current location or along your current route Available when not navigating Available when navigating along a route Performs a quick search for Camps 6 sites either around your current locat...

Page 72: ...re currently routing to a destination or not Choices available when NOT navigating Choices available when navigating along a route You can choose the following 1 Custom Search In a town Search for a specific POI within a town which you specify using the on screen keyboard Selecting In a Town will take you to the Find Places in a Town screen where you can specify the town required using the on scre...

Page 73: ...tination of your current route if you are currently navigating a route Options 2 3 and 4 will all take you to the Find Places screen where a list of all POI categories is displayed for you to choose from You can also choose to List All Places which shows ALL POIs for the current selection You can scroll up and down through the POI categories list using the up and down arrow buttons Choose the POI ...

Page 74: ...en keyboard List of POI Categories 4WD Facility Accommodation also accessible from the main Find Places screen Airport Automotive Business Café or Bar Camps 6 also accessible from the main Find Places screen Community Finance Leisure Marine Medical Parking Petrol Station also accessible from the main Find Places screen Restaurant also accessible from the main Find Places screen Shopping Sports ...

Page 75: ...d to work in conjunction with the Camps Australia Wide 6 book The range of CAMPS 6 Australia Wide books are available from many retailers or direct from HEMA Please contact HEMA to locate your nearest CAMPS 6 retailer CAMPS 6 POIs are divided into the following categories Caravan Park Day Use ONLY Overnight Camping CAMPS 6 POIs are categorised using an icon to identify the type as show below Day U...

Page 76: ...the standard search functions The Camps Australia Wide 6 book contains a wealth of information for each location The pairing of a HEMA NAVIGATOR HN5i and the Camps Australia Wide 6 book makes a great team and a terrific resource for travellers Finding CAMPS6 POIs As shown in previous sections of this user guide you can search for POIs in a number of ways Around your current location In a specific ...

Page 77: ...Camps 6 Along Route button You will see a list of CAMPS 6 POIs which are located along the route You can scroll up and down through the list using the arrows to the right of the list You can tap the Filter button to refine the list Tap the Filter button to take you to the Enter Filter screen ...

Page 78: ...or a part thereof In this example we are searching for any CAMPS 6 POI which matches the word MUCKA You will then see the Places Found screen showing any matches for the name you searched for If you tap one of the entries you will see a preview of that location on the map ...

Page 79: ...es your original route Add the place to your route as a waypoint keeping the original route destination Add it as the final destination of your current route In this case the original destination becomes a waypoint NOTE You can also search for a specific CAMPS 6 POI ID at this point but you MUST specify the ID in FULL i e QLD650 Enter the CAMPS 6 POI ID and hit the Done button ...

Page 80: ...as setting the POI as your new destination etc More Menu The More menu gives access to iGo Settings and other useful tools Tap the More button from the Navigation Menu to access the More menu The More menu contains multiple panels or pages you can use the Left and Right Arrow buttons to scroll the More menu left and right The image below is a composite of the two panels together ...

Page 81: ...such as Fine tune route planning options Change the look colours of the map screen Turn audio and visual warnings on or off Re run the Configuration Wizard Visit www naviextras com to access additional content such as New maps 3D landmarks Useful applications The Picture Viewer tool will allow you to view a slide show of pictures available on your NAVIGATOR ...

Page 82: ... help compare sizes of various items of clothing using standard sizes from different countries The Calculator tool allows you to perform many mathematical functions The Fuel Consumption tool helps you to keep track of your vehicle s fuel usage It also has a handy reminder tool for your vehicle s scheduled maintenance The Sunrise Sunset tool displays a world map showing the areas of night day ...

Page 83: ...s well as giving you a demonstration of the software running a simulated navigation Settings Menu The Settings menu allows you to change the settings used by iGo and alter the software s behaviour to suit your style and taste You can access the Settings menu by tapping the More button from the Navigation Menu and then tapping the Settings button The settings menu displays up to 4 four buttons per ...

Page 84: ...ght buttons which are available from the Quick Menu accessible from the Map Screen The Quick Menu is accessed from the Map Screen using the Quick Menu button Driving Time Management Customise automatic prompting for driving breaks during long journeys Traffic Enable collection and use of Historical Traffic data Route Settings Type of vehicle Road types used in route planning Route planning method ...

Page 85: ...rk your vehicles position when on map pages Visual Guidance Change values of data fields on map screen Display of junction views and signposts Display of route progress bar Display Display of menu animations Change application skin appearance of iGo Backlight adjustment Regional Program language Time Zone and Time format Units of measure Trip Monitor Automatic Trip saving Track Log saving Check si...

Page 86: ...ool This can be useful after resetting the program back to its default settings see below Reset to Defaults Deletes all saved data and resets the program settings to the factory defaults 4WD Nav 4WD Nav The 4WD Nav function on the HEMA NAVIGATOR HN5i uses the OziExplorer application to provide an exceptional user experience during offroad navigation The OziExplorer interface which is known as HEMA...

Page 87: ... GPS Satellite fix Once OziExplorer has got a GPS fix on your position it will show your current position indicated by the central Red Arrow you see in the image above As you drive around OziExplorer will move the map under the pointer indicating your position This is known as moving map display As you drive OziExplorer will leave a blue line behind the pointer This is the Track Tail The track tai...

Page 88: ...dard Toolbar Contains buttons for commonly used functions Page Specific Toolbar Contains buttons specific to the current page Map Overlay Information Buttons In addition to the standard tool bar the following buttons and information panels are displayed along with the map Speed Indicator The current speed Page Title The name of the currently displayed page ...

Page 89: ...agnification of current map Zoom button Decrease zoom magnification of current map Map Name The map name of currently loaded displayed map TIP The Increase Decrease Map Scale buttons are used to locate the next available map Standard Toolbar The OziExplorer Standard Toolbar consists of the following elements Select Page button Used to change pages within OziExplorer Add Waypoint button Add a waypo...

Page 90: ...located along the bottom of the screen The contents of this toolbar will vary depending on the current page displayed Acquiring a GPS Satellite Fix In order for the NAVIGATOR to find your current location it requires a GPS satellite fix To acquire a GPS fix it is important that you are in area open to the sky not inside an enclosed building and away from tall buildings and trees The initial fix ma...

Page 91: ...sky map with visible satellites When OziExplorer starts the Status page will appear displaying the GPS status and the number of currently visible satellites Once a fix is acquired OziExplorer will bring up a map of your location It is then possible to select a more or less detailed map as required Page Selection Within OziExplorer there are multiple pages or screens which you can access which prov...

Page 92: ...lated to Maps Waypoints Similar to Map View but has a bottom toolbar allowing access to functions related to Waypoints Waypoint Nav Similar to Map View but has information about the next Waypoint at the bottom of the screen for use during Waypoint navigation Tracks Similar to Map View but has a bottom toolbar allowing access to functions related to Tracks Area Estimator Displays map but will also ...

Page 93: ...leration Profiles Contains graphs showing Speed and Altitude over time Status Displays the current status of the GPS and satellites along with information on internal and SD card storage usage Settings Contains buttons allowing the customisation of OziExplorer Opening a Map NOTE Before attempting to open a map it is necessary to suspend GPS tracking by tapping the GPS OFF ON button on the right ha...

Page 94: ...wn list of maps Double tap to open selected map file or single tap to highlight and tap the OK button Adding Waypoints The Add Waypoint button is accessible from any page within OziExplorer that displays a map The Add Waypoint button will instantly add a waypoint at the current cursor position on the map ...

Page 95: ... This data can then be exported to the HN5i via the supplied USB cable Your PC will need Windows Mobile Device Centre Windows 7 and Vista or Microsoft Active Sync Windows XP to be installed See section 2 2 in this document Information on the operation of the HEMA NAVIGATOR Explorer PC software is available from the applications Help menu DVD Installation To install the software and maps into your ...

Page 96: ... Guide for connection information Note It is important to choose the Sync option of Connect without setting up your device Once the HN5i is connected click the OK button A message will be displayed stating Navigator Found If the device cannot be found it will be necessary to do the following Reset and restart the device reconnect to your PC and ensure that Microsoft Active Sync Windows XP or Windo...

Page 97: ...as routes tracks and waypoints to the HN5i device Importing of data such as routes tracks and waypoints from the HN5i device to the HEMA NAVIGATOR Explorer PC application A full list of all functions and methods of creating routes tracks and waypoints Further information is available on the NAVIGATOR web site under the Support menu http www hemanavigator com au Topo Nav Topo Nav The Topo Nav funct...

Page 98: ...matically acquire a GPS Satellite fix when the application is started While establishing a fix the Lock to GPS button will be disabled When a fix is finally achieved the Lock to GPS button will become solid To acquire a GPS fix it is important that you are in area open to the sky not inside an enclosed building and away from tall buildings and trees The initial fix may take anywhere from 2 to 5 mi...

Page 99: ...llowing overlay buttons will be displayed Mode Selector Use the Mode Selector button to toggle between Navigation Mode and Planning Mode Lock to GPS Use the Lock to GPS to display your current position centered on the display as indicated by the flashing red cursor Regardless of what map is being viewed pressing the Lock to GPS button will load the required map to display your current location Thi...

Page 100: ...for a map the next tap of the Zoom In button will display the next available map scale Map Scale Visual indicator shows approximate map scale Zoom Out Use this button to zoom out from a map for less detail When the maximum zoom level has been reached for the map the next tap of the Zoom Out button will display the next available map scale Planning Mode Planning Mode is used for creating waypoints ...

Page 101: ...us button The GPS status indicator will be displayed as a solid Icon in the absence of a GPS fix The icon will become semi transparent once a GPS fix has been established Mark Place button When the Mark Place icon is selected a waypoint mark can be plotted anywhere on the map by selecting a position on the map A red flag will appear at the selected position signifying that a waypoint has been crea...

Page 102: ...aded Search Entry Field Enter characters to search for in the list of maps Refresh button Re scan the Memory Map maps folder to build the list of maps Kbd button Tap to bring up the on screen keyboard for text entry Map List List of Memory Map maps installed on the NAVIGATOR Vertical Scroll Bar Tap Drag the scroll bar handle to scroll up and down through the list of maps Horizontal Scroll Bar Tap ...

Page 103: ...be exported to the HN5i MicroSD card via a card reader Card reader not included Please see the Memory Map NAVIGATOR help on your PC for more information on overlay creation and transfer and a full description of the function of this application DVD Installation To install the software and maps into your PC simply insert the DVD into your computer The installation program should start after a few s...

Page 104: ...tration by entering the serial number found on the back of the DVD paper sleeve Creation of Online Account Click the Memory Map icon on your desktop Once the program has started click the Help License Management menu License Management ...

Page 105: ...n In button If you already have a Memory Map online account sign in Enter 1 User ID 2 Password 3 Tick the Save Password checkbox so the program remembers your login details for future use if required 4 Click the OK button to log on If you are a new user Click the Create Account button ...

Page 106: ...t product updates etc Then click the OK button Once your account has been created sign in Enter 1 User ID 2 Password 3 Tick the Save Password checkbox so the program remembers your login details for future use if required 4 Click the OK button to log on Activate Your HEMA Maps Launch the License Management menu as shown previously The License Information window will show the resources that are cur...

Page 107: ...ur HEMA Region licenses click on Region 1 and press the Shift Key on your keyboard click on Region 4 while holding down the Shift Key Click the Activate button Locate the Registration Serial Number on the back of the Memory Map DVD paper sleeve ...

Page 108: ...ne separately When the activation process has been successfully carried out the License Information menu will appear as shown below All licensed resources will show Full No expiration in the Status column Note The same Registration Serial Number can also be used to activate the GPS Features and Printing The Professional Features requires licensing by payment through the Registration Activation men...

Page 109: ...en activated you will be able to view the maps from the Memory Map PC application NOTE These are the same maps that have been pre installed on your HEMA NAVIGATOR HN5i Click on the Map Map List menu The available maps will be displayed in the Map List window and can be selected by clicking on the desired map ...

Page 110: ... protected under Australia copyright laws and international copyright treaties You further acknowledge that the structure organisation and code of the software are valuable trade secrets of HEMA MAPS and that the software in source code form remains a valuable trade secret of HEMA MAPS You agree not to decompile de scramble modify reverse assemble reverse engineer or reduce to human readable form ...

Page 111: ...the consumer Virtually all data sources contain some inaccurate or incomplete data In some areas complete and accurate map information is either not available or is prohibitively expensive Declaration of Conformity Hereby HEMA NAVIGATOR declares that this product is in compliance with the essential requirements and other relevant provisions of Directive 1999 5 EC This product has been tested and f...

Page 112: ...ENTIAL DAMAGES WHETHER RESULTING FROM THE USE MISUSE OR INABILITY TO USE THIS PRODUCT OR FROM DEFECTS IN THE PRODUCT Some states do not allow exclusion of incidental or consequential damages so the above limitations may not apply to you HEMA retains the exclusive right to repair or replace the unit or software or offer a full refund of the purchase price at its sole discretion SUCH REMEDY SHALL BE...

Page 113: ... Input Touch Screen Interface FM FM Transmitter Function Bluetooth Hands Free with built in Microphone AV IN Rear View Camera ready PAL NTSC Support Loudspeaker 2W Built in Headphones Headphone Jack USB USB 2 0 compatible Mini USB Dimensions W x H x D 135mm x 85mm x 18mm Weight 185g Removable Storage 8Gb MicroSD Card Battery Type 2300 mAh Lithium Polymer Lifespan Battery life up to 4 hours Charge ...

Page 114: ... Quick Start Guide 108 hours Car Charger 12 24V DC Output 5V DC 1 5 A Environmental Conditions Temperature Operation 0 55 C Storage 20 35 C Humidity Operation 45 80 Non Condensed Storage 30 90 Non Condensed ...

Reviews: