7
General oPeraTinG inforMaTion
user disPlays/seTTinGs
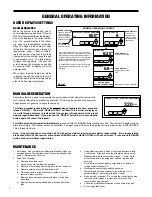
General Operation
When the system is operating, one of
several displays may be shown. Pressing
NEXT will alternate between the displays.
One of the displays is the current time of
day. The second display is the follow-
ing: days to a regen/gallons remaining.
Days To A Regen is the number of days
left before the system goes through a
regeneration cycle. Capacity remain-
ing is the number of gallons that will be
treated before the system goes through
a regeneration cycle. The third display
is current flow in gal/min. The user can
scroll between the displays as desired
by pushing NEXT or display will scroll
automatically.
When water is being treated (i.e. water
is flowing through the system) the word
"GPM" flashes on left side of display when
other than flow rate is displayed.
Figure 7
DAyS TO A REgEN
6
CAPACITy REMAININg
650
REgEN TODAy
gAL
NORMAL OPERATION SCREENS
PM
6:35
TIME OF DAy
gPM
6.8
FLOW RATE
USER DISPLAy 1
Typical user
display. Shows
capacity or days
remaining before a
regeneration.
USER DISPLAy 2
Displays current time.
USER DISPLAy 3
Displays present flow
rate.
REgEN TODAy
flashes in upper left
corner of display
between rotating dis-
play when REGEN
button pushed once.
gPM
Flashes when the
turbine is rotating.
User screens will continuously scroll, switching
views every 3 seconds. If the screens are manu-
ally scrolled, this screen will remain constant for
5 minutes then continue to scroll. The conditional
screens will take precedence over the scrolling
and the conditional conditions will apply.
To manually reduce capacity, press down button
while capacity remaining or days to a regen is
displayed.
DEALER NAME
DEALER PHONE NUMBER
gPM
May display if service is required.
Sometimes there is a need to regenerate the system sooner than when the system calls
for it, usually referred to as manual regeneration. There may be a period of heavy water
usage because of guests or a heavy laundry day.
To initiate a manual regeneration at the preset delayed regeneration time, press and
release “REGEN”. The words “REGEN TODAY” will flash in left corner of display as
it scrolls through displays to indicate that the system will regenerate at the preset
delayed regeneration time. If you pressed the “REgEN” button in error, pressing the
button again will cancel the request.
To initiate a manual regeneration immediately, press and hold the “REGEN” button for five seconds. The system will begin to regen-
erate immediately. The request cannot be cancelled. You must cycle all the way through the cycles to make it stop. PLEASE NOTE:
This will reset the meter.
Note: If the salt tank does not contain salt, fill with salt and wait at least two hours before regenerating. If two regenerations
are desired within 24 hour period, press /release REGEN button. REGEN TODAY will flash on screen. Press and hold REGEN
button until valve initiates regeneration.
"REgEN TODAy"
320
CAPACITy REMAININg
gAL
Manual reGeneraTion
1. Salt Usage: See your water conditioning professional for a rec-
ommendation on the best type of salt for your application. See
page 3 - Maintaining Salt Level.
2. Brine Tank Cleaning:
a. Remove brine tank cover.
b. Scoop out as much old salt as possible.
c. Disconnect brine tubing from safety brine valve at brine well.
d. Remove safety brine valve from brine well.
e. Place one hand in brine well to hold overflow nut and
remove 2-piece overflow.
f. Remove brine well and optional grid plate, if used, from
brine tank.
g. Remove any remaining salt and/or impurities from brine
tank.
h. Using clean water and a brush or rag, wipe and rinse inside
of brine tank. Wipe and rinse the grid plate and brine well.
i. Reassemble brine tank reversing steps c - f. Note: If grid
plate is used and it is damaged or cracked, replace with
new one.
j. Put brine tank in place making sure there is no debris or
foreign material beneath it.
k. Reconnect brine tubing to safety brine valve.
l. Manually add 6 inches of water to the brine tank (or to
approximately 1” above the grid plate, if used).
m. Add new salt. Important: Do not add the old salt which was
removed earlier unless it is clean and not mushy. We
recommend using new salt.
n. Follow the disinfection instructions found at top of page 8.
o. Put on brine tank cover.
MainTenanCe


