background image

16

F. Optional Accessories: a. Outdoor Cover

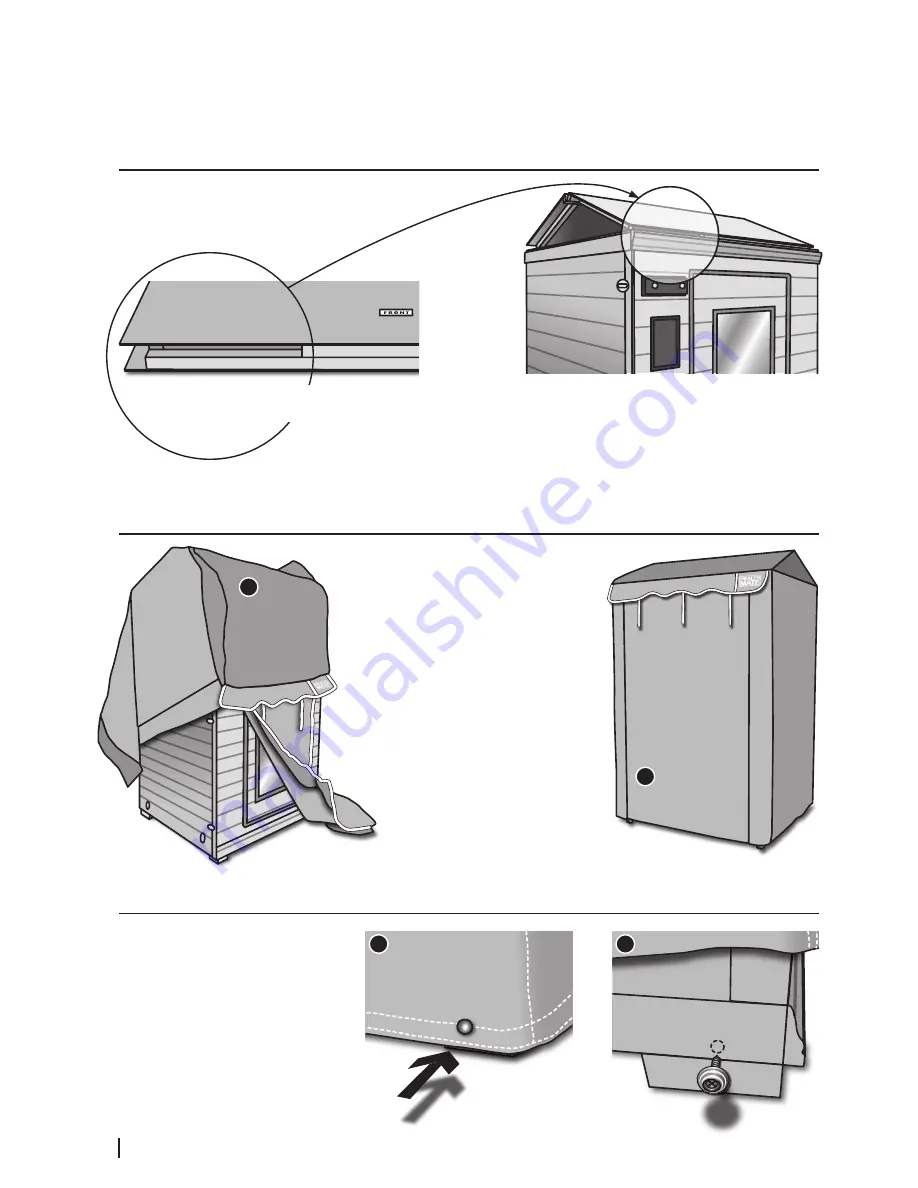
3. Place the Roof Peak and Prepare the Cover

Carefully place the roof peak on top of the sauna.  
The roof peak must form a triangle when you  
see it from the side of the sauna. 

Next, take the clear plastic lining and cover the roof peak completely prior to 
installing the canvas cover.

Now 

unfold the sauna cover and open the zippers on the front section of the cover.

4. Put the Cover Over the Sauna

1. Take the back section of the 
cover and put it over the sauna.  
Pull the cover slowly down from 
the back while lifting up the front 
section.

2. Line up the seams  

with the edges of the sauna.  

Close down the zippers.

5. Attach the Cover on the Sauna

1Tap hard on the snap buttons at  
each side of the cover, with the back  
of your screw driver 

to leave a mark  

on the wood

2. Lift up the cover and screw on the 
snap-screw
 at the center of the mark.

Lower down the cover of both sides 
and 

snap the buttons on until you  

hear a click.

1

1

2

2

Make sure that the 

long pine frame of the roof peak marked as “FRONT” has a cut off section above the CD player  

    and the control panel. 

Summary of Contents for Far Infrared Sauna

Page 1: ...idelines and Helpful Tips Congratulations on your purchase of your Health Mate Far Infrared Sauna We are confident that you will enjoy the many benefits for years to come Carefully read this manual be...

Page 2: ...tandards in the industry This allows us to proudly extend a lifetime warranty on all Health Mate Far Infrared Saunas You will be surprised at the noticeable effects on pain relief weight control skin...

Page 3: ...ions 9 D Safety Precautions for Your Health Mate Sauna 11 E Troubleshooting Guide 13 F Optional Accessories a Outdoor Cover 15 b Multi Color LED Light 17 c Accessories in Western Red Cedar 18 G Limite...

Page 4: ...your sauna Do not place the sauna on a surface that easily gets wet Place the sauna on a deck to protect it from moisture on the ground A Installation and Maintenance A Installation and Maintenance 1...

Page 5: ...el Temperature Display Current sauna session temperature indicator F C Time Display Off Mode Current Time On Mode Sauna Session Time Reserve Button Reserve session only works when power is OFF Clock B...

Page 6: ...utes and maximum session time is 60 minutes 4 The light button will be lighted to indicate inside lamp is turned on Press again to turn off lamp 6 Setting up Your Health Mate Sauna Session time and te...

Page 7: ...ight up during OFF mode 5 To check your scheduled session press Reserve button once Your reserved time will appear for a short moment 6 To cancel your scheduled session simply press the Power button a...

Page 8: ...isplayed when your sauna is in session During your session you can only see the countdown of your session time The Reserve and Clock button are not functional when your sauna is in session B Getting S...

Page 9: ...Your Infrared Session Your Health Mate Infrared Sauna is equipped with special infrared heaters Infrared heat waves reach the body directly without having to heat the intervening air inside the sauna...

Page 10: ...ranquility during your session You can use our ceramic aromatherapy cup op tional accessory to evaporate your favorite oils 9 To make the most out of your sauna session work your muscles while in the...

Page 11: ...al for causing fetal damage during the early months of pregnancy Pregnant or possibly pregnant women should consult their physician prior to using the sauna 3 The use of alcohol drugs or medications p...

Page 12: ...INTERRUPTER GFCI device in any potentially wet locations D Safeguards and Safety Precautions for Your Health Mate Sauna 3 Power Supply Related Precautions 1 When replacement parts are required be sur...

Page 13: ...nside the front of the bottom panel with male plug is plugged into the female outlet on the power supply Bench heater produces no heat The bench heater cable is not plugged tightly into the receptacle...

Page 14: ...ong the sauna has been on for The light turns on sometimes or not at all and is not very bright The sauna is connected to a 120 volt line instead of 230 volt House circuit breaker is tripping Check th...

Page 15: ...der an awning or overhang to prevent rain falling directly onto the roof 3 Place a deck to protect the sauna from moisture on the ground 4 The snap buttons must be clipped on at all times 5 The zipper...

Page 16: ...ack section of the cover and put it over the sauna Pull the cover slowly down from the back while lifting up the front section 2 Line up the seams with the edges of the sauna Close down the zippers 5...

Page 17: ...your color light 3 When the color light is on press the Manual button to change the colors of your color light manually 4 When the color light is on press the Auto button to change the colors automati...

Page 18: ...x 6 x 50 cm The ergonomic backrest gives extra support to your back in any desired angle This item does not need any assembly 3 Ergonomic Backrest Dimensions width x depth x height 45 x 90 x 4 cm The...

Page 19: ...country Please contact your local dealer for more information Dimensions width x depth x height 80 x 24 x 30 cm This accessory can be easily assembled with a Phillips screwdriver The shelf is simply...

Page 20: ...g or overhang to prevent rain falling directly onto the roof PLH Products Inc shall not be liable for the loss of use of the sauna or other incidental or consequential damages Under no circumstances s...

Reviews: