


13
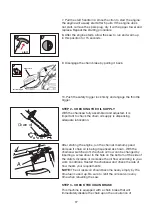
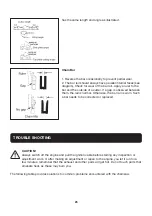
2)Install the guide and mount the chain on the pinion and
guide in the direction shown below
3)Attach the bracket and screw it in place.
4)Reinstall the chain cover in place.
5)Check if the chain is well install on the guide.
Rotate the chain with your hand to check that it is turning
without excessive resistance and that it is properly tightened.
Repeat the installation if the chain is not tight.
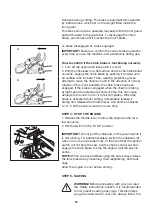
b.Adjusting the chain tension
The tool motor must be switched off before adjusting the
chain tension.
Make sure that the chain is inside the groove of the guide.
Hold the guide by its tip. Adjust the tension of until the chain
teeth touch the bottom of the guide.
Turn the chain tension adjustment clockwise until the chain is
tight. Do not stretch the chain too much. Check the tension of
the chain and check if the casing is properly tightened. If this
is not the case, please repeat the procedure.
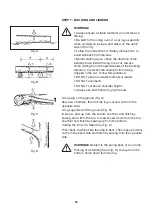
STEP 1 - CHAIN BRAKE MECHANICAL TEST
WARNING!
The purpose of the chain brake is to reduce the
possibility of injury due to kickback; however, it
cannot provide the intended measure of protection
if the saw is operated carelessly.
Always test the chain brake before using your saw
and periodically while on the job.
Your chainsaw is equipped with a chain brake that reduces
the possibility of injury due to kickback. The brake is activated
if pressure is applied against the brake lever when, as in the
event of kickback, the operator’s hand strikes the lever. When
the brake is actuated, chain movement stops abruptly.
Before starting, test the chain brake by pushing it forward
until an audible click is heard.
a. The chain brake is DISENGAGED (chain can move by hand)
when the BRAKE LEVER IS PULLED BACK AND LOCKED.
b. The chain brake is ENGAGED (the chain is locked) when
the brake lever is pushed forward. It should not be possible to
move the chain by hand.
WARNING!
The brake lever should snap into both
positions. If this is not the case, do not use your
saw.
Contact the helpline immediately on 01904 727509.
b
a
b
a