background image

19

Summary of Contents for 325604

Page 1: ...Manuel d utilisation Operating Manual TAILLE HAIES ÉLECTRIQUE 24PO DE 5A 325604 GHT610NU 24 5AMP ELECTRIC HEDGE TRIMMER 325604 GHT610NU A F 2 9 10 20 ...

Page 2: ...position ON Marche peut entraîner des accidents N utilisez pas un outil dont l interrupteur ne fonctionne pas normalement g Ne vous penchez pas trop en avant Maintenez un bon appui et restez en équilibre en tout temps Une bonne stabilité vous permet de mieux réagir à une situation inattendue h Lors du fonctionnement de l outil gardez toute personne de l entourage les enfants et les animaux à l éca...

Page 3: ...eau dans un outil électrique augmente le risque de choc électrique f Manipulez le cordon avec soin Ne transportez jamais l outil par son cordon et ne débranchez jamais la fiche en tirant sur le cordon N exposez pas le cordon à la chaleur à des huiles à des arrêtes vives ou à des pièces en mouvement Remplacez immédiatement un cordon endommagé Un cordon endommagé augmente le risque de choc électriqu...

Page 4: ...des pièces de rechange identiques Suivez les directives fournies dans la section Entretien du présent manuel L emploi de pièces non autorisées ou le non respect des instructions d entretien peut créer un risque de choc électrique ou de blessures L étiquette de l outil peut comprendre les symboles suivants V Volts A ampère Hz hertz no vitesse à vide courant alternatif Isolation double SYMBOLES DONN...

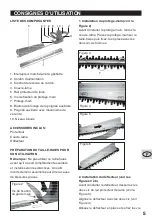
Page 5: ...t qu il ne soit complètement assemblé et installé selon les directives Un outil incorrectement assemblé peut être la cause de blessures graves Figure 2 Vis de fixation du garde main 1 Installation du protège main voir la Figure 2 Avant d installer le protège main retirez le couvre lame Placez le protège main sur le taille haies puis fixez le en place avec les deux 2 vis fournies Figure 3 7 Figure ...

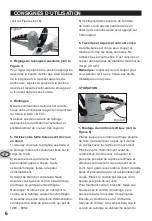
Page 6: ... d alimentation corresponde à celle de votre outil qui est de 120V 60Hz 5 Vérifiez l état des boutons de contrôle de l outil L outil devrait s arrêter dans un délai de 3 secondes après avoir appuyé sur l interrupteur 6 Travail pour lequel cet outil est conçu Ce taille haies est conçu pour couper et mettre en forme les haies normales Ne l utilisez pas à d autres fins Il est conçu pour couper des br...

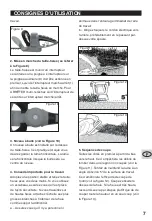
Page 7: ...e haies avec vos deux mains Si vous utilisez un escabeau assurez vous qu il est placé de façon sécuritaire Si vous travaillez sur de hautes haies attachez l échelle aux plus grosses branches à l intérieur de la haie comme support additionnel a Assurez vous qu il n y a personne ni animaux dans l entourage immédiat de l aire de travail b Dirigez toujours le cordon électrique vers l arrière préférabl...

Page 8: ... plus grosses branches avec un sécateur d élagage avant d utiliser votre taille haies Assurez vous qu il ne s y trouve pas de fil ou autre objet métallique qui pourrait venir en contact avec la lame ENTRETENEZ VOS OUTILS AVEC SOIN Votre outil ne nécessite aucune lubrification ou entretien supplémentaire Il ne comporte aucune pièce à réparer ou à entretenir par l utilisateur N utilisez jamais de l ...

Page 9: ...niciens en service et ce de 9 h à 21 h du lundi au vendredi heure normale de l Est La garantie ne porte pas sur l usure normale y compris l usure des accessoires Le produit est garanti pendant 36 mois s il est utilisé à des fins normales Toute garantie devient invalide si le produit a été surchargé ou soumis à un usage négligent ou inadéquat ou si une personne autre qu un agent autorisé a tenté de...

Page 10: ...his tool make sure they have these instructions Warning Some dust created when using lawn and garden power tools contains chemicals known to cause cancer birth defects and other reproductive harm Some examples of these chemicals are crystalline silica from sand bricks and other masonry dust arsenic and chromium from chemically treated lumber CCA compounds in fertilizer compounds in insecticides he...

Page 11: ...ssories or storing the tool Such preventative safety measures reduce the risk of starting the tool accidentally e Do not attempt to remove cut material or hold material to be cut when blades are moving Make sure trimmer switch is off when clearing jammed material from blades Do not grasp the exposed cutting blades or cutting edges when picking up or holding the hedge trimmer f Store idle tools ind...

Page 12: ...ation SYMBOLS TECHNICAL DATA Voltage 120 V 60Hz Rated Current 5 Amps Double Insulated No Load Speed 3 200 SPM Maximum Cutting Diameter 3 4 19mm Blade Length 24 Tooth Spacing 3 4 19mm Machine weight 8 5 lbs 3 8Kg Read the manual Warning Do not expose to rain or water Do not burn Wear safety goggles dust mask and ear protection Double insulated Keep by standers away Keep hands away ...

Page 13: ...ions A tool incorrectly assembled can cause serious injury Fig 2 Guard fixing screws 1 Fitting the Hand Guard See Fig 2 Before fitting the hand guard first remove the blade cover Fit the hand guard onto the body of the trimmer and secure it in place using the 2 screws provided Fig 3 7 Fig 4 Fig 5 Fig 6 2 Fitting the Scoop See Fig 3 6 Before fitting the scoop first loosen the two screws on the safe...

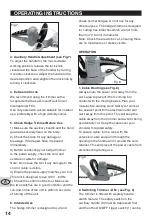
Page 14: ...e two switches are in good condition and the run down time of the unit is within 3 seconds of turning off the unit 6 Intended Use The hedge trimmer is designed to cut and shape normal hedges Do not use for any other purpose The hedge trimmer is designed for cutting tree branches which are not more than 3 4 19 mm in diameter Note Check the area to be cut ensuring there are no metal wires or stakes ...

Page 15: ...our shoulder Fig 11 Fig 12 Fig 13 5 Cutting Sequence First trim the sides from the bottom upwards This prevents debris from falling into the area which has yet to be cut se Fig 11 Try to keep the blade angled at approximately 5º to the work surface This will improve the cutting efficiency of the trimmer see Fig 12 Then cut the top of the hedge If the hedge is very long cut in stages rather than tr...

Page 16: ...e no user serviceable parts in your power tool Never use water or chemical cleaners to clean your power tool Wipe clean with a dry cloth Always store your power tool in a dry place Keep the motor ventilation slots clean Keep all working controls free of dust If you see some sparks flashing in the ventilation slots this is normal and will not damage your power tool Inspect tool cords periodically a...

Page 17: ...free service line at 1 888 334 8882 from 9 am to 9 pm Monday to Friday Eastern time Normal wear and tear including accessory wear is not covered under guarantee The product is guaranteed for 36 months if used for normal trade purposes Any guarantee is invalid if the product has been overloaded or subject to neglect improper use or an attempted repair other than by an authorized agent Heavy duty da...

Page 18: ...18 ...

Page 19: ...19 ...

Page 20: ...F CONSIGNES D UTILISATION 20 10 ...

Reviews: