A
OPERATING INSTRUCTIONS
13
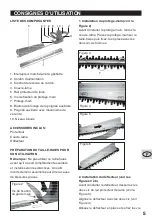
COMPONENT LIST
1. ON/OFF Trigger Switch
2. Power Cord
3. Cord Retainer
4. Blade cover
5. Blade Safety Rail
6. Hand Guard Attaching Screws
7. Hand Guard
8. Auxiliary Handle Lock Knob
9. Auxiliary Handle with Safety Mechanism
10. Spirit Level
INCLUDED ACCESSORIES:
Guard
Blade cover
Scoop
PREPARING TRIMMER FOR USE
Note:
Do not operate this trimmer until it is
assembled and installed according to the
instructions. A tool incorrectly assembled can
cause serious injury.
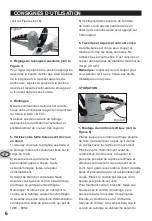
Fig 2
Guard fixing
screws
1. Fitting the Hand Guard (See Fig. 2)
Before fitting the hand guard, first remove the
blade cover. Fit the hand guard onto the body
of the trimmer and secure it in place using the
2 screws provided.
Fig 3
7
Fig 4
Fig 5
Fig 6
2.Fitting the Scoop (See Fig 3 - 6)
Before fitting the scoop, first loosen the two
screws on the safety blade rail as shown in
Fig 3.
Align the scoop on the two screws as shown
in Fig 4.
Slide the scoop until into place, tighten the
screws. (See Fig 5 & 6)
You can fit the scoop on both sides. (Left hand
or Right hand)
2
1
10
6 7 8 9
5
3


