background image


10 | 

P a g e


2.0 INSTALLATION 

2.7 Piping Leak Check 

Once 2.6 is completed. 

1)  Close return side line purge valve and 

perform leak check for a minimum of 30 
minutes at city water pressure. 


2)  Examine all piping connections for leaks. 

If leak is found isolate and eliminate. If 
leak is found and eliminated repeat 
piping line flush.


2.8 Piping Line Purge 

Once 2.7 is completed. 

1)  Once a successful leak check had been 

performed drain all water from piping 
lines.


2)  Open all drains including drains installed 

at the base of each rise.


3)  Compressed DRY air or DRY nitrogen 

may be used to assist in purging all 
piping lines


2.9 Filling the System 

1)  Fill the tank and entire piping loop 

independently with a mixture of 
propylene glycol, and potable water, see 
chart for % by volume.


2)  Use potable / distilled water.


3)  Contact Haskris for list of approved 

glycol vendors.


4)  Use a refractometer to verify percentage 

of propylene glycol.


NOTE:  

DO NOT OPERATE OUTSIDE THE 
ALLOWABLE GLYCOL PERCENTAGE 
RANGE. DO NOT USE AUTOMOTIVE 
ANTIFREEZE. DOING SO WILL DAMAGE 
PIPING LINES AND PUMP! 

PROPYLENE GLYCOL SOLUTION CONCENTRATION CHART 


For Freeze 

For Burst 


Protection 

Protection 

    
Temperature 

Volume % 

Volume % 

°F 

°C 

DOWFROST 

DOWFROST 

20 

-7 

18.8 

12.6 

10 

-12 

30.4 

20.9 

-18 

37.7 

25.1 

-10 

-23 

44 

29.3 

-20 

-29 

48.2 

31.4 


OPC 

TYPICAL TANK 

CAPACITY 

12  

12 GALLON 


NOTE: 

PROPYLENE GLYCOL 
CONCENTRATIONS LESS THAN 20% 
MAY BE AT RISK FOR BACTERIAL 
CONTAMINATION. 

PROPYLENE GLYCOL 
CONCENTRATIONS LESS THAN 30% 
MAY NOT PROVIDE ADEQUATE 
CORROSION PROTECTION. 

THE CHART SHOWN ABOVE, FIGURES 
ARE EXAMPLES AND MAY NOT BE 
APPROPRIATE TO YOUR SITUATION, 
CONTACT HASKRIS FOR ASSISSTANCE 
IN SELECTION OF THE PROPER 
GLYCOL CONCENTRATION.


Summary of Contents for OPC 12

Page 1: ...1 P a g e Instruction Manual For Haskris Systems OPC 12 Installation Start up Operation Maintenance Rev 0 0 10 10 2015 ...

Page 2: ...orksheet 12 2 12 Installer Check List 13 3 0 SYSTEM START UP 3 1 Remove Liquid Refrigerant Prior to Start Up 14 3 1 1 Energize Compressor Crankcase Heater 14 3 1 2 Failure to Energize Crankcase Heater 14 3 2 Final Inspection 14 3 2 1 Tank Level 14 3 2 2 Leaks and Line Debris 14 4 0 OPERATION 4 1 Temperature Control 15 4 1 1 Temperature Pre Set 15 4 1 2 Allowable Adjustments 15 4 1 3 Adjust Set poi...

Page 3: ...ol Adjustment 19 5 4 Propylene Glycol Change Draining the Reservoir 20 5 5 Propylene Glycol Change Draining the Piping 20 5 6 Wye Strainer 21 5 7 Condenser Cleaning 22 5 8 System Check Instructions 23 System Check Sheet 24 No Load start up Checklist 25 No Load start up Log sheet 26 Full Load Checklist 27 Full Load System Check 28 PM System Check 29 Troubleshoot Data Log 30 6 0 WARRANTY 6 1 STANDAR...

Page 4: ...e Having the serial number enables us to address problems quickly and effectively Phone 800 800 4925 Fax 330 963 0749 Email CSA hitachimed com Website www hitachimed com The website contains information addressing frequently asked questions trouble shooting guides and technical documentation 1 2 Service Support HMSA Contact HMSA if at any time you have questions encounter problems or need spare pa...

Page 5: ...2 P a g e 1 0 PRELIMINARY INFORMATION Listed below is a flowchart of the typical schedule of events for the installation and start up of the Haskris OPC Chiller ...

Page 6: ... readouts are located Access to the side panels is required to fill the reservoir or to perform maintenance and repair procedures Mount chiller to concrete pad or roof curb allowing 36 clearance all around If a level perimeter roof curb is used materials of construction thickness and any additional supports bracing should be specified by the Engineer selecting the roof curb Secure chiller to pad o...

Page 7: ...4 P a g e 2 0 INSTALLATION 2 2 System Location Continued ...

Page 8: ...5 P a g e 2 0 INSTALLATION ...

Page 9: ...essionals are familiar with local electrical codes and will be aware of specific requirements that apply to your area We recommend a service disconnect switch and time delay fusing be installed per the wiring diagram found inside your Haskris Chiller Your system will either use single phase power or three phase power Do not mount or support any electrical service disconnect directly to the chiller...

Page 10: ...rect improper pump rotation or improper phase displayed by the phase monitor Phase Monitor Factory settings Voltage line line At nameplate voltage Trip Delay At 10 seconds Unbalance At 5 Restart Delay At 180 seconds Under voltage Trip At 90 1 Apply power to chiller 2 LED on phase monitor will blink green for 180 seconds 3 LED will be green and on solid indicating all is OK 4 See photo below for er...

Page 11: ...erviced 8 Label supply and return lines over insulation with arrow indication flow direction 9 Sleeve and insulate pipe penetrations through all roof and or walls 10 Provide and install a ball valve on supply and return connections at the instrument equipment to allow isolation for service 11 Provide and install a pressure gauge 0 100psig on the supply side between the ball valve and indoor instru...

Page 12: ...YPICAL SETUP SHOWN 2 Open both supply and return purge valves and flush system with city water until water runs clear continue to flush for an additional 20 minutes NOTE DO NOT OPEN ISOLATION VALVES DURING FLUSHING PROCESS OPC Typical Connection size Model supply return 12 1 5 NPT Wye Strainer Return pressure gauge Supply valve Return valve Supply line purge valve Supply tank drain valve Return va...

Page 13: ...able water see chart for by volume 2 Use potable distilled water 3 Contact Haskris for list of approved glycol vendors 4 Use a refractometer to verify percentage of propylene glycol NOTE DO NOT OPERATE OUTSIDE THE ALLOWABLE GLYCOL PERCENTAGE RANGE DO NOT USE AUTOMOTIVE ANTIFREEZE DOING SO WILL DAMAGE PIPING LINES AND PUMP PROPYLENE GLYCOL SOLUTION CONCENTRATION CHART For Freeze For Burst Protectio...

Page 14: ...3 Remove protective cap from return line purge valve and connect hose Place other end of hose in large bucket This will act as a vent when filling piping thru the supply line purge valve 4 Open the return line purge valve 5 Open the supply line purge valve and fill piping with glycol solution 6 The use of an external pump may be required to fill the system 7 Vent air from piping during the fill pr...

Page 15: ...12 P a g e 2 0 INSTALLATION ...

Page 16: ...13 P a g e 2 0 INSTALLATION 3 1 Remove Liquid Refrigerant Prior to Start Up 3 1 1 Energize the compressor crankcase heater 12 hours prior to system start up This will help remove ...

Page 17: ...level in the storage tank will drop as the interconnecting hose and pipe fill Continue filling the reservoir until the glycol solution level in the reservoir reaches the full mark on tank Check liquid level after one week of operation 3 2 2 Leaks and Line Debris Check to make sure all external piping is leak tight and that the system is operating satisfactorily During initial operation the circula...

Page 18: ... Glycol solution temperature range is 45 F to 60 F 7 2 C to 15 6 C If a temperature setting outside this range is required please contact Haskris and we will advise you of precautions and the proper procedures to follow 4 1 5 Response Time for Adjustments While each Haskris system varies and individual design specifications may call for rapid response in temperature adjustment owners of systems wi...

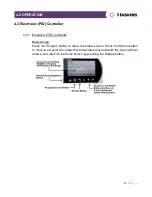
Page 19: ... Electronic PID Controller Basic Usage Press the Program button to reach the status screen Press the Return button to move to set point line adjust the temperature set point with the Up and Down arrows and return to the home screen by pressing the Escape button ...

Page 20: ... The pressure control can be found at the base of the Haskris system NOTE Adjustments to the safe operating limits of any refrigeration pressure control should be made only after a qualified refrigeration technician installs refrigerant pressure gauges on the high and low sides of the refrigeration system Low Pressure Control All refrigerated platforms include a low pressure control This control w...

Page 21: ...onfirm ambient air temperature is within range 20 F to 120 F 2 Confirm the condenser fins are clean and allow ambient air flow through the condenser 3 Verify the inlet to condenser is at least 36 from any obstruction 4 Confirm that another application is not directing hot air into the condenser inlet and the water pump is circulating cooling water pressure gauge needle indicates discharge pressure...

Page 22: ...ion If pH level is below 7 a line flush should also be performed 5 3 Propylene Glycol Percentage Adjustment If glycol solution percentage requires adjustment it may be necessary to remove some glycol solution from the system to prevent overfilling See DRAIN RESERVOIR in section 5 4 of manual 5 3 1 If Glycol percentage needs to be increased contact Haskris for an approved Glycol and vendor list 5 3...

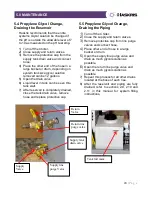
Page 23: ...oir is completely drained close the tank drain valve remove hose and replace protective cap 5 5 Propylene Glycol Change Draining the Piping 1 Turn off the Chiller 2 Close the supply and return valves 3 Remove protective cap from line purge valves and connect hose 4 Place other end of hose in a large bucket or drum 5 Open the supply line purge valve and drain as much glycol solution as possible 6 O...

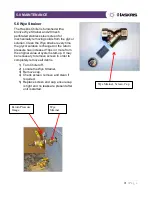
Page 24: ... the glycol solution is changed or the return pressure has increased 10psi or more from the original value at system start up It may be necessary to remove screen in order to completely remove all debris 1 Turn Chiller off 2 Locate the Wye Strainer 3 Remove cap 4 Check screen remove and clean if required 5 Replace screen and cap ensure cap is tight and no leaks are present after unit is started Wy...

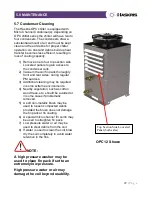
Page 25: ...ing regular PM services 3 Additional cleaning may be required in some extreme environments 4 Nearby vegetation such as cotton wood trees etc should be avoided or in some cases if problematic removed 5 A soft non metallic brush may be used to loosen compacted debris provided the brush does not damage the fin pack or fin coating 6 A special micro channel fin comb may be used to straighten fin pack 7...

Page 26: ...23 P a g e 6 0 WARRANTY 5 0 MAINTENANCE ...

Page 27: ...24 P a g e 6 0 WARRANTY 5 0 MAINTENANCE ...

Page 28: ...25 P a g e 6 0 WARRANTY 5 0 MAINTENANCE ...

Page 29: ...26 P a g e 6 0 WARRANTY 5 0 MAINTENANCE ...

Page 30: ...27 P a g e 6 0 WARRANTY 5 0 MAINTENANCE ...

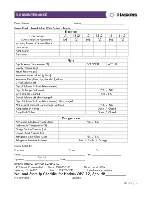
Page 31: ...28 P a g e 6 0 WARRANTY 5 0 MAINTENANCE PM System Check for Haskris OPC 12 S N HB ______________________________ Project Name ______________________________ Location____________________________________ ...

Page 32: ...29 P a g e 6 0 WARRANTY 5 0 MAINTENANCE ...

Page 33: ...30 P a g e 6 0 WARRANTY 5 0 MAINTENANCE 6 1 Standard Product Warranty 6 0 WARRANTY ...

Page 34: ...up or shipment from Haskris in no event longer than 18 months from the date of shipment The warranty includes parts and on site labor Any warranty labor must be authorized by Haskris in writing prior to proceeding with the repairs Parts Provisions Parts warranty does not include consumable items such as filtration elements Replacement parts furnished during the system warranty are covered until th...

Page 35: ...32 P a g e 6 0 WARRANTY 7 0 ELECTRICAL AND PIPING DIAGRAMS ...

Page 36: ...33 P a g e 6 0 WARRANTY 7 0 ELECTRICAL AND PIPING DIAGRAMS ...

Page 37: ...34 P a g e SERVICE NOTES Sales 001 847 956 6420 sales haskris com Service 001 847 956 6420 service haskris com Maintenance Action Performed By Date ...

Reviews: