background image


HAVE A QUESTION?  CALL THE HART HELP DESK at 800-252-2818, or EMAIL US AT [email protected] 

SET UP SCANNERS

SET UP SCANNERS


♦ 

Now that the 

access  point 

is up and running, you can start 

registering the scanners.   

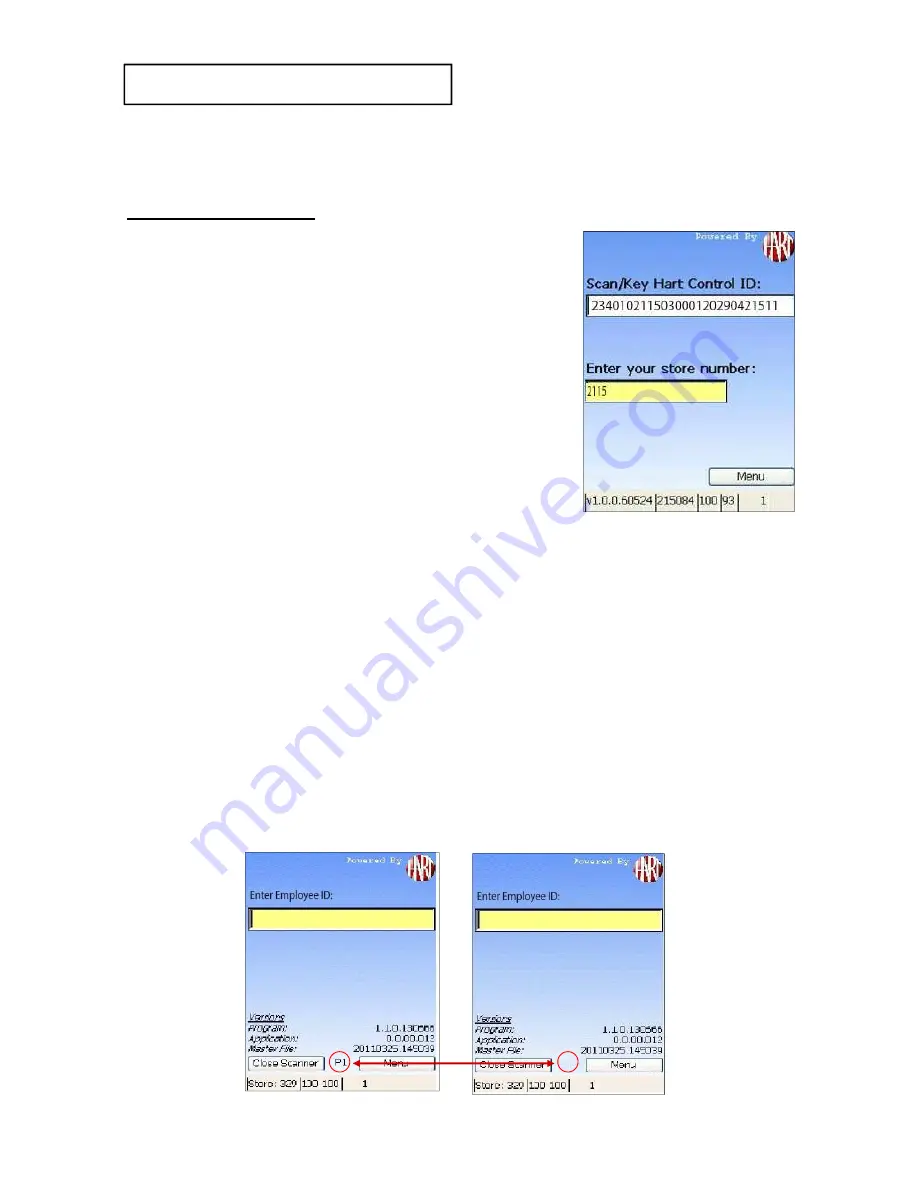
Set Up Scanners: 

1. 

Scan

 the Hart Control ID bar code. 

2. 

Key

  your  Store  Number  and 

press 

ENT

 (Enter).   

3.  The  scanners  will 

register  shortly 

after  pressing  ENT 

and 

will 

automatically  pick-up  any  Master  File 
updates.  Be  sure  to  Press  the 
Continue 

button 

to 

finish 

the 

registration.  

4.  The “Enter Employee ID” screen will be displayed. 

5. 

Repeat 

steps 1 and 2 for all scanners. 

6. 


Look  on  the  Hart  website  to 

verify  the  Scanners 

have Registered Successfully: 


After  entering  the  store  number,  the  “

P

”  should  disappear 

from the bottom of the screen.  


If the “

P

” still appears, it could mean your Access Point is 

not  connected,  or  the  Scanners  are  out  of  range  of  the 
access point.


Page - 7 

Summary of Contents for EZCORP

Page 1: ...MPONENTS SUPPLIES RECEIVE COMPONENTS SUPPLIES SET UP ACCESS POINTS SET UP ACCESS POINTS HART DEVICE HART DEVICE SET UP SCANNERS SET UP SCANNERS SCANNER FUNCTIONS SCANNER FUNCTIONS HOW TO ACCESS REPORT...

Page 2: ...You will use the same boxes to return the components to Hart Systems Inside one equipment box you will find Scanners Access Point Scanner chargers USB Modems 1 Verizon and 1 AT T Use the air card that...

Page 3: ...ntory Auditor s Reference Guide this can be printed from the Website Hart Control ID Bar Code you will need this form to set up the scanners for your store This form should be printed from the Hart We...

Page 4: ...high as reasonably possible 2 Try to avoid any known areas with difficult cell coverage 3 In the event that the location has no cell coverage please call the Hart Help Desk for further instructions T...

Page 5: ...vent that the location has no cell coverage call the Hart Help Desk for further instructions Power Switch Power Adapter Port USB Port 5 Once the Access Point has been connected to the power outlet and...

Page 6: ...EYS Increases screen brightness Decreases screen brightness Increases volume Decreases volume FUNC Function Key Auxiliary Scan Button Auxiliary Scan Button SCAN Press to scan bar codes ESC Used to cle...

Page 7: ...N CALL THE HART HELP DESK at 800 252 2818 or EMAIL US AT help hartsystems com Page 6 Signal Strength Store Employee ID Battery Strength Pending Items Indicator P Scanner contains items to be transmitt...

Page 8: ...shortly after pressing ENT and will automatically pick up any Master File updates Be sure to Press the Continue button to finish the registration 4 The Enter Employee ID screen will be displayed 5 Re...

Page 9: ...f the store you are scanning Sales Floor Back Room E Comm Safe Then you can scan the item ENTER ITEM SCREEN ENTER ITEM SCREEN Page 8 The file must be available for your store before you register the s...

Page 10: ...rat Item Description SCAN ITEMS SCAN ITEMS SCANNER FUNCTIONS SCANNER FUNCTIONS Continued Continued AUDIT ASSIGNENT ITEM s AUDIT ASSIGNENT ITEM s 1 The scanner will alert you if a scanned item is not o...

Page 11: ...r the filed one character at a time 1 You can only scan or key valid EZ Corp Item s 2 If the scanner makes a special sound Follow the instructions on the scanner screen Page 10 1 If an item is scanned...

Page 12: ...ring the scanner closer to the access point If you still cannot transmit check the access point SCANNER FUNCTIONS SCANNER FUNCTIONS Continued Continued VERY IMPORTANT VERY IMPORTANT The scanner will a...

Page 13: ...nner will return to the Enter Employee ID screen NOTE If there are any Pending item s P in the scanner for example Employee is logging out while out of range of the access point the scanner must be br...

Page 14: ...op Clicking on any of the underlined items will drill down to more details in that category 7 You can access additional reports for your store by clicking on ALL Reports located at the upper left corn...

Page 15: ...em area MFG and the item description Report displays total cost and total item s on the bottom MISSING ITEM REPORT This is the most important report since it lists all of the items that are Missing th...

Page 16: ...rview Missing Items Inventory Overview Drill down on any of the blue bolded reports or click on the All Reports Drop down menu to see a complete list of reports The Inventory Overview will indicate th...

Page 17: ...ssociated with the audit review the Inventory Overview via the Hart website on the left From this report fill in the required information on the Hart Control ID Form This is your official documentatio...

Page 18: ...confirm that your missing Item list is correct If you have confirmed then click Yes and continue If you would like to continue verifying click No 3 Once the close inventory process has been completed...

Page 19: ...ind the cradles Second place the scanners into the foam cavities Third place any paperwork in the box Finally remember to include all batteries whether used or unused and chargers Place the batteries...

Page 20: ......

Page 21: ...scan something that is not part of the audit 1 The scanner will advise you that the item is not on the Audit Assignment File 2 Press ENT to continue How do I know if a scanner has transmitted successf...

Page 22: ......

Page 23: ...ease Enter 1 for The Help Desk You can also contact the Hart Help Desk via e mail When sending an email please remember to include your Company Name Store Location Personal Name Phone Number A Brief M...

Page 24: ......

Reviews: