Harman Kardon System 13828 Owner'S Manual Download Page 38

38

SYSTEM SETUP

While DVD-Audio also is output only in analog
form, many discs also contain PCM, Dolby Digital
or DTS digital tracks and may be played through
the 

Digital Audio Outputs

.

Delay Unit:

This setting selects the unit of

distance used for calculating delay times when
the 

AUDIO ADJUSTMENTS

menu is

activated. The default unit is feet, but you may
select meters.

Bass Management:

This setting activates the

AUDIO ADJUSTMENTS

menu’s bass

management settings, to optimize playback of
DVD-Audio discs through the 

Analog Audio

Outputs

. Three settings are available:

• 

O n

: This is the default setting. If your receiver

or processor is equipped with “direct” 6-chan-
nel inputs and the receiver is not capable of
performing bass management on these inputs,
then leave this setting on the DVD 28 at the
default of 

O N

, and proceed to the 

AUDIO

ADJUSTMENTS

menu to program the

bass management settings.

• 

Bypass

: If your receiver or processor is

equipped with 6-channel inputs and is capable
of adjusting the bass management settings
(speaker size, output levels and delay times)
for its 6-channel analog inputs, then 
Harman Kardon recommends that you change
this setting to 

Bypass

, and adjust the bass

management settings on your receiver.

• 

Stereo

: If your receiver or processor is not

equipped with 6-channel inputs at all, then
change this setting to 

Stereo

, which will

send a downmixed 2-channel signal to the

Analog Audio Outputs

, for use with any

2-channel analog input on your receiver.
You may then select an analog surround mode
available on your receiver.

Audio Adjustments Submenu

This menu allows you to adjust bass manage-
ment settings that control the audio output of
the 

6-Channel Audio Outputs

for speaker

size, output level and delay times. The proper
adjustment of these settings is key to optimal
reproduction of DVD-Audio discs, when the 
DVD 28 is used with a receiver or processor that
does not have audio adjustment capabilities for
the direct inputs.

Important Note:

In order to avoid audio

problems, when the DVD 28 is connected to a
receiver or processor that does have the
capability to adjust bass management
parameters for its multichannel inputs, you have
the option to either use that capability or adjust
the settings in the DVD 28. The preferred method
of operation is to use the receiver for these
adjustments. In that case, remember to set the

Bass Management

setting in the

AUDIO SETUP

menu to 

Bypass

. If you

make the adjustments using the DVD 28's
settings, it is important that the receiver's
settings for the multichannel direct inputs be
disabled, or set to “Large” for the speaker sizes
and “0” for the level adjustments and delay
times, unless these settings are also used for the
receiver’s other source inputs, in which case they
should be left the way you set them when you
configured your receiver. If you have any
questions about the capabilities of your receiver
or processor, we recommend that you consult its
owner’s manual or the manufacturer’s Web site
for further information.

If your receiver or processor does not have 
6-channel analog inputs, make sure to select

Stereo

for the 

Bass Management

setting in the 

AUDIO SETUP

menu. Then

connect the 

Analog Audio Outputs

to any

2-channel analog inputs on your receiver.

Before proceeding with the DVD 28’s audio
setup adjustments, we recommend that you first
use the menu system in your receiver or proces-
sor to ascertain the settings already established
for “Speaker Size,” “Output Level” and “Delay
Time,” which may be set as a distance. Write
these settings down to refer to during the
configuration process.
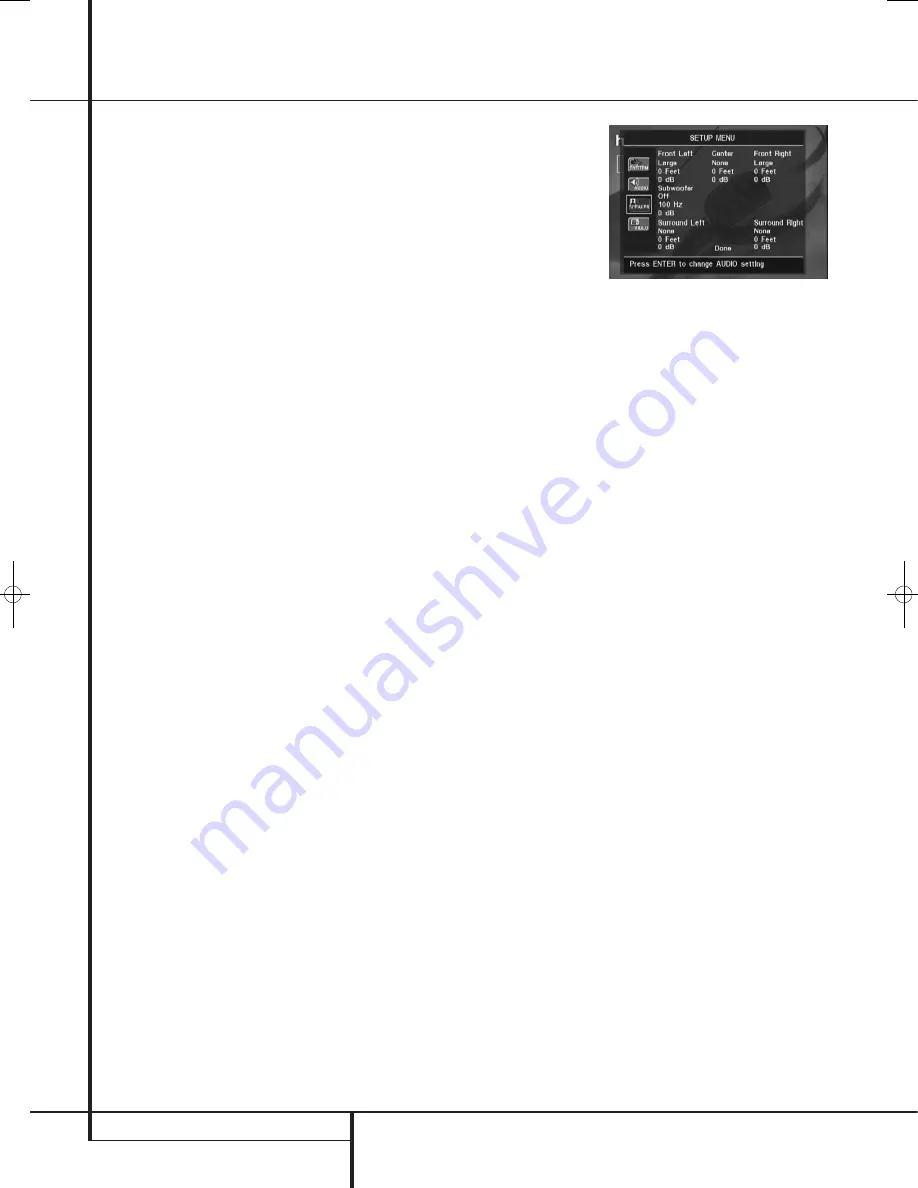
Press the 

Setup Button

9

to activate the

Setup menu; then use the 

KL

Navigation

Buttons

until the 

AUDIO ADJUST-

MENTS

submenu is highlighted within a white

outline box, and press the 

OK Button

A

.

The following adjustments are available on the

AUDIO ADJUSTMENTS

menu for each

speaker position. It is recommended that you
cycle through the adjustments for each speaker
position using the 

KLM N

Navigation

Buttons

to enter the settings that are

appropriate for your system. Pressing the 

OK

Button

A

displays a dropdown menu with the

selections available for that setting. Use the

KL

Navigation Buttons

to highlight

the appropriate setting, and then press the 

OK

Button

A

to select it.

You will notice that the adjustments for speaker
size and distance (used to calculate delay times)
are set in tandem for the front left and right
speaker pair, and for the surround left and right
speaker pair. Changing the settings for either
speaker in these pairs also affects that setting for
the other speaker in that pair. For this reason, it
is important to select the same brand and model
for both speakers in each pair, and also to place
them at about the same distance from the
listening position.

Speaker Size:

Speaker size is part of the bass

management system which determines which
frequencies are sent to the specific speaker
position, and which are sent to the subwoofer.
The designation of “size” does not refer to the
speaker’s physical size, but rather to the lowest
frequency a speaker can handle. For this purpose,
“full-range” speakers are considered “large,”
while those not capable of reproduction below
100Hz are considered “small.” In general, if you
are using a packaged speaker system with
smaller satellite-type speakers and a subwoofer,
you should select 

Small

for all five speakers.

Large

should only be selected if you are

certain that your speakers are capable of
handling extreme low-frequency sounds.

At the subwoofer setting, you can select the fre-
quency under which bass information is directed
to the 

Subwoofer Output

and above which

the remaining signal is directed to all other
speakers. When making these selections, choose
the crossover frequency that is closest to the
lower frequency limit of your "SMALL" speakers.
This figure is normally printed in the owner’s
manual or data sheet for the speakers; or consult
the speaker’s manufacturer.

System Setup

38277_AVR138_DVD28_ENG  23/07/08  18:36  Side 38

Summary of Contents for System 13828

Page 1: ...ENGLISH System 13828 AVR 138 Audio Video Receiver DVD 28 Digital Versatile Disc Player OWNER S MANUAL Open Close DVD 28 AUDIO VIDEO...

Page 2: ...ic front panel control number in a circle indicates a rear panel connection 0 number in an oval indicates a button or indicator on the remote Declaration of Conformity We Harman Consumer Group Inc 2 r...

Page 3: ...ature accompa nying the product WARNING To reduce the risk of fire or electric shock do not expose this apparatus to rain or moisture Do Not Open the Cabinet There are no user serviceable components i...

Page 4: ...et Up Down F RDS Select Progressive Scan Interlaced Button G Playlist H A B I DTS Neo 6 Mode Selector J Stereo Mode Selector K Logic 7 Selector L Dim Button M Transport Buttons N Skip Up Down Buttons...

Page 5: ...rocess of configuring the AVR s Bass Management System for use with the type of speakers used in your system Once the but ton has been pressed use the K L buttons to select the channel you wish to set...

Page 6: ...e If the Player Information Screen is active the changes will be displayed on screen Random DVD Press for RANDOM playback in random order Tone Mode Pressing this button enables or disables the Bass an...

Page 7: ...the 6 Channel Direct Input as the audio source AM FM Tuner Select Press this button to select the AVR s tuner as the listening choice Pressing this button when the tuner is in use will select between...

Page 8: ...ker Channel Input Indicators These indicators are multipurpose indicating either the speaker type selected for each channel or the incoming data signal configuration The left center right right surrou...

Page 9: ...of input sources B RDS Select Button Press this button to display the various messages that are part of the RDS data system of the AVR s tuner See page 24 for more information on RDS C Surround Mode S...

Page 10: ...accordance with the instructions supplied with the antenna Video 1 Audio Outputs Connect these jacks to the RECORD INPUT audio jacks on a VCR or any other Audio recorder DVD Audio Inputs Connect these...

Page 11: ...Connect the Y Pr Pb component video outputs of a DVD player to these jacks Note All component inputs outputs can be used for RGB signals too in the same way as described for the Y Pr Pb signals then...

Page 12: ...loss of clarity or resolution we suggest that you use high quality speaker cable Many brands of cable are available and the choice of cable may be influenced by the distance between your speakers and...

Page 13: ...input of your television monitor or video projector 6 If your DVD player and monitor both have component video connections connect the component outputs of the DVD player to the Video 1 Component Vid...

Page 14: ...ed Before using the unit you will probably want to change these settings for most inputs so that they are properly configured to reflect the use of digital or analog inputs the type of speakers instal...

Page 15: ...ubwoofer output too as long as SUB L R LFE is selected in the SUB WOOFER line in this menu see below This mode is needed if no Center speaker is used Note that for the use of Logic 7C surround mode a...

Page 16: ...ars in the Main Information Display F and the Surround Mode Indicator D for Surround Off is lit the AVR will pass the analog source material directly through to the front left and right speakers bypas...

Page 17: ...about the operation of the surround channels While some assume that sound should always be coming from each speaker most of the time there will be little or no sound in the surround channels This is b...

Page 18: ...adjustment made will be effective for the surround mode currently selected also when other inputs are selected using the same surround mode To adjust the output level with all other surround modes us...

Page 19: ...d to the Video Out puts and Video Monitor Output This permits simultaneous viewing and listening to different sources When a Video source is selected its audio signal will be fed to the speakers and t...

Page 20: ...the input just selected until another choice is made NOTE The name of each Surround Mode will scroll through the Main Information Display F while the modes are being selected To avoid exiting from the...

Page 21: ...there is no discrete center channel signal This will be displayed for Dolby Digital bit streams that have stereo program material A 1 tells you that there is only a mono channel available in the Dolb...

Page 22: ...is available and when the machine is in a standard play mode 2 Although the AVR will decode virtually all DVD movies CDs and HDTV sources it is possible that some future digital sources may not be com...

Page 23: ...te station presets and recalled from a 30 position memory Station Selection 1 Press the AM FM Tuner Select button on the remote to select the tuner as an input The tuner may be selected from the front...

Page 24: ...pendent on the radio station not the AVR Some RDS stations may not include some of these additional features If the data required for the selected mode is not being transmitted the Main Information Di...

Page 25: ...Main Power Switch is pushed into a live outlet Check to see if outlet is switch controlled Display lights but no sound Intermittent input connections Make certain that all input and speaker or pictur...

Page 26: ...ed as an entire movie or program There can be as many chapters within a title as the producers decide to include Most discs include only one title but some may have more than one to give you a Double...

Page 27: ...le with the DVD Similarly although the DVD is capable of a wide range of features not all discs include every capability of the DVD system For example although the DVD is compatible with multi angle d...

Page 28: ...anged DVD playback will continue from the same point on the disc when the Play Button is pressed again Resume will also work if the unit was turned off To stop a disc and have play start from the begi...

Page 29: ...ese indicators will show the current track time time remaining in the current track or the total remaining time on the disc NOTE The Indicators DEF will also display text messages about the DVD s stat...

Page 30: ...our TV has a SCART socket you can connect a SCART cable to your TV and to your DVD Player for improved video quality The SCART cable carries both audio and video You can select Composite Video or RGB...

Page 31: ...RT connectors rather than with a normal video input yellow cinch In that case the SCART connection should be used providing the audio signal too Separate analog audio connections to TV are needed only...

Page 32: ...uts on your receiver or processor NOTES FOR ANALOG AUDIO If you wish to use the DVD 28 as the input for a multiroom system the Analog Audio Outputs should be connected to the standard analog left righ...

Page 33: ...clude copy protection codes that do not permit digital output For full 96kHz fidelity from these discs use the analog outputs of the DVD IMPORTANT If your surround processor D A converter does not sup...

Page 34: ...the remote Once one of these buttons is pressed the fast search will continue until PLAY is pressed There are four fast play speeds Each press of the SEARCH Buttons will cycle to the next speed in th...

Page 35: ...isc Before playing DivX movie discs please note the following multi session DVD containing Windows Media Audio files may not be supported open session discs are not supported the DVD player does not s...

Page 36: ...until the desired option is highlighted then press the OK Button A to select that option A Main Menu Line B Submenus C Actual Settings D Instruction Line Most DVDs are created to allow setup menus to...

Page 37: ...d audio language Every time a disc is played that contains this audio language it will be activated automatically If you do not find your preferred language in the list of options you can select your...

Page 38: ...f your receiver or processor we recommend that you consult its owner s manual or the manufacturer s Web site for further information If your receiver or processor does not have 6 channel analog inputs...

Page 39: ...te video that is compatible with any television set or video display Two choices are available Progressive Select this option if you have a video display that is compatible with input sources of 480P...

Page 40: ...cale in the middle line needs to have the same clear difference between each bar as before the contrast adjustment If not go back to the brightness adjustment and repeat step 3 and then the contrast a...

Page 41: ...e Display Type The Time Search function enables you to start playback at any point in the program Use the M N Navigation Buttons to highlight this display and the numbers will change to dashes You may...

Page 42: ...isplays the disc type Audio This line displays the type of audio recorded on the disc usually Stereo Playlist With this line highlighted press the OK Button A to change the order in which the tracks a...

Page 43: ...will appear on screen indicating the new repeat mode Each press of the Repeat Button will cycle through the available repeat modes To end Repeat play continue pressing the Repeat Button until the Off...

Page 44: ...ay and the Time Search function is not available MP3 or WMA Disc Playback MP3 and WMA discs may contain 200 tracks or even more To get the best overview about all tracks on the disc and their names an...

Page 45: ...nd any comments For WMA and JPEG files only the file name will appear JPEG Playback The DVD 28 is capable of recognizing JPEG still image files and displaying them When a disc or folder containing JPE...

Page 46: ...l audio settings DVD disc is in fast or slow mode There is no audio playback on DVD discs during fast or slow modes Surround receiver not compatible Use analog audio outputs with 96kHz PCM audio DVD A...

Page 47: ...ration 35dB 1kHz Selectivity 400kHz 70dB Image Rejection 80dB IF Rejection 90dB AM Tuner Section Frequency Range 522 1620kHz Signal to Noise Ratio 45dB Usable Sensitivity Loop 500 V Distortion 1kHz 50...

Page 48: ...t 4 0 kg Depth measurement includes knobs and connectors Height measurement includes feet and chassis All specifications subject to change without notice Harman Kardon and Harman International are reg...

Page 49: ...ENGLISH TECHNICAL SPECIFICATIONS 49...

Page 50: ...250 Crossways Park Drive Woodbury New York 11797 www harmankardon com Harman Consumer Group Inc 2 route de Tours 72500 Ch teau du Loir France 2008 Harman Kardon Incorporated Part No CQX1A1382Z...

Reviews: