background image

Buttons to select the next channel. Repeat the procedure to enter the
output level offset, if needed, that brings all of the channels to the same
output volume. You may need to repeat this procedure more than once 
to accurately set the levels.

The DVD 48 includes a built-in test tone to assist you with setting
Speaker Levels. Navigate to the Test tone line and use the 

/

Buttons to select the Manual or Auto test tone.

• 

Manual:

Navigate to the desired speaker’s line within the submenu,

press the Enter Button and the test tone will play from that speaker.
The test tone will not play from another speaker until you move the
cursor to its line and press the Enter Button. You may adjust the
speaker’s level setting while the test tone is playing.

• 

Auto:

When this option is selected, the Test Tone dialog box will

appear and ask you to confirm your selection. Press the 

Button to

highlight “Yes”, and press the Enter Button to proceed. The test tone
will automatically be played by each speaker in order, starting with the
front left speaker. It is not possible to make any adjustments to the
level settings while the test tone is playing in Auto mode.

• 

Off:

Navigate back to the Test tone line and use the 

/

Buttons 

to select Off to stop the test tone.

Initialize:

Set Initialize to On to reset all of the Speaker Level settings to

their factory defaults. When prompted by the Initialize dialog box, press
the 

Button to highlight “Yes”, and press the Enter Button to proceed.

When you have finished adjusting the speaker output levels, press the
Return Button to return to the SPEAKER SETUP menu (Figure 24). The
two remaining items are used to configure the speaker settings that will
be used when an SACD disc is playing. These settings have no effect
for other playback modes.

• 

SACD Config:

This setting allows you to select from one of three

preset speaker-size configurations, as indicated in Table 2. Select the
configuration that most closely matches your system. If you have
fewer than six speakers, use the 2-Channel Analog Audio Outputs 
for SACD discs, and change the Analog Output setting in the Audio
Setup menu to Stereo.

• 

CUT-OFF Frequency:

This setting selects the frequency below which

all signals are sent to the subwoofer. Consult the speaker frequency
response specifications that you obtained at the beginning of the
Speaker Setup process, and locate the speaker with the lowest 
low-frequency limit. Set the CUT-OFF Frequency to the setting closest
to or just above that low-frequency limit. The available settings are
60Hz, 80Hz, 100Hz and 120Hz.

When you have finished configuring your speakers, press the Return
Button to return to the SYSTEM SETUP menu (Figure 20).

Step Four – Video Setup

In this step you may make a few adjustments to ensure that the video 
signal is output in a way that is compatible with your video display.

Press the Setup Button and use the 

/

¤

Buttons to highlight the

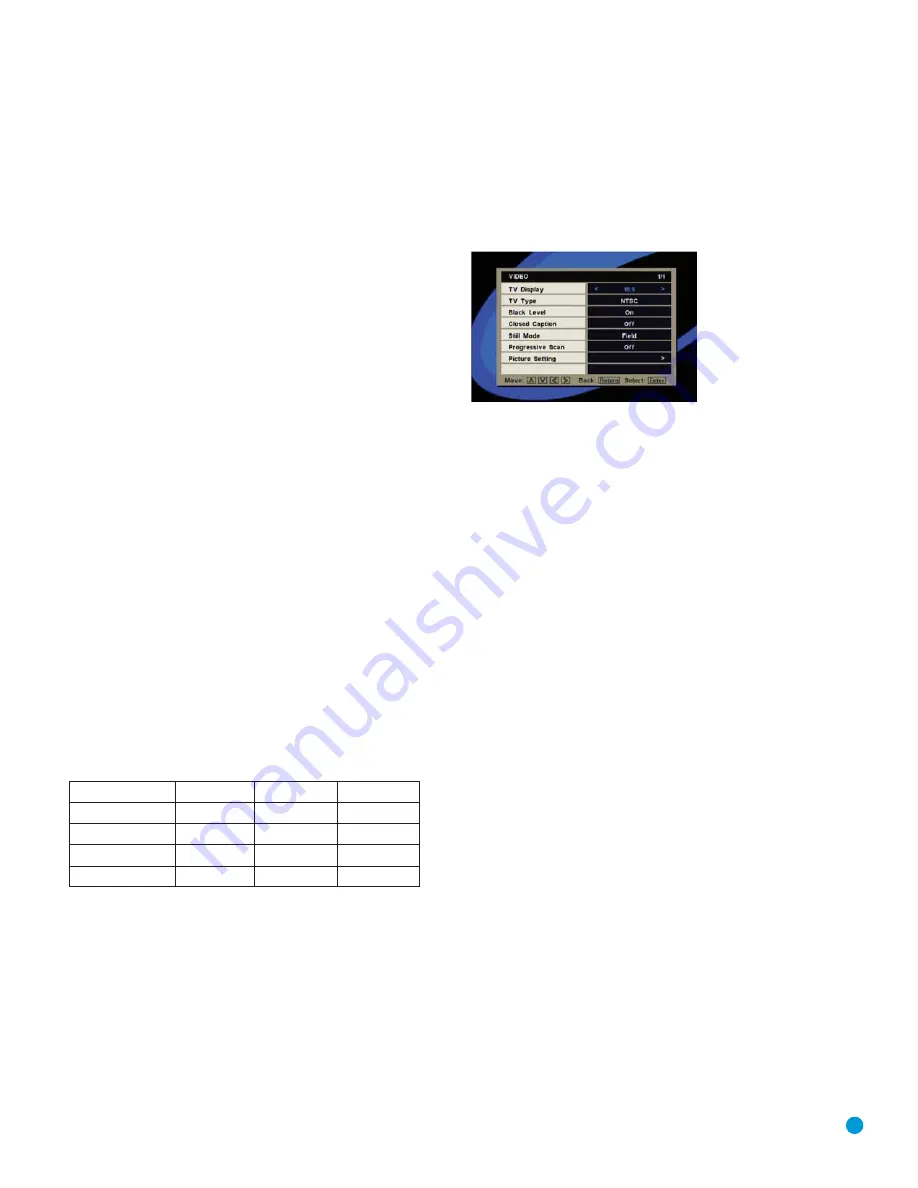
Video tab. See Figure 20. Press the Enter Button to view the VIDEO
SETUP menu (Figure 28).

Figure 28 – Video Setup Menu Screen

TV Display:

This setting selects the aspect ratio of video programming.

Your choice should be made according to the shape of your video 
display and your personal preferences. Three choices are available:

• 

16:9:

If you have a widescreen (16:9) display, or a display that has 

a widescreen mode, choose this setting. The DVD 48 will adjust the
output for widescreen movies so that they fill the entire screen in the
proper aspect ratio. However, a disc recorded in the 4:3 aspect ratio
will appear as a boxed image in the center, with black or gray bars on
the left and right side of the screen. If the widescreen option is chosen
and a widescreen movie is played on a conventional 4:3 aspect ratio
set, the image will be distorted due to vertical compression.

• 

4:3 Letterbox:

If you have a standard, 4:3 aspect ratio video display,

choose this setting to see the entire frame of the movie as it is
recorded on the disc without any image cutoff at the left and right
sides. While this allows widescreen movies to be shown in their entirety,
they will occupy a smaller portion of the screen and black “letterbox”
bars may appear at the top and bottom of the screen.

• 

4:3 Pan Scan:

This setting is useful only with a few specially encoded

DVDs; with all others, the letterbox format fits best when a standard
4:3 aspect ratio video display is in use. For these special DVDs
widescreen movies will fill the entire screen. However, you won’t see
parts of the picture (particularly the right and left edges). Most discs
produced in a widescreen format can’t be cropped in this fashion,
which means the black bars will appear at the top and bottom of 
the screen (letterbox format). Some widescreen DVDs, particularly
anamorphic types, may be shown with original width but spread 
vertically. With these discs, the letterbox format must be selected.

TV Type:

This setting allows you to specify whether your video display

uses the NTSC (used in North America) or PAL (used in Europe and
other parts of the world) video format. The DVD 48 is capable of recog-
nizing and playing DVDs in the PAL format, but only if they are encoded
for Region 1 or Region 0 (open region, playable worldwide). The DVD 48
automatically converts the video to the NTSC format for output to your
video display. If you have inadvertently changed this setting to PAL and
your picture is too distorted for you to view the on-screen menus, you
may reset the setting to the default NTSC by following these steps:

Speaker

Config 1

Config 2

Config 3

Front L/R

Large

Small

Large

Center

Large

Small

Small

Surround L/R

Large 

Small

Small

Subwoofer

On

On

Off

29

INITIAL SETUP

Summary of Contents for DVD 48

Page 1: ...DVD 48 DVD AUDIO VIDEO AND SACD PLAYER WITH HDMI...

Page 2: ...oduct be sure the antenna or cable system is grounded so as to provide some protection against voltage surges and built up static charges Article 810 of the National Electrical Code ANSI NFPA 70 provi...

Page 3: ...y exit from the apparatus 11 Only use the attachments accessories specified by the manufacturer 12 Use only with a cart stand tripod bracket or table specified by the manufacturer or sold with the app...

Page 4: ...h with clean water Wipe it dry immediately with a dry cloth NEVER use benzene aerosol cleaners thinner alcohol or any other volatile cleaning agent Do not use abrasive cleaners as they may damage the...

Page 5: ...29 Step Four Video Setup 32 Step Five Disc Settings 34 OPERATION 34 Turning On the DVD 48 34 Playback Basics 37 DVD Playback 41 CD Playback 43 MP3 Windows Media and JPEG Playback 45 VCD Playback 46 P...

Page 6: ...ars ago and in the intervening years we have witnessed amazing advances in consumer electronics With our line of high performance DVD players Harman Kardon offers a complete home theater solution sour...

Page 7: ...discs may contain menus and chapters while other discs simply contain tracks Version 2 0 discs may offer interactive playback control PBC The DVD 48 will NOT play the following DVD discs with a Region...

Page 8: ...ation of the disc The DVD 48 is compatible with most discs recorded with files encoded using MP3 or Windows Media 9 up to 320kbps as well as JPEG still images However variations in the encoder or code...

Page 9: ...icator Standby On Play Skip Search Reverse Remote IR Sensor Pause Skip Search Forward Open Close NOTE To make it easier to follow the instructions throughout the manual that refer to this illustration...

Page 10: ...mage of the frozen action will appear on screen In Pause mode you may access the Frame by Frame Advance and Slow Search functions by pressing the forward or reverse Step or Skip Buttons on the remote...

Page 11: ...specific HDMI Output video resolution and the DVD 48 successfully determines that the video display is capable of handling that resolution its indicator will light and will appear briefly in the Messa...

Page 12: ...ns DO NOT connect it to a conventional analog input jack Component Video Outputs If your television or video display and receiver are component video capable and your display does not have an HDMI inp...

Page 13: ...axial Digital Audio Output Composite Video Output 2 Channel Analog Audio Outputs 6 Channel Analog Audio Outputs NOTE To make it easier to follow the instructions throughout the manual that refer to th...

Page 14: ...ks on a CD in random order on or off Numeric Keys Use these buttons to directly enter a track or chapter number to skip to that section of the disc or to enter a password for the parental control syst...

Page 15: ...Close Audio Clear Program Repeat A B Repeat Random Group Audio Mode Previous Step Skip Search Slow Reverse Angle Backlight System Setup Play Video Off Pause Navigation NOTE To make it easier to follow...

Page 16: ...og Output setting which is also found in the AUDIO SETUP menu There are two available settings Multichannel and Stereo The first button press displays the current setting and each additional press tog...

Page 17: ...rs in the system will be calibrated to sound equally loud at the listening position most sound tracks use the surround speaker for ambient effects only and they program their materials to steer very l...

Page 18: ...hould not be confused and you should not connect coaxial digital audio outputs to analog inputs or vice versa See Figure 1 Figure 1 Coaxial Digital Audio Optical digital audio connectors are normally...

Page 19: ...HDMI Connection Analog Video There are three types of analog video connections composite video S video and component video Composite video is the basic connection most commonly available The jack is...

Page 20: ...sensor is difficult such as inside a cabinet or facing away from the listener you may connect an external IR receiver such as the optional Harman Kardon HE 1000 to the Remote IR Input jack If your re...

Page 21: ...o Outputs See Figure 11 Figure 11 2 Channel Analog Audio Outputs NOTE The DVD 48 is capable of downmixing 5 1 channel materials to the 2 channel format but it is necessary to adjust the Analog Output...

Page 22: ...n connect the DVD 48 s 2 Channel Analog Audio Outputs to any pair of analog audio inputs on the receiver See Figure 11 Figure 11 repeated 2 Channel Analog Audio Outputs Even if you connected one of th...

Page 23: ...on the front panel or remote See Figure 17 Figure 17 Open Close Button Pressing the Open Close Button will also open the disc drawer c Press the Play Button on the front panel or remote If a disc is p...

Page 24: ...a last resort you may perform a system reset that will require you to reenter all user settings Press and hold the Clear Button on the remote for 5 seconds The display will blink and all user setting...

Page 25: ...djust this setting Remove the current disc for this setting to have an effect Check the disc s jacket to find out whether it is a hybrid SACD many SACD discs are not OSD Language This setting selects...

Page 26: ...the front left and right channel information will be available at the 2 Channel Analog Audio Outputs and the center and surround information will be lost If you wish to use the 2 Channel Analog Audio...

Page 27: ...For this reason it is important to select the same brand and model for both speakers in each pair and also to place them at about the same distance from the listening position Before proceeding with...

Page 28: ...less than the Surround L R speakers The Front L R distance must be the same as or no more than 15 feet greater than the Surround L R distance For optimal audio performance we recommend that you place...

Page 29: ...ay make a few adjustments to ensure that the video signal is output in a way that is compatible with your video display Press the Setup Button and use the Buttons to highlight the Video tab See Figure...

Page 30: ...o display that has Y Pr Pb component inputs but which is not capable of displaying high scan rate or HD signals NOTES The Scan Type only affects the Component Video Outputs If you have connected the D...

Page 31: ...video displays during video processing to insure that lighter and darker portions of the picture appear equally intense When viewing a CRT video display in a darkened room or a brightly lit room twea...

Page 32: ...CM signals Off This setting mutes the audio output If the DVD 48 is connected to a receiver or processor that is not capable of accessing the audio portion of the HDMI signal select this setting NOTES...

Page 33: ...appear prompting you to enter a four digit language code Look up the desired language code in Table A11 in the appendix and use the Numeric Keys to enter it This setting will display Others rather th...

Page 34: ...sunlight or sources such as hot air ducts or leave it in a car parked in direct sunlight as there can be a considerable rise in temperature inside the car After playing store the disc in its case Do n...

Page 35: ...me or for that disc As explained in more detail below pressing the Status Button displays the appropriate Status Display When a DVD is detected playback will automatically begin and the screen will sh...

Page 36: ...for other features Accordingly the Slow Play Reverse and Step Advance features are not available with these discs When a camera icon appears on screen or the Angle Indicator appears on the front pane...

Page 37: ...ation Buttons to explore the enlarged picture once the information box with the zoom ratio and playback time no longer appears on screen Some discs are created in a way that prevents the Zoom feature...

Page 38: ...audio selection is MLP Lossless the DVD Audio standard format in 5 1 channels at a resolution of 96kHz and 24 bits NOTE With the DVD Audio mode setting in the GENERAL SETUP menu set to DVD Audio only...

Page 39: ...you must change the audio soundtrack using the disc s menu system Press the Disc Menu Button to display the disc s menu and then use the Navigation Buttons to make your selection following the naviga...

Page 40: ...manually stopped The Repeat Rep indicator will light in the front panel display A B Repeat Play The Repeat A B function allows you to select any portion of a DVD Video disc and have it repeat continuo...

Page 41: ...Programmed Play You may program a playlist of up to 20 tracks in which you select the tracks for play in a new order or skip some tracks at your discretion See the Programming a Playlist section for m...

Page 42: ...he Disc setting will indicate whether the Analog Output setting in the AUDIO SETUP menu was set to Multichannel or Stereo 2 channel You may only change this setting in the AUDIO SETUP menu and it will...

Page 43: ...A discs may contain 200 or more tracks To get the best view of all tracks on the disc including their names and to select them comfortably use the on screen display rather than the front panel display...

Page 44: ...the first track To see and play tracks from other folders you must first use the Navigation Buttons until the desired folder is selected Press the Enter Button to expand the folder navigate to the des...

Page 45: ...Button or the Enter Button to begin play You will find that the Stop Pause Track Skip Forward and Reverse Slow Forward and Reverse Step Forward and Reverse Fast Forward and Reverse Search Repeat and...

Page 46: ...Step 02 4 Continue entering the disc track numbers into the desired program step positions You need not do so in step order you may use the Navigation Buttons to navigate to any step in the list 5 Pre...

Page 47: ...re not available simultaneously Press the HDMI Button on the remote to turn the HDMI Output on or off When the HDMI Output is on the Component Video Outputs are deactivated and vice versa Disc does no...

Page 48: ...is displayed in the Incorrect match of aspect ratio Change aspect ratio settings wrong aspect ratio settings to disc Disc will not copy to VCR Copy protection Many DVDs are encoded with copy protecti...

Page 49: ...Weight 8 8 lb 4kg Depth measurement includes knobs buttons and terminal connections Height measurement includes feet and chassis All features and specifications are subject to change without notice H...

Page 50: ...ed photographs These files may be burned onto a compact disc The DVD 48 is capable of recognizing JPEG files and enabling you to view them on your video screen MP3 Files MP3 is an audio compression fo...

Page 51: ...pling frequency in a single bit format but eliminated the downsampling required to fit 74 minutes of audio on a standard CD they could preserve a much higher quality of audio that more closely approxi...

Page 52: ...etting Default Your Setting Analog Output Multi channel Digital Out All LPCM Output 48kHz Night Listening Mode Off Table A3 Speaker Setup Menu Settings Setting Default Your Setting SA CD Config Config...

Page 53: ...ssive Scan Off Table A8 Picture Settings Access this menu from the Video Setup menu Setting Default Your Setting Brightness 0 Contrast 0 Hue 0 Sharpness Mid 0 Sharpness High 0 DNR 0 Gamma 0 Chroma lev...

Page 54: ...m 7776 Maltese 7784 Language Code Maori 7773 Marathi 7782 Moldavian 7779 Mongolian 7778 Naru 7865 Nepali 7869 Norwegian 7879 Occitan 7967 Oriya 7982 Oromo Afan 7977 Panjabi 8065 Pashto Pushto 8083 Per...

Page 55: ...STAPLE INVOICE HERE...

Page 56: ...250 Crossways Park Drive Woodbury New York 11797 www harmankardon com 2007 Harman International Industries Incorporated All rights reserved Part No CQX1A1189Z...

Reviews: