


ZONE
II
REMOTE CONTROL FUNCTIONS 13
ZONE
II
REMOTE CONTROL FUNCTIONS
å
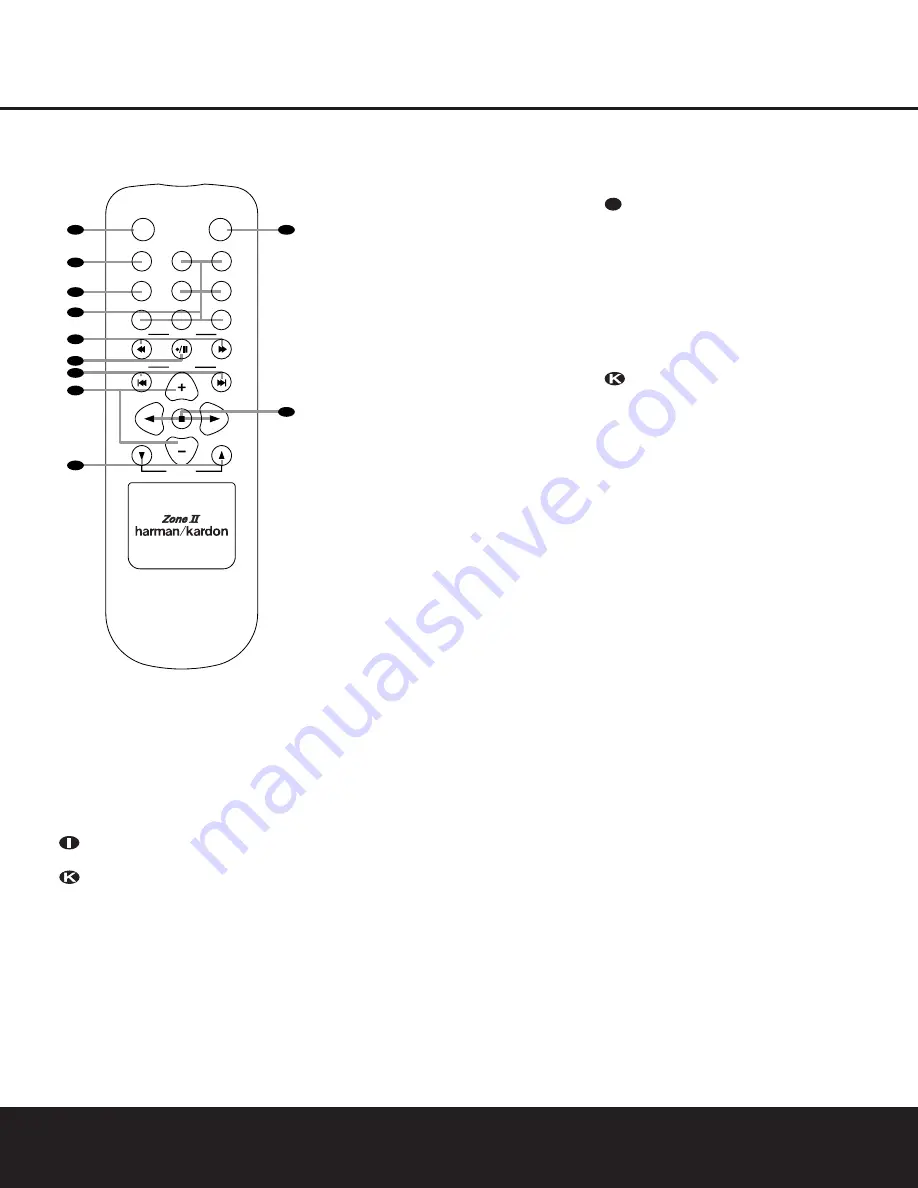
Power Off:
When used in the room where the
DPR 1001 is located, press this button to place the
unit in Standby. When it is used in a remote room with
a sensor that is connected to the
Multiroom IR Jack
£
, this button turns the Multiroom system off.
∫
AVR Selector:
Press this button to turn on the
DPR 1001. The input in use when the unit was last on
will be selected.
ç
AM/FM Tuner Select:
Press this button to
select the Tuner as the input to the Multiroom system.
Press it again to change between the AM and FM
bands.
∂
Input Selectors:
When the DPR 1001 is off,
press one of these buttons to select a specific input
and turn the unit on. When the unit is already in use,
pressing one of these buttons will change the input.
≠
Tuning Up/Down – Fast-Play:
These buttons
may be used to change the frequency of the tuner.
These buttons may also control the Fast-Play or Fast-
Reverse functions of compatible Harman Kardon CD,
DVD or cassette decks in the same room, or from a
remote room when an IR link is connected to the
DPR 1001.
ƒ
Record/Pause:
Press this button to activate
either the Record or Pause function on compatible
Harman Kardon CD, DVD or Cassette Deck products.
©
Preset Up/Down – Track Skip:
When the
DPR 1001’s tuner is selected as the input source,
these buttons will move up or down through the list of
stations that have been stored in the preset memory.
When a CD or DVD changer or player is selected,
these buttons activate the Forward or Reverse Track or
Chapter Skip functions.
˙
Disc Skip:
Press this button to change discs on
compatible Harman Kardon CD or DVD changers or
players.
Volume Up/Down:
When used in the room
where the DPR 1001 is located, press this button to
raise or lower the volume in that room. When it is
used in a remote room with a sensor that is con-
nected to the
Multiroom IR Jack
£
, this button will
raise or lower the volume in the remote room.
∆
Play Forward/Reverse/Stop:
Press these but-
tons to control compatible Harman Kardon CD, DVD or
cassette players.
Mute:
When used in the room where the
DPR 1001 is located, press this button to temporarily
silence the unit. When it is used in a remote room with
a sensor that is connected to the
Multiroom IR Jack
£
, this button will temporarily silence the feed to the
remote room only. Press the button again to return to
the previous volume level.
I
å
Power Off
∫
AVR Selector
ç
AM/FM Tuner Select
∂
Input Selectors
≠
Tuning Up/Down – Fast-Play
ƒ
Record/Pause
©
Preset/Up/Down – Track Skip
˙
Disc Skip
Volume Up/Down
∆
Play Forward/Reverse/Stop
Mute
POWER
OFF
MUTE
AVR
AM//FM
VID 1
VID 3
DVD
CD
TAPE
DN
TUNING
PRESET
VOLUME
DISC SKIP
DISC SKIP
UP
DN
UP
VID 4
VID 2
G
A
B
C
D
E
F
H
I
K
J
NOTES:
• The Zone II remote may be used in either the same room where the DPR 1001 is located, or it may be used
in a separate room with an optional infrared sensor that is connected to the DPR 1001’s
Multiroom IR Input
Jack
£
. When it is used in the same room as the DPR 1001, it will control the functions of the DPR 1001 or
any compatible Harman Kardon products in that room. When it is used in a separate room via a sensor connected
to the
Multiroom IR Jack
£
, the buttons for power, input source, volume and mute will control the source
and volume for the second zone, as connected to the
Multiroom Out Jacks
ª
. (See page 31 for complete
information on using the Multiroom system.)
• To make it easier to follow the installation instructions that refer to this illustration, a larger copy may be
downloaded from the Product Support section at www.harmankardon.com.


