Harken Air 250 User And Maintenance Manual Download Page 35


Rev.#0


35 


16.1 Internal maintenance procedure 


1. Maintenance products 

The maintenance products listed below must be used: 
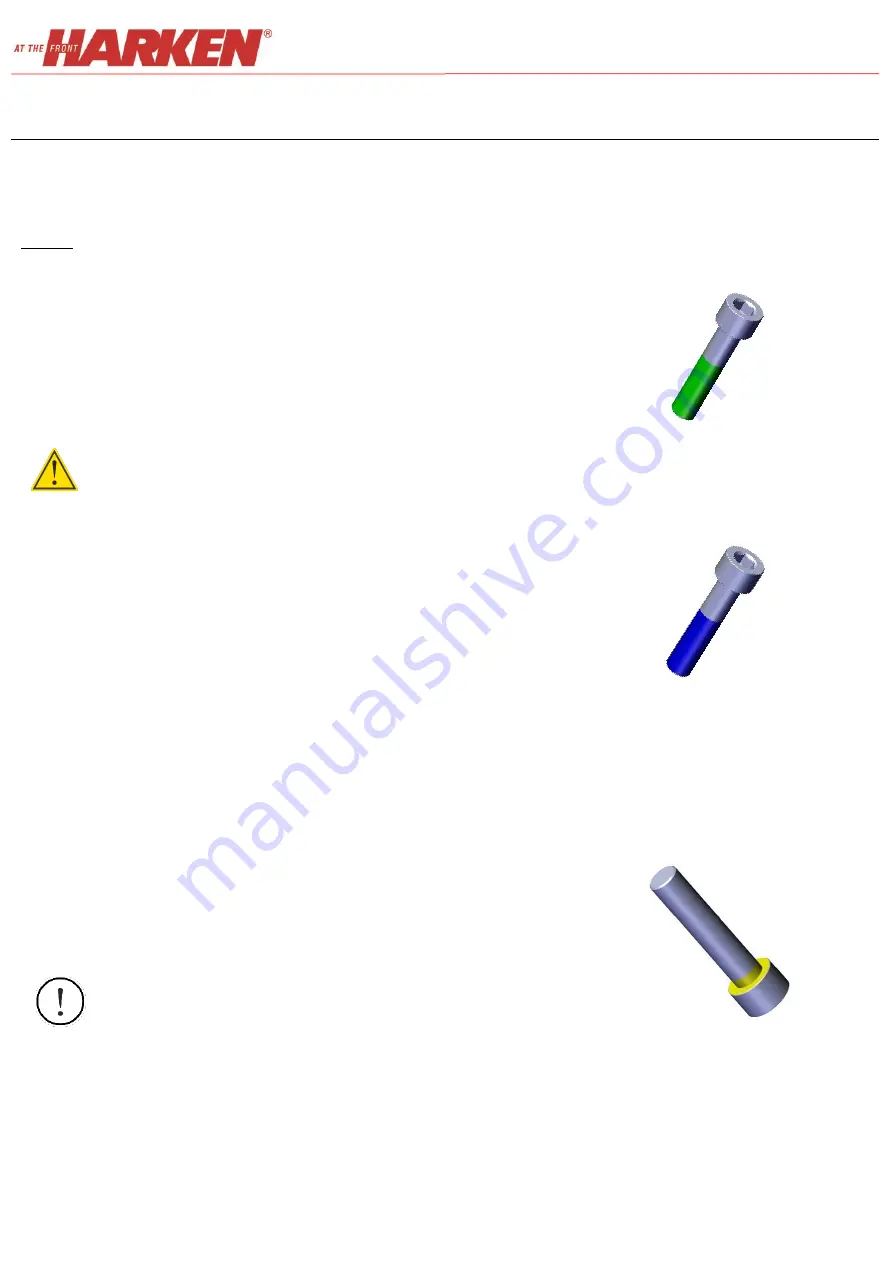
 

Types 


Strong threadlocker 

– Green (i.e. LOCTITE

®

 270)   

Clean the parts and apply the product, spreading it all over the thread 
as shown. 

Assemble the parts and wait at least 45 minutes before use. To 
remove screws sealed with threadlocker, you may need to heat the 
parts to reduce the effect. 

WARNING! 

Do not apply this product to screws into carbon components. 


Medium threadlocker 

– Blue (i.e. LOCTITE

®

 243)  

Clean the parts and apply the product, spreading it all over the thread 
as shown. 

Assemble the parts and wait at least 45 minutes before use.  

Generally, for use on all screws, requires no heating before removal.  


OIL Harken - BK4521 

Apply the oil to the parts indicated in the internal maintenance 
pocedure below, taking care to lubricate the surfaces completely.  

Rotate or slide the oiled parts to distribute the product in a uniform 
way. Remember to oil the pawls and do not use grease on them. 


Anti-corrosive lubricants (i.e. TEFGEL

®

Apply sacrificial anodes or anti corrosive lubricants to prevent 
electrolytic corrosion between different metals in contact with 
aluminum 

NOTE! Apply the anti-corrosive lubricant with a brush on clean 
surfaces. 


Summary of Contents for Air 250

Page 1: ...USER AND MAINTENANCE MANUAL Winch Air 250 300...

Page 2: ...Rev 0 2...

Page 3: ...ion procedures 20 13 2 1 Deck integrated version 20 13 2 2 Aluminum base installation 23 13 2 3 Mounting templates 23 13 2 4 Sealing templates 25 14 Self Tailing positioning 27 14 1 Self Tailing drill...

Page 4: ...perator person who has attended specialisation and training about the use of the winch User person who uses the winch regularly Maximum working load MWL maximum value of the load the winch can bear 2...

Page 5: ...the winch will void the warranty of the winch itself and the Harken products to which it may be connected Refer to the warranty on the web site www harken com Do not apply to the winch loads greater t...

Page 6: ...en winch must not be used if unauthorized modifications or interventions have been carried out Do not use the winch for hauling mooring the boat or weighing the anchor Do not wind any line turn around...

Page 7: ...ith a special care to the racers needs but it may be effectively employed on cruiser yachts and used to trim and hoist sails Winch Air is produced in the Self Tailing version ST Harken provides two ve...

Page 8: ...the slowest speed but allows higher loads to recover small amounts of line 7 3 Maximum Working Load Winch Air 250 is designed to put a maximum working load MWL of 3000Kg Winch Air 300 is designed to...

Page 9: ...are required contact Harken Customer Service at highprofileyachtservice harken it Version Features Size AKC aluminum base ceramic coated aluminum drum carbon top Winch Air 250 AAC aluminum base black...

Page 10: ...ight hand version and in the left hand version Viewing the winch from above in the right hand version drum rotates clockwise in the left hand version drum rotates counterclockwise Version Weights Kg A...

Page 11: ...ed with Harken deck mold In this case winch is not equipped with base winch is directly installed on the laminated deck The winch is supplied with a plastic disposable base useful for shipping and tra...

Page 12: ...of the diameters indicated below NOTE In the Self Tailing top Winch Air have jaws that adapt automatically to the following rope diameters range 5 10mm For the rope usage see the Rope use chapter of t...

Page 13: ...Rev 0 13 10 Winch outline Winch Air Manual handled Winch Air Manual handled Base sheave version...

Page 14: ...Rev 0 14 Winch Air 250 Manual handled Deck integration Winch Air 250 Manual handled Base sheave deck integration...

Page 15: ...Rev 0 15 Winch Air Powered handled Base sheave Winch Air Powered handled...

Page 16: ...the system while the recovery speed of the winch is proportional to the oil flow The hydraulic vertical versions of the Winch Air can be equipped by a hydraulic motor of 200cc displacement Electric eq...

Page 17: ...hat the rope is not parallel to the base of the winch to avoid line overrides around the drum which could seriously damage the winch and or put the crew in danger NOTE The correct entry line angle is...

Page 18: ...Rev 0 18 WARNING Situation to avoid incorrect entry angle with the rope parallel to the base of the winch Beware of possible overrides around the drum INCORRECT...

Page 19: ...if this is compatible with the space available below deck NOTE For the rope positioning see the Use chapter of this manual After correctly positioning the final pinion with respect to the load check t...

Page 20: ...ce harken it WARNING Installation must be done before installing the deck over the hull To install the Winch Air deck integrated follow the steps of the procedure below 1 Harken mold Harken provides t...

Page 21: ...rted into the customer s deck mold 3 Mold orientation The Harken mold must be placed following the proper orientation as indicated NOTE The input shaft is 24mm eccentric shifted relative to the winch...

Page 22: ...of tolerance of 0 10mm the depth of deck cutout of 46mm with a range tolerance of 0 50 a fiberglass layer on the upper surface of the portion of the laminated deck 5 Installation After lamination the...

Page 23: ...ved and the base of the winch is isolated deck installation can begin To install the Winch Air manual and powered follow the steps of the procedure shown below 13 2 3 Mounting templates 1 Place the dr...

Page 24: ...l the fixing holes with a suitable marine adhesive sealant as shown in the following image green lines To apply the adhesive sealant clean and remove all grease from winch bottom surface and apply the...

Page 25: ...semble the winch until step 15 of the Maintenance chapter of this manual 6 Position the base of the winch on the deck and bolt it in place using through deck screws of a suitable length for the thickn...

Page 26: ...Harken takes no responsibility for incorrect installation of its winches or for an incorrect choice of mounting screws WARNING Fix the winch to the deck using screws in A4 70 stainless steel WARNING T...

Page 27: ...st drill two 5 5mm holes radially in the top of the winch the position of the two holes determines the rope usage 14 1 Self Tailing drilling procedure For the drilling operation of the self tailing fo...

Page 28: ...assembly on the top NOTE Use a 5 5mm diameter drill NOTE If there s the need to lock the rotation of the peeler user must insert two pins at the bottom of the peeler assembly To request the two pins c...

Page 29: ...chosen The correct line entry 6 is granted NOTE Take turns of the rope around the drum the more turns are taken the lower the load the user has to handle The more turns around the drum are taken the m...

Page 30: ...act on a leverage available at the bottom of the winch NOTE User handles the leverage with a string NOTE If the kit is not already installed in the winch user must remove the insert of the first spee...

Page 31: ...1 Move counterclockwise the lock of the Winch handle Fig 2 Insert the lock in winch handle in the handle socket Fig 3 To operate the 1st speed turn the handle clockwise for a right hand winch Fig 3 On...

Page 32: ...he two commands mounted on the deck The winch will operate in first speed very fast but with little power used to recover a lot of line under little load 15 4 2 Operating second speed on a powered win...

Page 33: ...first of the two commands mounted on the deck The central button of the winch will remain in the disengaged position The winch will operate at third speed slow but very powerful This speed is particul...

Page 34: ...h pressure hose to eliminate any threads from lines and traces of oil or other slippery substances that could reduce the grip of the lines on the drum WARNING Do not use Winch Metal Polish BK4520 on a...

Page 35: ...arts and apply the product spreading it all over the thread as shown Assemble the parts and wait at least 45 minutes before use Generally for use on all screws requires no heating before removal OIL H...

Page 36: ...sted NOTE Apply the anti seize with a brush Vaseline oil This product is used to lubricate balls and roller bearings WARNING Do not use Vaseline oil on the pawls Do not use Vaseline oil on the bearing...

Page 37: ...flat bladed screwdriver head width 10 13mm Set of allen wrenches n 3 5 Rags 3 Disassemble procedure NOTE The steps shown in the disassemble procedure below are valid for manual and powered versions e...

Page 38: ...Rev 0 38 For powered versions only Step 1M Step 1 1M For powered versions only Step 1 2M For powered versions only...

Page 39: ...Rev 0 39 Step 3 Step 4 Allen wrench size 3 Step 2 Step 5 Use grease on the balls race Use anti corrosive lubricant under the head of the screws...

Page 40: ...Rev 0 40 Step 7 Step 6 Step 8 Use anti corrosive lubricant under the head of the screws...

Page 41: ...Rev 0 41 Use anti corrosive lubricant under the head of the screws Step 9 Allen wrench size 3...

Page 42: ...Rev 0 42 Step 12 Step 10 Step 11 The pin of the spring is indexed into the housing grey item...

Page 43: ...Rev 0 43 Step 13 Step 14 Allen wrench size 5 Use anti corrosive lubricant under the head of the screws...

Page 44: ...Rev 0 44 Step 15 Step 16 Step 17 NOTE For deck integrated only apply anti corrosive lubricant on the indicated surfaces...

Page 45: ...Rev 0 45 Step 18 Step 19 Step 20 Step 21...

Page 46: ...Rev 0 46 Step 22 Step 23 Step 24...

Page 47: ...the spring correctly as shown below WARNING In the assembling phase position the pawls correctly in the housing as shown below Once they have been lubricated with oil check that all the pawls can be...

Page 48: ...ect rod is not correctly screwed insert the disconnect rod in the hub down to the bottom and with a medium flat bladed screwdriver twist on the rod while holding the drum PROBLEMS POSSIBLE CAUSES POSS...

Page 49: ...Rev 0 49 19 Ordering spare parts Spare parts can be requested from Harken as described in the Harken Limited Worldwide Warranty available on the web site http www harken com...

Page 50: ...gi 14 22070 Limido Comasco CO Italy Tel 39 031 3523511 Email info harken it Web http www harken com Tech Service Email techservice harken it Customer Service Tel 39 031 3523511 Email highprofileyachts...

Reviews: