background image

10

STEP 10

STEP 11

STEP 12

  Attach firebox to cooking chamber 

with M6 x 12 bolts (AA).

  Tighten all firebox bolts securely.

  Attach firebox to firebox support 

with M6 x 12 bolts (AA) and M6 nuts 
(DD).

  Attach side handle to the smoking 

chamber with M6 x 12 botls (AA) and 
M6 nuts (DD).

M6*12 4PCS

M6*12 2PCS

M6 Nut 2PCS

M6*12 4PCS

M6 Nut 4PCS

fig. 10

fig. 11

fig. 12

AA

AA

DD

AA

DD

Summary of Contents for HK0537

Page 1: ...HARK HICKORY PIT OFFSET SMOKER Owner s Manual ASSEMBLY CARE SAFETY INSTRUCTIONS Product Code HK0527 MODEL HK0537 FOR OUTDOOR USE ONLY ...

Page 2: ......
Page 3: ...d freight charges both ways are paid by the owner No liability is accepted for loss or damage during transit The appliance is installed by a qualified person and operated and maintained in accordance with the instructions supplied Repairs or service must be carried out by an authorised person Installation must conform to the applicable Gas Electrical and Building standards laid down by the local c...

Page 4: ...not fully open it could fall back to closed position and cause an injury Always wear shoes and protective clothing during operation of this smoker Never use this smoker as a heater The smoker is HOT while in use and after use Always wear protective gloves or mitts when operating the smoker Avoid touching hot surfaces at all times Keep CHILDREN AND PETS away from the smoker at all times Do not allo...

Page 5: ...e 15 Ash Tray 16 Air Damper Handle 17 Ash Tray Handle 18 Air Damper 19 Wheel Axle 20 Wheel Legs Short 2 21 Wheels 2 22 Bottom Wire Rack 23 Long Legs 2 24 Front Shelf Bracket Right NO Name 25 Front Shelf Bracket Left 26 Grease Bucket Holder 27 Beer Bottle Opener 28 Side Handle 29 S Hooks 30 Smoke Stack 31 Smoke Stack Damper 32 Sealing Gasket 33 Grease Bucket 34 Large Baffle 35 Small Baffle 4 1 8 9 ...

Page 6: ...EQUIRED Hardware Description M6 x 12 Bolt 46 AA Picture Qty M5 x 12 Bolt 4 BB 2 CC M6 Nut 32 DD 1 EE 4 FF M12 Nut 16 GG M5 Nut Flat Washer M6 Lock Nut Silver Phillips Head Screwdriver Not included Adjustable Wrench Not included ...

Page 7: ...sembly right side firebox side with M6 x 12 botls AA M6 nuts DD and flat washers GG Note Keep the bolts and nuts loose They can be tightened after the wheels and bottom shelf are assembled Insert the bottom shelf into mounted legs Attach remaining two legs by inserting the hooks of the wire rack through the holes in the legs and then attaching to the cooking chamber with M6 x 12 bolts AA M6 nuts D...

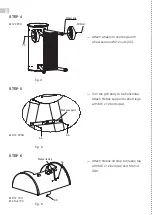
Page 8: ...the grill body to be horizontal Attach firebox support to short legs with M6 x 12 bolts AA Attach firebox lid stop to firebox top with M6 x 12 bolt AA and M6 nut DD fig 4 fig 5 fig 6 M12 2PCS M6 12 1PC M6 Nut 1PC M6 12 2PCS Wheel axle CC M12 Nut AA AA Firebox support Firebox lid stop AA DD ...

Page 9: ...12 bolts AA Insert two M6 X 12 bolts half way into the firebox elliptical cut outs as shown Attach firebox assembly to smoking chamber by aligning the slots on the smoking chamber to the two M6 x 12 bolts and slide into place as shown M6 12 2PCS M6 12 6PCS AA 5 0MM Approx AA M6 x 12 Bolt ...

Page 10: ... AA Tighten all firebox bolts securely Attach firebox to firebox support with M6 x 12 bolts AA and M6 nuts DD Attach side handle to the smoking chamber with M6 x 12 botls AA and M6 nuts DD M6 12 4PCS M6 12 2PCS M6 Nut 2PCS M6 12 4PCS M6 Nut 4PCS fig 10 fig 11 fig 12 AA AA DD AA DD ...

Page 11: ...x 12 bolts BB and M5 nuts FF Attach smoke stack and smoke stack gasket to the smoking chamber with M6 x 12 bolts AA and M6 nuts DD Insure that the gasket is in between the smoke stack and smoking chamber Remove cap nut and spring from smoke stack Place smoke stack damper over the bolt at the top of the smoke stack Then place the smoke stack damper spring over the bolt and tighten with cap nut Smok...

Page 12: ...e slots on front shelf brackets as shown and then attaching to smoking chamber with M6 x 12 bolts AA and M6 nuts DD Screw temperature gauge fully into lid Slightly unscrew gauge until gauge is in an upright position Use pre attached nut to lock into place Attach smoking chamber lid by sliding the hinge pins into the lid hinge holes on the smoking chamber as shown Secure with one hinge bolt and one...

Page 13: ...ith M6 nut DD Note While making the above installations insure the air damper handle passes through the bottom opening with the curved slot This will make sure you can completely open and close the air damper fig 20 Remove pre attached hinge bolt and washer from firebox lid hinge pins Then attach firebox lid by sliding the hinge pins into the lid hinge holes on the firebox chamber as shown Secure ...

Page 14: ...P 24 M5 12 2PCS M5 Nut 2PCS fig 22 fig 23 Insert ash drawer assembly into firebox assembly as shown Attach four S hooks to side handle Attach ash drawer handle to ash drawer with M5 x 12 bolts BB and M5 nuts FF fig 24 BB FF ...

Page 15: ...chamber Fit baffle plates above the charcoal grates in the cooking chamber Place three cooking grates over the baffle plates in the cooking chamber Place firebox charcoal grate into the bottom of the firebox Place two firebox cooking grates over the charcoal grate fig 25 ...

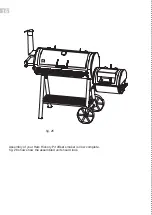
Page 16: ...16 Assembly of your Hark Hickory Pit offset smoker is now complete fig 26 shows how the assembled unit should look fig 26 ...

Page 17: ... hours The longer and the more gradually heat rises the better Care should be taken not to scrape or rub any surface during the curing process After you have burned your fire for 2 hours or more you will notice a shiny black coating developing on the inside of your smoker This is a protective resin that comes from the burning wood This resin will help seal the inside of the smoker for many fantast...

Page 18: ...st as it will get wet and hold moisture over time Ash contains corrosive elements that will rust through any thickness of steel It is advised that you clean out any ash or coal remains after every cook Always allow the smoker and the ash to thoroughly cool before cleaning and never dispose of hot ashes in a rubbish bin Use a protective grill cover to prolong life and store your Hark Hickory Pit of...

Page 19: ...y are dry and able to burn Light using firelighters or paper and as the fire burns add larger pieces of wood to increase the fire Always wear protective BBQ mitts when lighting your fire Lighting your fire using a charcoal starter Fill the charcoal starter with charcoal or briquettes Place three firelighters on your charcoal grate where you plan to build your fire Light the firelighters and then p...

Page 20: ...ne Single layer of coals Used for cooking the food c Cool Zone No Coals Used for warming or resting the food if it starts to burn Smoking or Slow Cooking For smoking or slow cooking the fire is built in the Firebox and the food is cooked slowly in the Cooking Chamber The smoke and heat will pass indirectly through the opening between the Firebox and the Cooking Chamber and will smoke cook the food...

Page 21: ...part 15 to make it easy to clean and dispose of the ash Remember this will get hot and a protective BBQ mitt should be used when handling this part Also allow the smoker to fully cool before cleaning out your ash This can also be used when first starting the smoker to allow more oxygen into the fire or can be used during the cooking process to regulate air flow in conjunction with the Air Damper D...

Page 22: ...COOKING INSTRUCTIONS For detailed instructions on how to cook with your Hark Hickory Pit offset smoker and to obtain tailored recipes visit our website at www hark com au YEAR WARRANTY After Sales Support Telephone 1300 799 787 03 9702 8823 Email service hark com au PLEASE NOTE One common mistake when using an offset smoker is to build the fire too big The Hark Hickory Pit offset smoker is very ef...

Page 23: ...Hark Enterprises Pty Ltd 19 25 Cyber Loop Dandenong South VIC 3175 T 1300 799 787 E service hark com au W www hark com au ...

Reviews: