7
C.
ASSEMBLY INSTRUCTIONS
STEP 1
STEP 2
STEP
fig. 1
fig. 2
— Remove the lid from the smoking
chamber by removing bolt and
washer and sliding the hinge pins
on the lid out of the hinge holes on
the cooking chamber. Set bolts and
washers aside for step 18.
— Place the grill body assembly on its
end. Make sure that another person
is holding the grill body assembly
steady.
— Attach one long leg to the grill body
assembly left side (smoke stack
side) with M6 x 12 bolts (AA), M6
nuts (DD) and flat washers (GG).
— Attach one short leg to grill body
assembly right side (firebox side)
with M6 x 12 botls (AA), M6 nuts
(DD) and flat washers (GG).
Note: Keep the bolts and nuts
loose.They can be tightened after
the wheels and bottom shelf are
assembled.
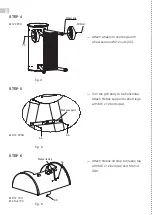
— Insert the bottom shelf into mounted
legs.
— Attach remaining two legs by
inserting the hooks of the wire
rack through the holes in the legs,
and then attaching to the cooking
chamber with M6 x 12 bolts (AA), M6
nuts (DD) and flat washers (GG).
Make sure that the wheel legs (short
legs) is on the side of the off-set
firebox with the firebox hole (right
side). Tighten all leg bolts.
fig. 3
Short leg
Long leg
AA
DD
GG
AA
DD
GG
M6*12 8PCS
M6 Nut 8PCS
Flat Washer 8PCS
M6*12 8PCS
M6 Nut 8PCS
Flat Washer 8PCS
Smoking chamber
Bolt
Washer
Long leg
S
Short leg
S
Summary of Contents for HK0537
Page 2: ......


