FINAL INSTALLATION
14
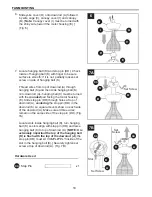
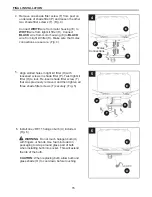
3. Remove one fitter plate screw (J) from fitter plate
(on underside of motor) and loosen the other two
fitter plate screws (J). Align slotted holes in middle
of shade fitter (P) with loosened screws in fitter
plate, allowing molex connections from motor
housing (E) to come through hole in middle of
shade fitter (P). Twist shade fitter (P) to lock.
Re-insert fitter plate screw (J) that was just
removed, and then tighten all three fitter plate
screws (J) securely. (Fig. 3)
Fitter
Plate
3
E
P
J
Molex
Connections
Upward Arc
2.
AA
Blade Screw x9
Lock Washer x9
BB
Hardware Used
AA
BB
2
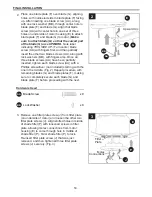
Place one blade plate (F) over blade (G), aligning
holes, with numbered side in blade plate (F) facing
up. After inserting one blade screw (AA), along
with one lock washer (BB), through center hole in
blade plate (F) and blade (G), align that blade
screw (AA) with center hole in one set of three
holes on underside of motor housing (E) to attach
blade plate (F) and blade (G) to motor. (
Make
sure to attach blade (G) so that the curved part
of the blade (G) arcs UPWARD. Note label
indicating THIS SIDE UP
.) Turn center blade
screw (AA) with fingers first, and then partially
insert the other two blade screws (AA), along with
lock washers (BB), with fingers also. Once all
three blade screws (AA) have been partially
inserted, tighten each blade screw (AA) with a
Phillips screwdriver (not included) starting with the
one in the middle. (Fig. 2) Repeat procedure with
remaining blades (G) and blade plates (F), making
sure to completely secure each blade (G) and
blade plate (F) before proceeding with the next.
G
E
F


