Training Workbook: HAPPY HCD-1501 Operation and Maintenance
Education Department
Chapter 2: Machine Setup & Orientation
29
Machine Setup
Control Panel 2
Design Transfer
Transfer via USB Connection
3. Install
HAPPYLINK
.
Install 3.07 or
newer for Vista 64
or Windows 7.
Design Transfer
4. Click
to install the
appropriate USB
driver for your
Windows Operating
system.
1. Run the CD that
came with your
machine
before
connecting your
HAPPY machine to
your computer.
2. Wait
for the CD install screen to appear.
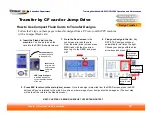
5. Launch the HAPPYLINK program
you installed in
Step 3.
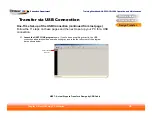
6. Click on File…Options
until the dialog box shown below
appears. Ensure that the dialog box is set as shown below,
then click OK.
check “compatible”
set to 12 needles
set to USB
no borer
HAPPYLINK program window
One-Time Set-up of the USB Connection (continued from last page)
Follow the steps on these pages to set up your PC for a USB connection. You
’
ll
only need to do this once.
For 64-bit versions of
Windows Vista and all
versions of Windows 7,
choose USB-COM. You’ll
have to find the port# after
connecting your Happy
machine via USB cable
and letting the driver set
up, as in the next page.
Return to this screen here
on the left after finding the
virtual COM port#
assigned to your HAPPY
machine by Windows.


