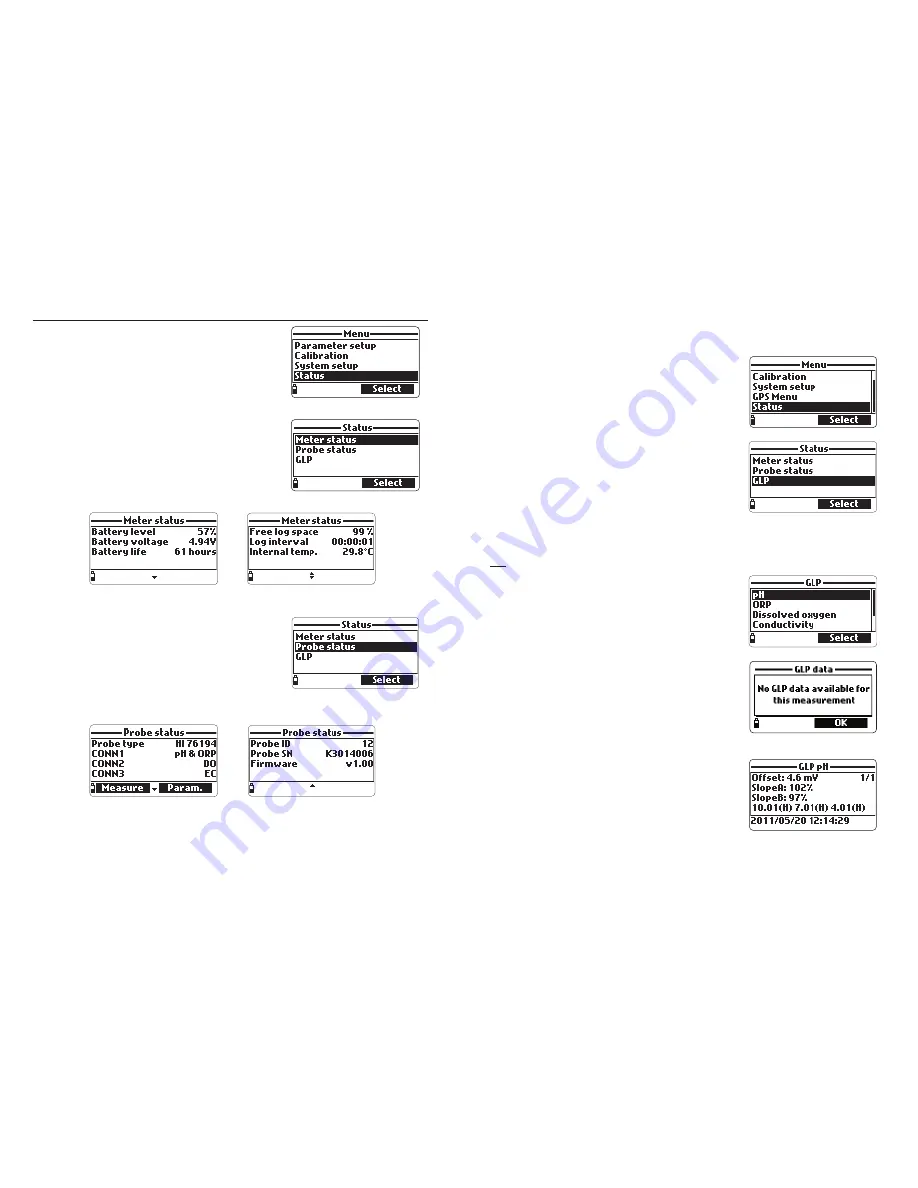
background image

49

48

9.3 GLP DATA

GLP (Good Laboratory Practice) is a set of functions that allows the user to store
or recall data regarding the probe calibration. This feature also allows the user
to associate readings with specific calibrations.
To view GLP data select “GLP” from the “Status”
menu. The complete list of available parameters
appears. Select the desired parameter to view the
stored GLP information.

Note

If no calibration data is available for the
selected parameter, the display shows the
message “No GLP data available for this
measurement”. Press 

OK

 to return to the

previous screen.

Note

GLP data is stored for the last 5 calibrations.
This calibration history allows the user to detect when readings start to
change and sensors may require cleaning or replacement.

pH

• From the “GLP” menu, select the “pH” option.
• Data regarding the last pH calibration will be

displayed: offset, acidic slope, basic slope,
buffers used, time and date of the calibration.

• Use the arrow keys to scroll through the stored

data for the last 5 calibrations.

• Press 

ESC

 to return to the “GLP” menu.

Note

A “C” label near the buffer value indicates
a custom point, while an “H” indicates a
HANNA standard buffer value.
If a quick calibration was performed, the buffer values are replaced
with the “Quick calibration” indication.
If no pH calibration has been performed
or if calibration was cleared using the the
“Restore factory calib.” option the offset
and slope values are set to default, and
the message “Factory calibration” is dis-
played. Press 

ESC

 to return to the previous screen.

Chapter 9 - STATUS

Useful information regarding the meter, probe (if
connected) and GLP calibration data are available
for viewing by selecting “Status” from the main
menu.

9.1 METER STATUS

Select “Meter Status” to display information related
to the battery, logging, internal temperature,
password, Meter ID, serial number and firmware
version. Press [up] and [down] to scroll through
the status screens. Press 

ESC

 to return to the

“Status” menu.

9.2 PROBE STATUS

Select “Probe Status” to display information related
to the probe type, connected sensors, Probe ID,
serial number and firmware version.
• Press [up] and [down] to scroll through the status

screens.

• Press 

ESC

 to return to the “Status” menu.

Note

The probe status screen will automatically be displayed when the probe
sensor status has changed. If this occurs, the “Measurement Screen”
and “Parameter Selection” softkeys are available (see Section 5.2).

Summary of Contents for HI98194

Page 1: ...1 Instruction Manual HI 98194 HI 98195 HI 98196 Multiparameter Meters w w w h a n n a i n s t c o m...

Page 2: ...6 1 4 Display and Keypad Description 8 CHAPTER 2 QUICK START 9 2 1 Sensor and Probe Installation 9 2 2 Basic Operation 11 2 3 Help Function 11 CHAPTER 3 SPECIFICATIONS 12 3 1 System Specifications 12...

Page 3: ...on Unit HI 98194 HI 98195 only 28 6 2 8 Absolute EC Resolution Unit HI 98194 HI 98195 only 28 6 2 9 TDS Resolution Unit HI 98194 HI 98195 only 28 6 3 Parameter Coefficients 29 6 3 1 EC Reference Tempe...

Page 4: ...ately Note Save all packing materials until you are sure that the instrument functions correctly Any damaged or defective items must be returned in their original packing material with the supplied ac...

Page 5: ...otective shield onto the probe body With the meter off connect the probe to the instrument input on the top of the meter Align the pins and key then push the plug into the socket and tighten the threa...

Page 6: ...ll blink when the reading is out of range Press Log to display the logging menu You can either log a single sample on the meter or start an interval log on the meter See chapter 10 for more details Pr...

Page 7: ...from 10 00 to 99 99 ppt g L 0 1 ppt g L from 100 0 to 400 0 ppt g L Automatic ppt g L 0 001 ppt g L from 0 000 to 9 999 ppt g L 0 01 ppt g L from 10 00 to 99 99 ppt g L 0 1 ppt g L from 100 0 to 400...

Page 8: ...uctivity calibration SEAWATER SIGMA HI 98194 HI 98195 only Range 0 0 to 50 0 t 0 15 Resolution 0 1 t 0 15 Accuracy 1 t 0 15 Calibration Based on conductivity or salinity calibration ATMOSPHERIC PRESSU...

Page 9: ...lyte gel Electrolyte gel CAP Reference double Reference double Maintenance HI 70300 HI 70300 HI 7042S none Solution storage solution storage solution D O electrolyte Dimensions 118 x 15 mm 118 x 15 mm...

Page 10: ...electrode for at least five minutes in HI 7091 For oxidizing pretreatment immerse the electrode for at least five minutes in HI 7092 Chapter 4 PROBE INSTALLATION 4 1 SENSOR DESCRIPTIONS HI 769828 0 C...

Page 11: ...ide of sensor with deionized water Invert sensor and inspect There should be no bubbles or debris between the membrane and sensor body 4 2 4 EC Sensor Preparation The EC sensor does not need to be soa...

Page 12: ...ng to swell Insert the sensor into the correctly color coded opening while positioning the connector key toward the center of the probe Make sure the connector is seated correctly the sensor will no l...

Page 13: ...for details 5 2 METER INITIALIZATION After connecting the desired sensors to the probe and connecting the probe to the meter see previous chapter turn the meter on by pressing ON OFF After the initial...

Page 14: ...ction is enabled you will be required to enter the password before any parameters can be modified 6 2 PARAMETER UNITS 6 2 1 Temperature Unit The user can select the measurement unit C F or K The defau...

Page 15: ...l be delayed by a few seconds if averaging is used 6 2 5 Resistivity Unit HI 98194 HI 98195 only The user can select resistivity from one of the following measurement units cm k cm or M cm Resistivity...

Page 16: ...nt standards of known value Calibrations are intuitive and menu driven All calibration data is stored in the non volatile probe memory allowing probes to be connected to different meters without recal...

Page 17: ...aker and empty the solution Shake any remaining liquid off the probe and beaker No droplets should remain on the D O sensor membrane Note Do not attempt to dry wipe the D O sensor as damage to the mem...

Page 18: ...ic correction and is correct only at the standard temperature For example HI 7022L reads 470 mV at 20 C versus the Ag AgCl reference The ORP mV versus a SHE would be 675 mV add 205 mV to the observed...

Page 19: ...pressing ESC after the first point is accepted Note If the D O input is not within the acceptable range the message Invalid input is displayed 7 3 1 Preparation Appendix D ACCESSORIES lists Hanna sol...

Page 20: ...oftkey and select the desired point To insert a different calibration value press Cal point and then Custom Insert the desired value using the keypad then press Accept When the reading is stable the R...

Page 21: ...ctivity input is not within the acceptable range the message Wrong standard is displayed The third level displays the status message Press Custom to insert a custom value temperature compensated value...

Page 22: ...in the Pressure calibration menu and press Select 7 6 TEMPERATURE CALIBRATION The probe is factory calibrated for temperature readings The user can perform a single point temperature calibration or r...

Page 23: ...type of decimal separator dot or comma Press the softkey to select the desired option The default setting is dot 8 1 7 LCD Contrast The LCD contrast can be adjusted with this function Press Modify to...

Page 24: ...se the arrow keys to change the level and press Accept to save the new value The default value is 7 8 1 9 Meter Password The Meter Password protects against unauthorized configuration changes and log...

Page 25: ...s a custom point while an H indicates a HANNA standard buffer value If a quick calibration was performed the buffer values are replaced with the Quick calibration indication If no pH calibration has b...

Page 26: ...the message Factory calibration is displayed Press ESC to return to the previous screen ORP From the GLP menu select the ORP option Data regarding the last ORP calibration will be displayed calibratio...

Page 27: ...g on demand records and or continuous records with different parameter configurations 10 1 LOGGING MENU STRUCTURE From measurement mode press Log to access the log menu Chapter 10 LOGGING MODE The HI...

Page 28: ...the graph 10 2 1 One Sample On Meter Use this option to log one set of enabled measurement parameters to the meter memory If there are no lots saved on the meter press New to create a new lot Use the...

Page 29: ...y of logged data lots The lots logged on the meter can be saved to the PC by pressing the Download lot button after the desired lot is selected Once the lot has been downloaded all the logged samples...

Page 30: ...he problem persists contact the HANNA service center Language data not available this message appears when powering up the meter if the language file is not seen by the meter Restart the meter to veri...

Page 31: ...ey will disappear when rinsed with water Shake down the sensor as you would do with a clinical thermometer to eliminate any air bubbles inside the glass bulb If the bulb and or junction are dry soak t...

Page 32: ...sampling with another probe are addition ways to validate the measurements taken by unattended continuous logs The probe is suitable for installation in confined locations such as air vaults river int...

Page 33: ...onsidered Freeze protection security and convenience of calibration and possibility of adding multiple measurement points and antifouling preconditioning systems are advantages to this type of install...

Page 34: ...on solution 230 mL USB cable Manual appropriate probe shield and specified sensors HI 98194 HI 98194 meter probe with 4 meter 13 1 cable with pH ORP EC D O sensors HI 98194 10 HI 98194 meter probe wit...

Page 35: ...tion solution 500 mL QUICK CALIBRATION SOLUTIONS HI 9828 20 Quick calibration solution 230 mL HI 9828 25 Quick calibration solution 500 mL HI 9828 27 Quick calibration solution 1 gal pH BUFFERS HI 500...

Page 36: ...m any measurement in microwave ovens APPENDIX D WARRANTY All HANNA Instruments meters are guaranteed for two years sensors electrodes and probes for six months against defects in workmanship and mater...

Page 37: ...g the details below UK Office Keison Products P O Box 2124 Chelmsford Essex CM1 3UP England Tel 44 0 330 088 0560 Fax 44 0 1245 808399 Email sales keison co uk Please note Product designs and specific...

Reviews: