background image


12 


Figure 2-2 

For details, please refer to the following table. 

No. 

Name 

description 

propeller 

High-speed rotation provides lift,folding paddles to save space. 

Motor 

Drive propeller rotation. 

Sprinkler pipe 

Connecting pesticide pipes and nozzles. 

nozzle 

Spray and atomized pesticides. 

Direction indicator 

Indicate the direction. 

Arm 

Non-folding arm with higher strength, stronger and durable. 

Pesticide tank 

As a container for pesticides, volume: 10L. 

radar 

detect height and follow terrain. 

Entrance  for  pesticide 

loading 

Entrance for pesticide loading. 

10 

Landing gear cushion 

Reduce shock when landing. 

11 

landing gear 

Support the aircraft. 

12 

LED flight status 

indicator 

Indicate  the  status  of  each  flight.  For  details,  please  refer  to  the 

appendix 

Instructions for indicating the status of the aircraft.


13 

Battery retention hook 

To fix the battery 

14 

Battery installation 

position 

Where to install the battery 

15 

Aircraft shell 

Protect internal components 

16 

Pump 

pumping pesticides. 

Summary of Contents for 3WD4-QF-10B

Page 1: ...User s Manual Q10Plant protection drone Model 3WD4 QF 10B Q10Plant protection drone controller Model QF T 1000 V 1 0 0 Hangzhou Qifei Intelligence Technology Co Ltd ...

Page 2: ...etting Control Parameters 24 3 1 6 Voltage Reading and Setting 25 3 1 7 Setting crop protection Functions 26 3 1 8 Setting flight parameters 26 3 1 9 Starting stopping the motor 26 3 1 10 Motor Test 27 3 2 Charge 28 3 2 1 Charge the Aircraft Battery 28 3 2 2 Charge the Remote Controller 29 3 3 Prepare Aircraft 30 3 3 1 Unfold propeller 30 3 3 2 Install smart battery 30 4 Enable Flight 32 4 1 Overv...

Page 3: ... 4 Electric fence system 43 5 End Flight 46 5 1 Cleaning after work 46 5 2 Maintenance 46 6 Upgrade 47 7 Appendix I Specifications 1 8 Appendix II Description of Aircraft Status Indicators 2 Legal Statement ...

Page 4: ...reverse engineer reverse compile or disassemble the software Trademark are the trademarks or registered trademarks of the QiFei in various jurisdictions Other trademarks and registered trademarks mentioned are the properties of their respective owners Update and Modification In order to enhance the product security and provide better user experience QiFei may improve the product via software auto ...

Page 5: ... make initial debugging before first use If it is not the first time to use the device you can select the installation content according to the dismounting situation last time but it has to be confirmed that all the components unnecessary steps excluded listed in the chapter have been stably installed 4 Enable Flight It is to introduce the complete flow of aircraft formal launch and landing in det...

Page 6: ...r save your time Note It means the additional information which is the emphasis and supplement of the main body Document Material The product includes the following document materials you can search according to your requirements Quick Start Guide It can be applied to the first flight Please refer to User Manual for operation details when it is used for the second time or it has to use some other ...

Page 7: ...onment When disassembling the device strictly follow the procedures described in the manual Do not unduly remove other components The use of 3WD4 QF 10BPlant protection drone has security risks and is not suitable for people under 18 years of age Caution Please operate the device by strictly conforming to the steps described in the chapter the operation sequence can t be reversed It needs to under...

Page 8: ... and negative when charging the device which is to prevent short circuit Please do not place the device close to fire source or inflammables Please do not charge and discharge the device in a situation where it is not guarded by people Please do no use undesignated battery to the device Please do not dismantle and destroy the battery without permission water is not allowed to enter the device dama...

Page 9: ...ue to the reasons such as the real environment is not stable Please refer to the final explanation of the company if there is any doubt or dispute All the designs and software are subject to change without prior written notice The manual will be regularly updated according to the product upgrade without prior announcement Please contact the supplier or customer service if there is any problem occu...

Page 10: ... Accurately Positioning GPS accuracy 1 5m Terrain Following Function Millimeter wave radar Wireless Transmission The aircraft has several antennas They are used for remote control receiver communication with ground station and GPS antenna RTK spiral antenna only RTK version includes this component Low Battery Level Protection When the low battery level triggers the aircraft to return to home it ca...

Page 11: ...trol The aircraft adopts a four axis structure and has multiple control modes which is simple and safe Maximum taking off weight 28 5kg Electronic Fence Support electronic fence e fence function in case the aircraft is out of the specified flight zone Support customized e fence settings Battery alert LED1 LED2 LED3 LED4 Current power 0 8 8 25 25 37 5 37 5 50 50 62 5 62 75 75 92 92 100 ...

Page 12: ...te All figures listed below and all dimensions listed here for reference only The figure and the dimensions may be slightly different from the user data due to measure position measure accuracy and position indicator Please refer to the actual product for detailed information 2 1Aircraft For detailed operation please refer to Chapter 3 2 1 1 Product Dimensions The aircraft is shown as in Figure 2 ...

Page 13: ...le 7 Pesticide tank As a container for pesticides volume 10L 8 radar detect height and follow terrain 9 Entrance for pesticide loading Entrance for pesticide loading 10 Landing gear cushion Reduce shock when landing 11 landing gear Support the aircraft 12 LED flight status indicator Indicate the status of each flight For details please refer to the appendix Instructions for indicating the status o...

Page 14: ...ressure spraying which can achieve forward and backward switchable spraying During operation parameters such as spray flow rate spray width and flight speed can be adjusted based on actual operating conditions Spraying flow 1600 2000 ml min Spray width 1 20 meters depending on flight altitude Flow meter Real time monitoring of the spray system such as flow flow rate remaining amount of pesticide e...

Page 15: ...YAW 4 Right stick The default right stick s X axis is channel 1 ROLL and the Y axis is channel 2 PITCH 5 Power switch Power switch of the remote control 6 One click return key It defaults to channel 6 return 7 work indicator It defaults to red 8 Power indicator Display the power of the remote control 9 Mode switch It is also called a three state switch and defaults to channel 5 MODE 10 Left wheel ...

Page 16: ...mperature 0 40 C 9 Weight 12KG 2 3 3 APP interface Advantages simple operation high degree of intelligence voice broadcast the real time data of each module complete functions 2 3 3 1 Flight data interface This screen shows the aircraft s flight status and basic flight operation buttons At the top the icons from left to right are flight mode battery voltage value GPS star number satellite display ...

Page 17: ...atellite display Displays the current number of searched stars for flight control Connection Status Displays the status of all sensors connected to the flight controller The icon turns green when the connection is normal Remote control signal Displays the remote control signal status Digital Radio Link Shows the connection status of the data link After the connection is normal the icon will turn g...

Page 18: ...17 Parameter settings Click to set the relevant parameters of the flight control 2 3 3 3 Route planning interface Figure 2 9 ...

Page 19: ...rding to the actual situation after the first flight is over if it is not the used for the first time Caution Please operate by strictly conforming to the steps described in this chapter the operation sequence can t be reversed 3 1preparation and inspection 3 1 1 T1000 remote control settings There are 6 steps as shown in Figure 3 1 to Figure 3 11 Figure 3 1 Figure 3 2 ...

Page 20: ...19 Figure 3 3 Figure 3 4 Figure 3 5 ...

Page 21: ...20 Figure 3 6 Figure 3 7 Figure 3 8 ...

Page 22: ...21 Figure 3 9 Figure 3 10 Figure 3 11 ...

Page 23: ... the aircraft is in the air Tips After connecting the mobile phone and remote controller click the parameter setting button in the upper right corner of the IFLY APP flight interface to enter the parameter adjustment interface The icons in the left menu bar are model selection remote control calibration accelerometer calibration and magnetic compass from top to bottom Reading and writing of parame...

Page 24: ...irst time use magnetic compass calibration must be performed otherwise the system may not work properly affecting flight safety The magnetic compass is easily disturbed by other electronic devices which affects flight and even causes flight accidents Regular calibration can make the aircraft work in the best condition Figure 3 14 Warning Do not calibrate in areas with strong magnetic fields such a...

Page 25: ... Complete the calibration If the aircraft status indicator flashes alternately red yellow and green it means that the calibration was successful and you need to power on again If the status indicator of the aircraft shows a steady red light it means that the calibration failed Please power off and restart and follow the above steps to recalibrate the compass Need to recalibrate 1 The magnetic comp...

Page 26: ...16 3 1 6 Voltage Reading and Setting Click read to display the write button current voltage voltage protection type and alarm voltage Click the input box to enter the value and click Write to set it up Figure 3 17 ...

Page 27: ...g crop protection Functions Figure 3 18 3 1 8 Setting flight parameters Figure 3 19 3 1 9 Starting stopping the motor Unlock and lock Unlock as shown below After unlocking the motor will change to a low speed rotation ...

Page 28: ...e test and the movement direction test It is mainly used to detect whether the motor installation serial number and rotation direction are correct so as to avoid accidents due to installation errors Motor sequential test When it is locked please push the left joystick of the remote control to the lower left and then make the right joystick do counterclockwise coiling U S hand mode then the motor s...

Page 29: ...u do not need to perform the following sections 3 2 1 Charge the Aircraft Battery The connection of the smart battery and charger is shown below Figure 3 22 Instructions 1 Before connecting the 220V power supply place the switch in the OFF position 0 At this time the external power supply channel is cut off and the charger does not work 2 After connecting the 220V power supply place the switch in ...

Page 30: ...ger s input voltage is too high or too low it will cause the charger to work abnormally or cause damage to the charger Do not short circuit the positive and negative terminals of the charger or the positive and negative terminals of the battery This product is compatible with 12S 50 4V lithium battery Please select the right battery for charging When the charger is connected to the power supply al...

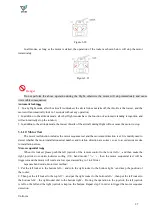
Page 31: ...V Charge and discharge once per month at least 3 3Prepare Aircraft 3 3 1 Unfold propeller For easier transportation and storage the propeller is folded Unfold the propeller before take off as shown in Figure 3 24 Figure 3 24 3 3 2 Install smart battery As is shown in Figure 3 25 the smart battery is installed Place the smart battery on the battery s mounting position Attach the strap to one end of...

Page 32: ...31 Figure 3 25 ...

Page 33: ...off process as shown below Enable Flight Unlock Take off Flight RTH and Landing Lock 1 Place the aircraft near the work area with the user facing the back 2 Check the structure 1 Check if the blades are unfolded and damaged 2 Check if the shell is fixed firmly 3 Turn on the remote control first and then connect the aircraft power supply When connecting the aircraft power supply first insert the bl...

Page 34: ...lock Unlock as shown below After unlocking the motor will change to a low speed rotation Figure 4 1 Note If there is a significant difference in the rotation speed between the propellers move the left joystick to the lower left corner while moving the right joystick to the lower right corner and then hold it until the propellers stop rotating Turn off the aircraft and contact our company 4 2 3 Man...

Page 35: ...he right stick up and down to control aircraft s ascend and descend respectively Moving the right stick left and right to control aircraft s left and right movement horizontally Figure 4 4 Mode 2 American hand Moving the left stick up and down to control aircraft s ascend and descend respectively Moving the left stick left and right to control aircraft s left and right turn horizontally Moving the...

Page 36: ...zontally Moving the right stick up and down to control aircraft s ascend and descend respectively Moving the right stick left and right to control aircraft s left and right turn horizontally Figure 4 6 4 2 5 Manual RTH and Landing Step 1 Manual RTH Control the aircraft to hover over the proper landing point Step 2 Manual landing Reduce the throttle to make the aircraft land slowly Figure 4 7 4 2 6...

Page 37: ...d complete a series of checks and settings before take off After planning the route click Start Mission and the aircraft will automatically take off 4 3 1 3 Automatic Return and Landing Note Each time the user unlocks the flight controller automatically records the current position as the home point point The automatic return mode can be triggered by a joystick or triggered by a loss of control Wh...

Page 38: ...duction of Ground Station Software and Notes 1 Connect the USB and open the IFLY APP as shown in Figure 4 9 Figure 4 9 2 Icon Description Figure 4 10 3 Precautions The attentions for using the ground station APP are shown in Figure 4 11 Figure 4 18 ...

Page 39: ...38 Figure 4 11 Figure 4 12 ...

Page 40: ... 15 4 3 2 2 Route Planning Click on the Route Plan button to carry out plot measurement and route planning You can set flight parameters such as spacing blade angle obstacle margins work margins etc mainly in three steps Figure 4 18 4 20 ...

Page 41: ...40 Figure 4 16 Figure 4 17 Figure 4 18 ...

Page 42: ...ection drone click APP to plan the route open the plot of the surveying and mapping route click the edit icon and click the task icon after the editing is completed The steps are divided into three steps see the figure below for the specific operation steps Figure 4 19 Figure 4 20 ...

Page 43: ... B point Hover in GPS mode and turn the AB stick to the third gear After completing the recording the LED flashes green for 2 seconds 3 AB execution Turn on AB execution function 4 Choose direction Operate the roll bar to select the direction Move the left roll rocker to the left and the right roll rocker to the right The premise of this step is to clear the previously recorded AB point otherwise ...

Page 44: ... forward 1 meter 4 3 3 3 AB Point Parameter Settings Open the APP and connect the UAV click the setting button in the upper right corner and select the plant protection function in the left button bar to set the route spacing and speed of the AB point mode Figure 4 23 4 3 3 4 Others Clear the AB points Quickly toggle the AB point recording switch 4 5 times and the LED lights flash red green and ye...

Page 45: ... restricted a in cylindrical region as shown below Figure 4 24 Attitude mode Flight restrictions The maximum height Cannot exceed the setting in the software The maximum radius Cannot exceed the setting in the software Positioning mode GPS Flight restrictions The maximum height Cannot exceed the setting in the software The maximum radius Cannot exceed the setting in the software Warning The remote...

Page 46: ...tricted area Specific Sites as the center of a circle the radius of 1 KM area is prohibited area Prohibited area deny flight 100m Alert zones is set between restricted area and Unrestricted airspace Details reference below picture Figure 4 26 Positioning mode GPS area Flight restrictions Flight status indicator No fly zone Motor will not start The red light flashes for 3 seconds before the normal ...

Page 47: ...ing equipment clean residual pesticide details tank is filled with soapy water then repeatedly shake tank Manually turn on the spray switch Until Clean water flows out when the pesticide is cleaned Then rinse with water again Clean the aircraft wipe the remaining pesticide on the aircraft shell inspect the air frame structure replace the damaged pipes check the tightness of the screws to eliminate...

Page 48: ...47 6 Upgrade Update or upgrade equipment or ground station software please contact your dealer or technical support engineer please see the official network http www qifeizn com ...

Page 49: ...h 1100mm Flight parameters Remote control distance 1000 Aircraft weight 15 8kg Full load takeoff weight 25 8kg No load endurance time 20min full load endurance time 10min Best speed 4 6m s Spray flow 1 6 2 0L min Spray efficiency 0 16 0 25acre min Optimal flight height 1 5 2 0m above the crops Safe wind speed 4 level Recommended temperature 10 40 Spray width 3 4m Continuous operating time for each...

Page 50: ...al GPS signal low GPS signal is good Normally on low RTK positioning Low voltage alarm LED status priority Level 1 alarm low Level 2 alarm high Magnetic compass calibration LED status priority Horizontal calibration Normally on middle Vertical calibration Normally on middle Calibration failed Normally on middle Successful calibration middle Abnormal state LED status priority Remote control loses c...

Page 51: ...ce All trademarks and registered trademarks are the properties of their respective owners If there is any uncertainty or controversy please refer to the final explanation of us Please visit our website or contact your local service engineer for more information Hangzhou Qifei Intelligence Technology Co Ltd Postcode 310018 Tel 0571 85239009 15757164322 Website www qifeizn com ...

Page 52: ...h can be determined by turning the equipment off and on the user is encouraged to try to correct the interference by one or more of the following measures Reorient or relocate the receiving antenna Increase the separation between the equipment and receiver Connect the equipment into an outlet on a circuit different from that to which the receiver is connected Consult the dealer or an experienced r...

Reviews: