035-17477-002 Rev. D (1202)
Unitary Products Group
11
This appliance is design certified for line contact for furnaces
installed horizontally. The intersection of the furnace top and
sides form a line. This line may be in contact with combustible
material. Refer to the "SPECIFIC UNIT INFORMATION" sec-
tion of this manual for further information on installation loca-
tion and limitations.
Secure a platform constructed of plywood or other building
material to the floor joists.
NOTE:
In either a horizontal left or right installation, a mini-
mum of 8" clearance is required beneath the furnace to allow
for the installation of the condensate trap and drain pipe.
Refer to "CONDENSATE PIPING" section of this manual for
more information.
NOTE:
See crawl space installation for suspending the fur-
nace in attic installations.
CRAWL SPACE INSTALLATION
The furnace can be hung from floor hoists or installed on suit-
able blocks or pad. Blocks or pad installations shall provide
adequate height to ensure the unit will not be subject to water
damage.
When suspending the furnace from rafters or floor joists using
rod, pipe or straps, refer to the Physical and Rating Data
Table for downflow/horizontal furnace weights to determine
suitable means of suspension.
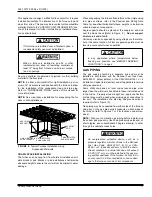
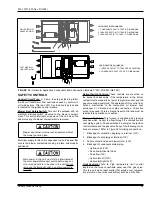
Angle supports should be placed at the supply air end and
near the blower deck (Refer to Figure 9 ).
Do not support
at return air end of unit.
Units may also be suspended by using straps or other mate-
rial at the same location. All four suspension points must be
level to ensure quiet furnace operation.
GAS PIPING
The gas supply should be a separate line and must be
installed in accordance with the National Fuel Gas Code,
ANSI Z223.1 (latest edition), or the CAN/CGA B149.1 or .2
Installation Codes (latest edition) and all applicable local and
utility requirements.
Some utility companies or local codes require pipe sizes
larger than the minimum sizes listed in these instructions and
in the codes. Properly sized wrought iron, approved flexible
or steel pipe must be used when making gas connections to
the unit. The installation of a drop leg and ground union is
required (refer to Figure 10).
Gas piping may be connected from either side of the furnace
using any of the gas pipe entry knockouts on both sides of
the furnace (refer to Figures 1 or 2 for locations and dimen-
sions).
NOTE:
Plan your combustion air piping before determining
the correct gas pipe entry. Use 90 degree service elbow(s), or
short nipples and conventional 90 degree elbow(s) to enter
through the cabinet access holes.
If this furnace is installed over a finished space, a
condensate safety pan must be installed.
When a furnace is installed in an attic or other
insulated space, keep all insulating materials at
least 12" away from furnace and burner combus-
tion air openings.
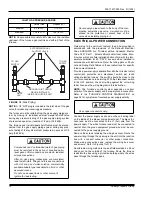
FIGURE 9 :
Typical Furnace Installation Using
Suspension Materials
1” MAX. BETWEEN
ROD & FURNACE
SUPPORT
ROD
6” MIN BETWEEN
ROD & FURNACE
1” MAX. BETWEEN
ROD & FURNACE
ANGLE IRON
BRACKET
In any application where temperatures below
freezing are possible, see “BELOW FREEZING
LOCATIONS ” on page 4
An overpressure protection device, such as a
pressure regulator, which conforms to the National
Fuel Gas Code, ANSI Z223.1 (U.S.) or CAN-
B149.1 or.2 (Canada) and acts to limit the down-
stream pressure to a value that does not exceed
0.5 PSI (14" w.c.), must be installed in the gas pip-
ing system upstream of the furnace. Failure to do
so may result in a fire or explosion or cause dam-
age to the furnace or some of its components.


