background image

Instruction Manual for DR-20 DSL/Broadband Router 

09.6.2005 


       Art. Nr. 00049079 


Seite  7 


the back of the router for 

approximately


5 seconds

The router deletes all 

the old entries

 and is 

reset to the factory settings.


Blocking websites


If you wish to 

prohibit or allow

 access to 

specific Internet pages

 for the computers connected to 

the router, you can set the pages as follows. 
 

Log on to the router as described above. 
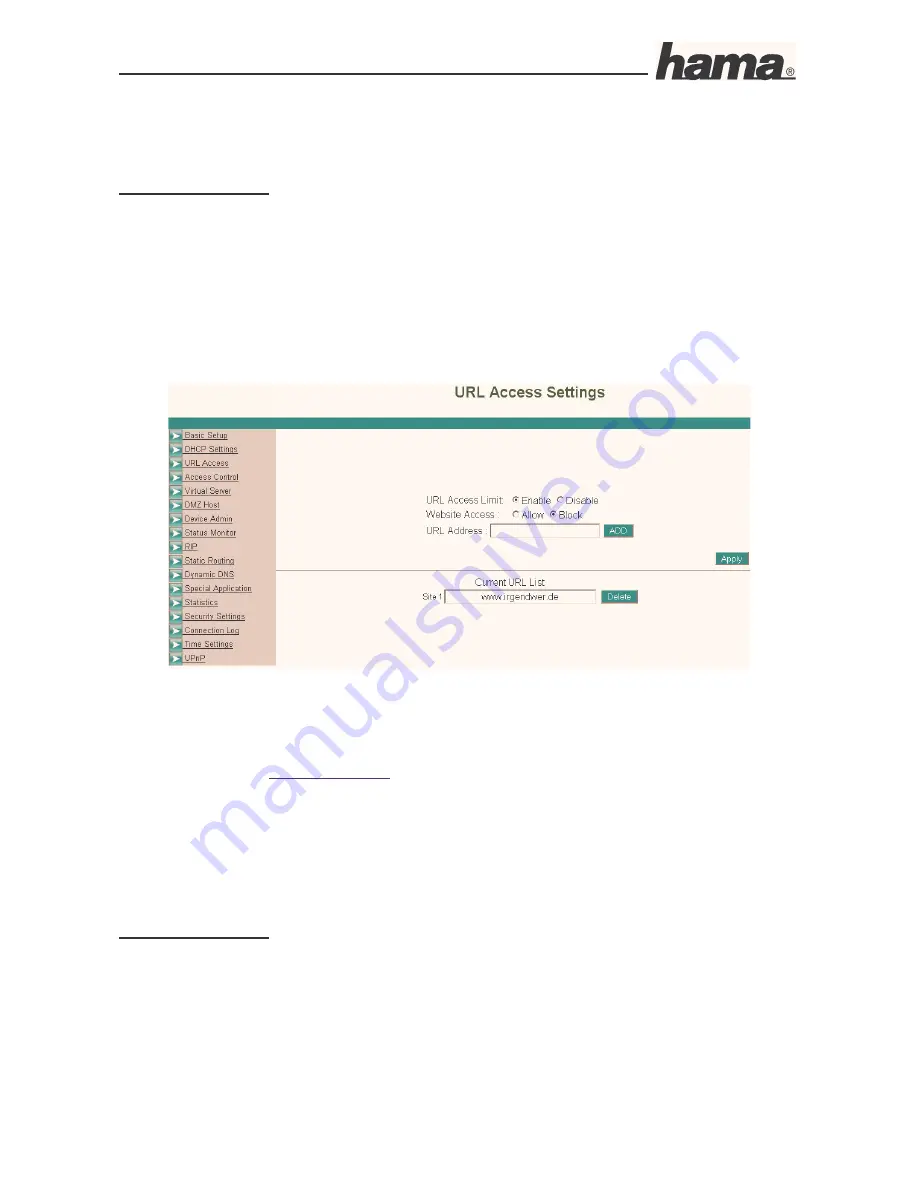
Select 

URL Access 

in the left navigation field. The following window opens: 


URL Access Limit:


enable

, this allows you to allow or block access to specific websites. 


Website Access:


You can select 

block

 or 

allow 


URL Address:


Enter the website address that you wish to 

block

 or 

allow

. For example: 

www.someone.de

, then click 

ADD

. Click 

BACK

 to enter additional websites, 

maximum of 10 websites are allowed

.

 T

hen click 

Apply

 to save the list 

permanently. 


Port Forwarding: 


Some applications require 

special connections

 such as online computer games, video conferencing 

software, peer-to-peer software or similar items. These programs have 

difficulties when used with 

NAT

 therefore they 

require special settings

 
Log on to the router as described above. 

Select 

Special Application 

in the left navigation field. The following window opens: 

Summary of Contents for DR-20

Page 1: ...1 00049079 DSL Breitband Router DR 20 DSL Broadband Router DR 20 Routeur DR 20 DSL large bande...

Page 2: ...ction Connect the computer s that you would like to connect to the Internet using the router Insert a suitable network cable patch or crossover cable CAT5 STP in your network card on the PC and connec...

Page 3: ...ter That means that the connected PCs are automatically given appropriate addresses and other settings We recommend using these Select the TCP IP setting Get IP address automatically for all PCs or no...

Page 4: ...sconnect when network idle Enter the number of minutes after which the router should disconnect the Internet connection when it is idle Important information for DSL users who are billed based on data...

Page 5: ...er the IP Address that you received from your Internet provider Subnet Mask Enter the Subnet Mask that you received from your Internet provider Default Gateway Enter the Gateway Address that you recei...

Page 6: ...e Internet bill switch off the router after you are finished using the Internet to be completely sure that no unwanted connections can occur To save your settings click Apply The basic configuration p...

Page 7: ...nge the password proceed as follows Log on to the router as described above Select Device Admin in the left navigation field In the old password entry enter the old password for example admin and ente...

Page 8: ...s allows you to allow or block access to specific websites Website Access You can select block or allow URL Address Enter the website address that you wish to block or allow For example www someone de...

Page 9: ...ort area for the outgoing data traffic Incoming Enter the port or port area for the incoming data traffic To save your settings click Apply The configuration process is now complete Updating Firmware...

Page 10: ...g the router otherwise the router may no longer function and must be set in for repair Wait until the router indicates that the firmware has been successfully updated Then reboot the router Dynamic DN...

Page 11: ...lected host name For example myftp dyndns org MX If you would like to use a private e mail server you must enter your domain name of the e mail server here Wild Card Select enable or disable if you wo...

Page 12: ...case problems occur it can be very useful to look at the router log to localize any unauthorized external or internal accesses Proceed as follows to do so Log onto the router as described above and s...

Page 13: ...w starts Now follow the wizard s instructions by clicking Next On the following page you must accept the License Agreement by clicking I accept the terms of the license agreement Click Next so the sof...

Page 14: ...ect your printer model and then the corresponding available connection Select LPT1 ECP printer connection then after clicking Next the following prompt appears do you want the printer to be the standa...

Page 15: ...o try the installation steps described in the paragraph USB printer installation for Windows XP 2000 without Tool Using an all in one device via the USB printer server has its limitations The device c...

Page 16: ...ept the terms of the license agreement Click Next so the software can be installed on your computer and then click Finish The computer must now be restarted so your operating system can apply all the...

Page 17: ...to select the correct printer model and to install the corresponding driver We recommend printing a test page Note If your printer is not listed either your driver is not current or your printer is no...

Page 18: ...pon which you would also like to use the network printer USB Printer Installation on Windows XP 2000 Without Tool Requirements A functioning network with TCP IP protocol Pre installed Sun Java version...

Page 19: ...nual for DR 20 DSL Broadband Router 09 6 2005 Art Nr 00049079 Seite 18 Only select the option as displayed above and click Next Select Create a new port and the connection type Standard TCP IP Port Th...

Page 20: ...ield By default this is 192 168 1 1 Leave the default port name setting Select PRINTSERVER as the device type as shown above Then click Next Now only the correct printer driver must be installed Note...

Page 21: ...tings Printers Add printer The printer installation wizard now starts Select Create a new port and the connection type Standard TCP IP Port Then click Next Enter your router s IP address in the printe...

Page 22: ...Seite 21 Select Generic Network Card as the device type as shown above Then click Next Now only the correct printer driver must be installed Click Next now only your printer driver should be installe...

Page 23: ...printer and click Configure port The window displayed above now opens check that the settings are identical Then click OK and try to print the test page again Note Repeat this procedure on the other n...

Page 24: ...Jet 3330 Printing only 24 Epson Stylus Color 680 58 HP LaserJet 4050 25 Epson Stylus Color 740 59 HP PSC2110 Printing Only 26 Epson Stylus Color 760 60 Lexmark Optra E312L 27 Epson Stylus Color 860 61...

Page 25: ...product information can be found at www hama de Support Hotline Hama Product Consulting Tel 49 0 9091 502 115 Fax 49 0 9091 502 272 E mail mailto produktberatung hama de Postal address Hama GmbH Co K...

Reviews: